Pleated blouse in wool flannel from 1970’s Gunne Sax pattern
After some significant design amendments, made a cropped blouse in micro-houndstooth wool flannel. Lessons learnt.
TOTAL TIME COMMITMENT: 19 hours including toile
Toile (without buttons, lining, interior seam finishing, basting stitch removal or hemming) and pattern amends: 7 hours
Cut out & transfer all pattern markings: 1.5 hours
Main construction: 8.5 hours
Lining construction: none
Finishings (buttons, hem): 2 hours
Fabric type
Wool flannel
Fabric weight
estimate 170gsm
VERDICT & LESSONS LEARNT
Size 11 Junior is an excellent starting size for me – I had to make hardly any adjustments to the neck, chest & shoulder (the usual places I need to adjust). The only thing I needed to do was lower the bottom of the armhole, and shorten the bodice by 1 inch. This pattern already had plenty of room at the bust due to the pleats, and plenty of room at the bicep because of the full sleeve. Had this been more fitted in those areas, doubtless I could have also had to do a full bust and fuller bicep adjustment, but the fit across the back, shoulders and chest is particularly nice.
I also adjusted the placement of the stitching across the pleats, raising them up to be more flattering on my petite frame, and also so that they were not so close to the bust area which caused the fabric to pouch out over my full bust, making me look disproportionately large there.
BUTTON HOLES NEED TO BE VERTICAL ON BLOUSES EXCEPT AT THE COLLAR!! I did them horizontally on this, and they extend beyond the edge of the placket, which I will have to live with, but feel a bit daft since they really should be vertical. It did also occur to me that if a blouse pattern has a defined placket, this determines the max size of button I can use.
Also, I need to remember that my choice of interfacing for anywhere there is going to be buttonholes, is really important. I need to choose a facing that will blend in effortlessly when the buttonholes are cut. I used a white interfacing on this, but because it is a darker fashion fabric, you can see little tufts of white where I have cut for the buttonholes. Not a disaster, but would have been so much better to have used a black interfacing.
This is the heaviest fabric I could use for this design I think, and as a matter of fact, it could look much much better on me in a super lightweight fabric like cotton batiste or crepe-de-chine. Made up, wearing it feels a tiny bit like wearing a jacket, so nice and substantial, but I think I would prefer it in a lighter weight fabric. This fabric would be better suited to a trouser or skirt I think.
I learnt a lot about proportioning a loose fit blouse on my petite frame – when there is quite a bit of extra fabric across the front, I need to be very careful and really, these look best on me as cropped blouses, as I ended up doing with this pattern.
Very pleased to find a use for the decorative stitching, but I didn’t do this in a contrasting thread, so it can hardly be seen on the finished blouse.
VARIATION IDEAS FOR ANOTHER MAKE
Make it in a much more lightweight fabric, perhaps sheer as in the sewing pattern photo.
Make the collar, button placket and cuff with a decorative scalloped edge (pattern pieces drafted)
Or make the collar and cuff inserting a piping or lace trim in a contrast colour to define the edge – this will work beautifully well if the main blouse is made in a plain fabric
Travel itineraries for Autumnwear
Puff-sleeve midi dress in khaki green linen-cotton twill from 1970’s pattern
Fourth make with this pattern, following several refinements on fit and pattern instructions.
TOTAL TIME COMMITMENT: 20 hours
Toile (without zip, lining, interior seam finishing, basting stitch removal or hemming): none
Cut out & transfer all pattern markings: 3 hours
Main construction: 11 hours
Lining construction, attachment and hemming: none
Finishings (hem, enclose zip): 2.5 hours
Applying studs: 2.5 hours
Fabric type
Cotton-linen twill
Fabric weight
estimate 250-300gsm
ADDITIONAL SEAM FINISHING, CONSTRUCTION NOTES & EXTRAS
Overlock each edge of skirt pattern piece before construction, press open
Overlock raw edges together at gathered tier seam
Overlock raw edges separately before construction on zip seam
Attach bodice facing to rest of garment using stitch-in-the-ditch
VERDICT & LESSONS LEARNT
For a centred zip, I must not sew the whole thing around in one continuous line - this is what made the top of the zip and the seam go out of alignment
Travel itineraries for Autumnwear
The Four L’s of Summer Dressing
For summer dressing I need the 4 L's:
Lightweight
|
Loose
|
Layers
|
Long & Short
|
Lightweight | Loose | Layers | Long & Short |
These principles are what I need for a warm to temperate climate, like Central to Northern Europe.
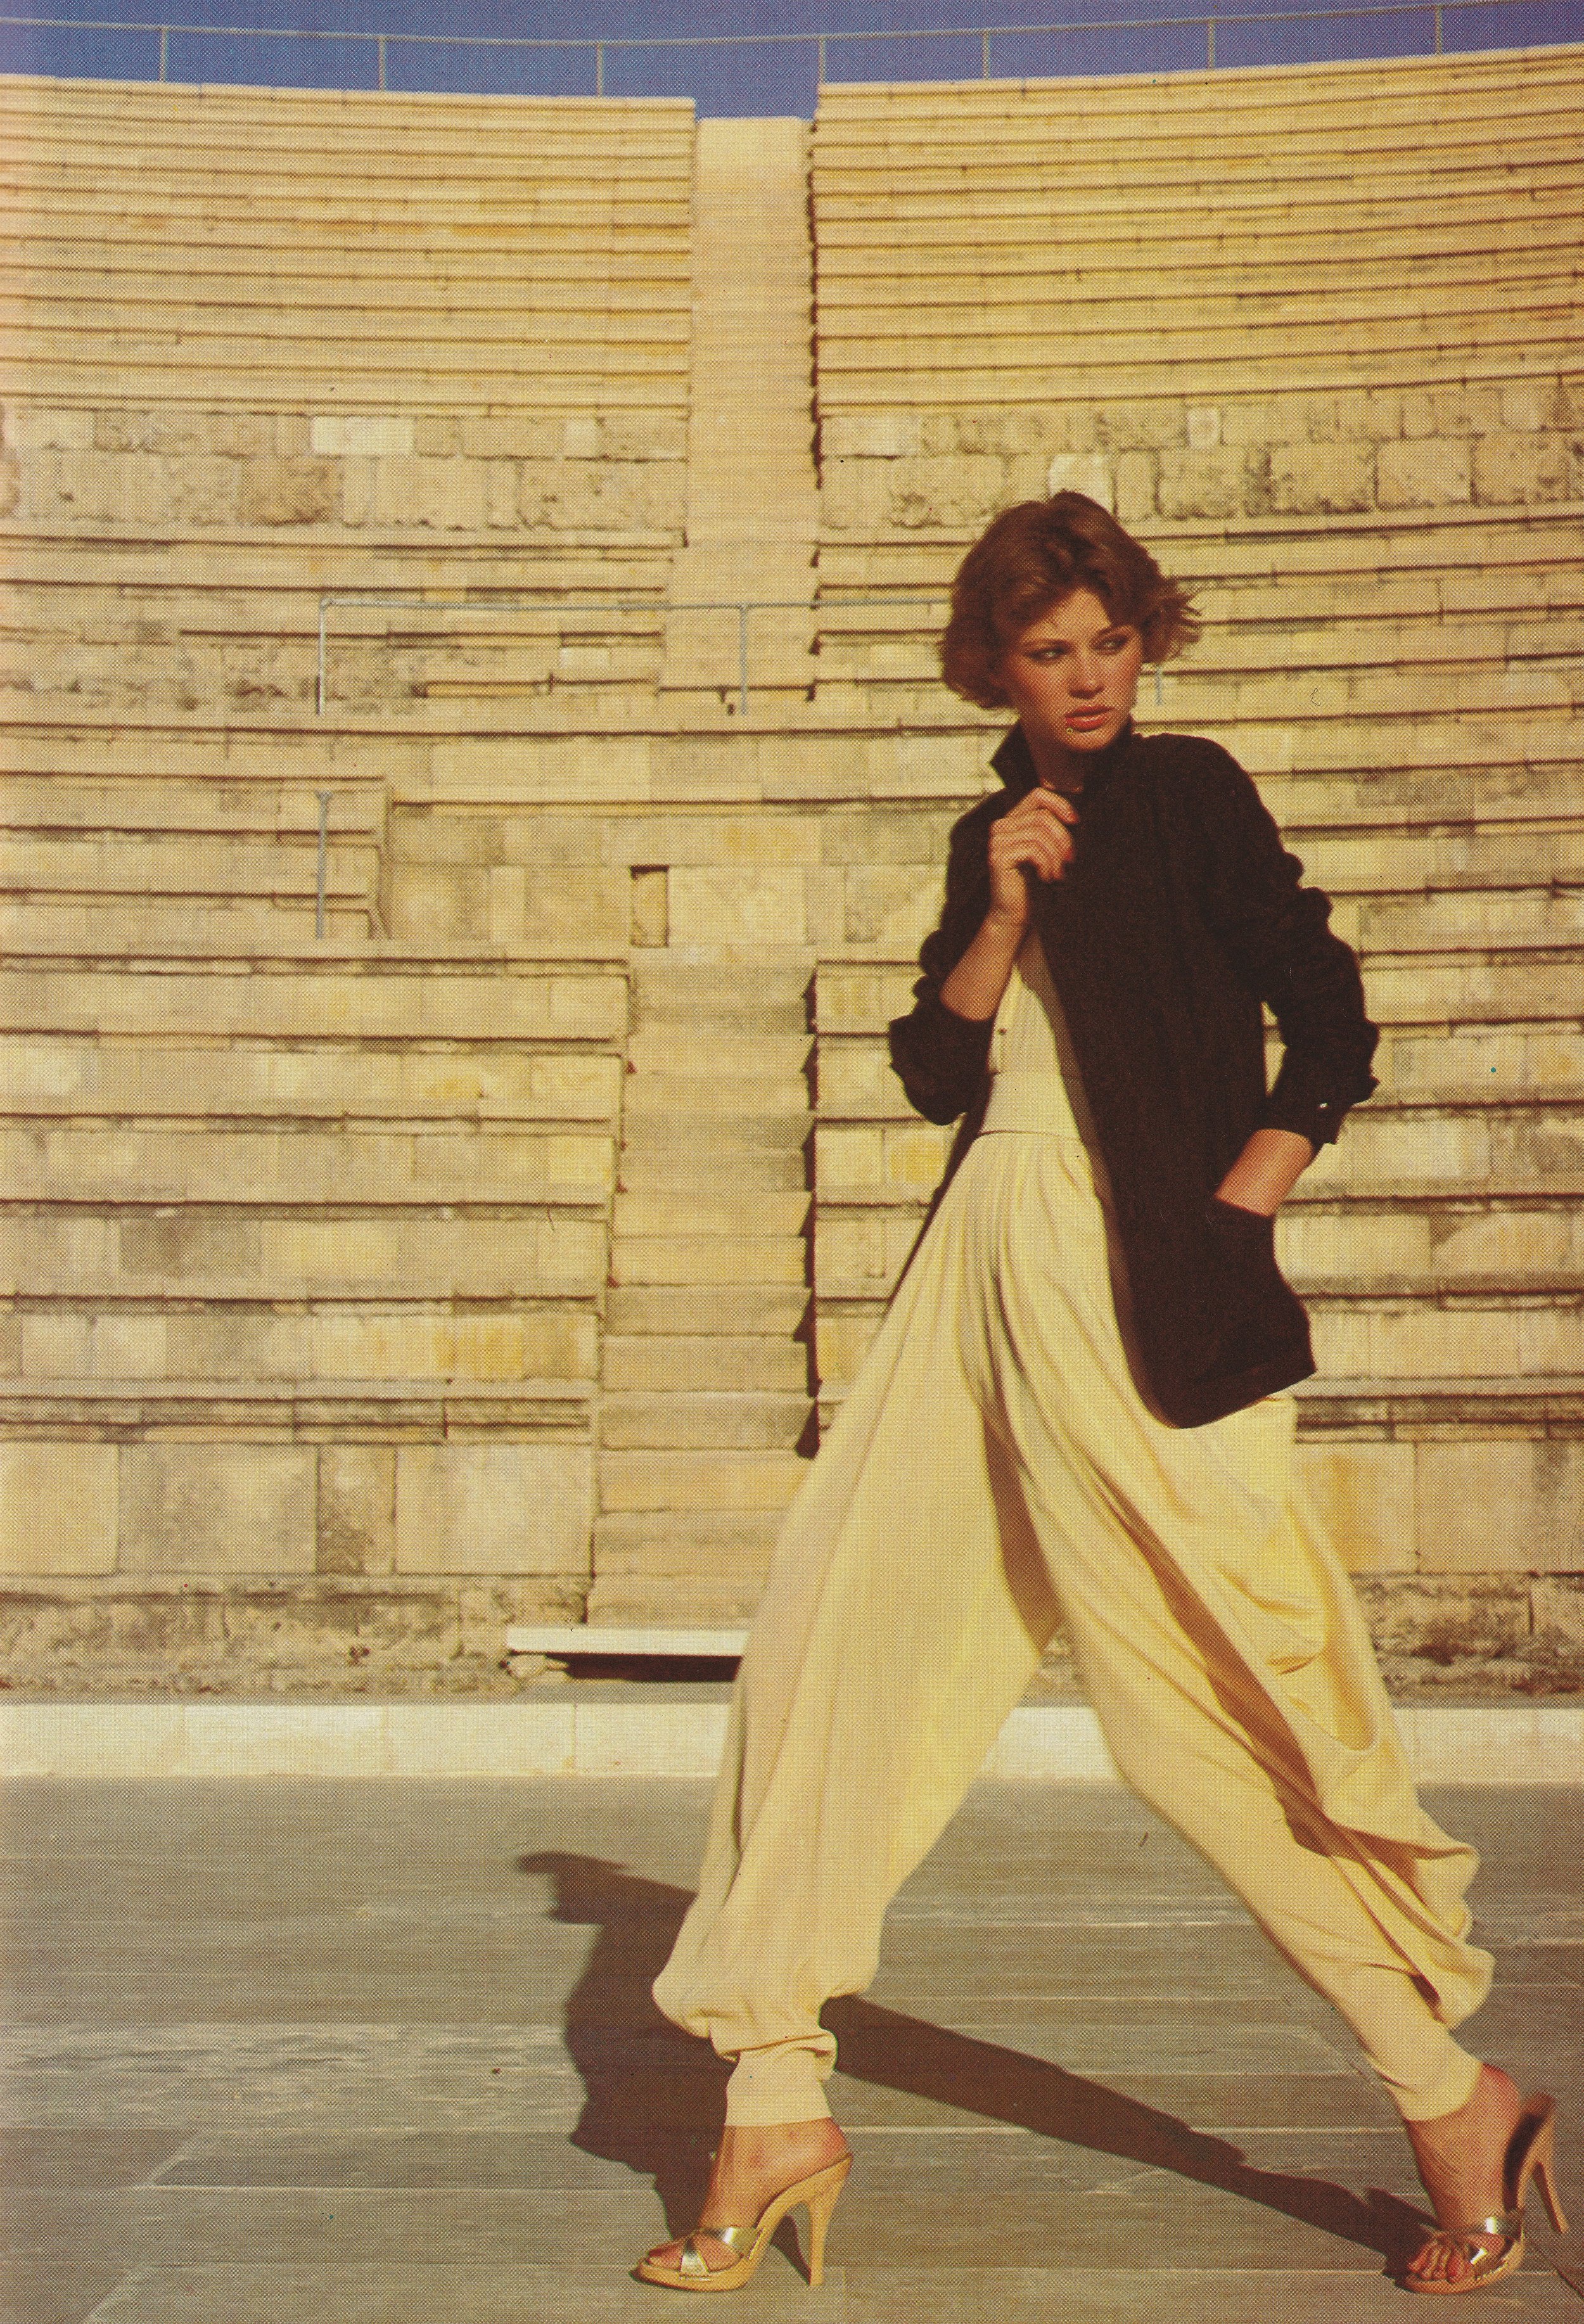
Vogue September 1978
Striking fashion imagery from a vintage Vogue magazine, September 1978 edition.
Reflections on The Lost Art of Dress, by Linda Przybyszewski
A book about The Dress Doctors, a troop of women operating during the early-to-mid 20th century who advised American women on style and clothing throughout the Great Depression, World Wars and social upheaval.
“Knowledge, not money, is the key to beauty in dress.”
This has been on my want-to-read list for quite some time, and I’m so very glad I finally got round to it.
It’s both opinionated and academic, an in-depth look at how there was once a proud, educated, and forthright group of women who were embedded in the US education system through Home Economics, who taught dressmaking and style.
“By teaching dressmaking, the Dress Doctors made women into creators, not just shoppers....[The Dress Doctors’] aim was the creation of what they called “artistic repose”, the moment when the discerning eye takes in a design as a whole and finds it perfectly satisfying in colour, line and form.”
Their teachings not only honed students’ creative expression, their dressmaking skills and their ability to dress themselves well and beautifully, but it also lead to paying careers for women, independence, an ability to handle a budget, problem solving skills and a self-assuredness in how they presented themselves to the world. They also sought to teach the principles of art and an appreciation for utility equally matched by beauty.
This book is about a combination of dressmaking, art, cultural history of the 20th century, women’s independence, and fashion, and seeks to tie all the different threads together. I think it does it very very well.
I loved everything about this book.
“…by dressing well, a woman could gain ‘a basic sense of security and self-respect’ that would release her ‘from the tensions caused by concerns about her appearance. She would then be free to give her full attention to the more vital matters, for herself, and for the welfare of others.’ Dressing beautifully was satisfying in itself, because the human soul and eye craved beauty, but it was also a means to a more work-a-day end.”
A-line skirt in bright red serge wool twill
Using a 1990’s pattern, details on total make time, adjustments and seam finishes, and lessons learnt.
TOTAL TIME COMMITMENT: 6 hours
Toile (with buttons but no lining, interior seam finishing, basting stitch removal or hemming): none
Cut out & transfer all pattern markings: 1 hour
Main construction: 4.5 hours
Lining construction: none
Finishings (hooks, hem): 1.5 hour
ADDITIONAL SEAM FINISHING & DECORATIVE EXTRAS
Each side of the seam allowance was overlocked before stitching
Went with an overlock with single fold hem because I attempted a blind hem, but it didn’t take all the way round, and I didn’t want to unpick it and potentially ruin the overlocking so just stitched it
VERDICT & LESSONS LEARNT
Attached the zip too high up on the centre back seam – have to draw this over my head.
This was an INCREDIBLY easy skirt to sew together and I absolutely love this, what I am calling ‘trench-weight’ wool. It is so smooth, so drapey, great handle, and yet still has a touch of structure. Been wearing it in London today actually and not found it very creasy at all. Looks amazing with my Jaeger navy wool trench which is in a similar fabric.
Other 1990’s Sewing Projects
High-waisted trousers in smooth serge wool twill
Working with a 1970’s Vogue Basic Design pattern, details on total make time, adjustments, seam finishes, and lessons learnt.
TOTAL TIME COMMITMENT: 9.5 hours, no toile (note these trousers are unlined)
Toile (without zip, buttons, lining, interior seam finishing, basting stitch removal or hemming): none
Cut out & transfer all pattern markings (both main fabric and lining): 1.5 hours
Main construction: 6.5 hours
Lining construction: none
Finishings (buttons, hem): 1.5 hours
PATTERN CHANGES
Increased zip length to 8” (for easier clearance over my hips)
SEAM FINISHING & DECORATIVE EXTRAS
Edgestitching at pocket opening
2 ½” hem, made using blind hem
Leg and crotch seams – overlock separately
Pocket bags – overlock together
VERDICT & LESSONS LEARNT
I need to be more careful and choosy about trousers with tucks:
- just because they fit at the waist, they may not be the best fit at the hips. The tucks need to have more room and ease to ‘billow’ over the hips and not cling. I have drafted a pattern with an extra 2 ½” at the hips
- when making a garment with these pleats/tucks, it may be better to fit them to have the waist band sit very slightly below my natural waist, to avoid the tucks ‘poofing’ over my stomach
This weight of wool, I am henceforth going to refer to a ‘trench weight’ wool. It is fine for use on some trousers and skirts, though better application would be a trench coat or a jacket. Its smooth and lovely to wear though, and I don’t find these trousers miss a lining.
VARIATION IDEAS FOR ANOTHER MAKE
Make in a very fluid fabric, such as a viscose crepe or viscose jacquard – should work really well with the pleats at the front, and especially if I lower the waist a teeny bit to sit just below my natural waist
Other 1970’s Sewing projects
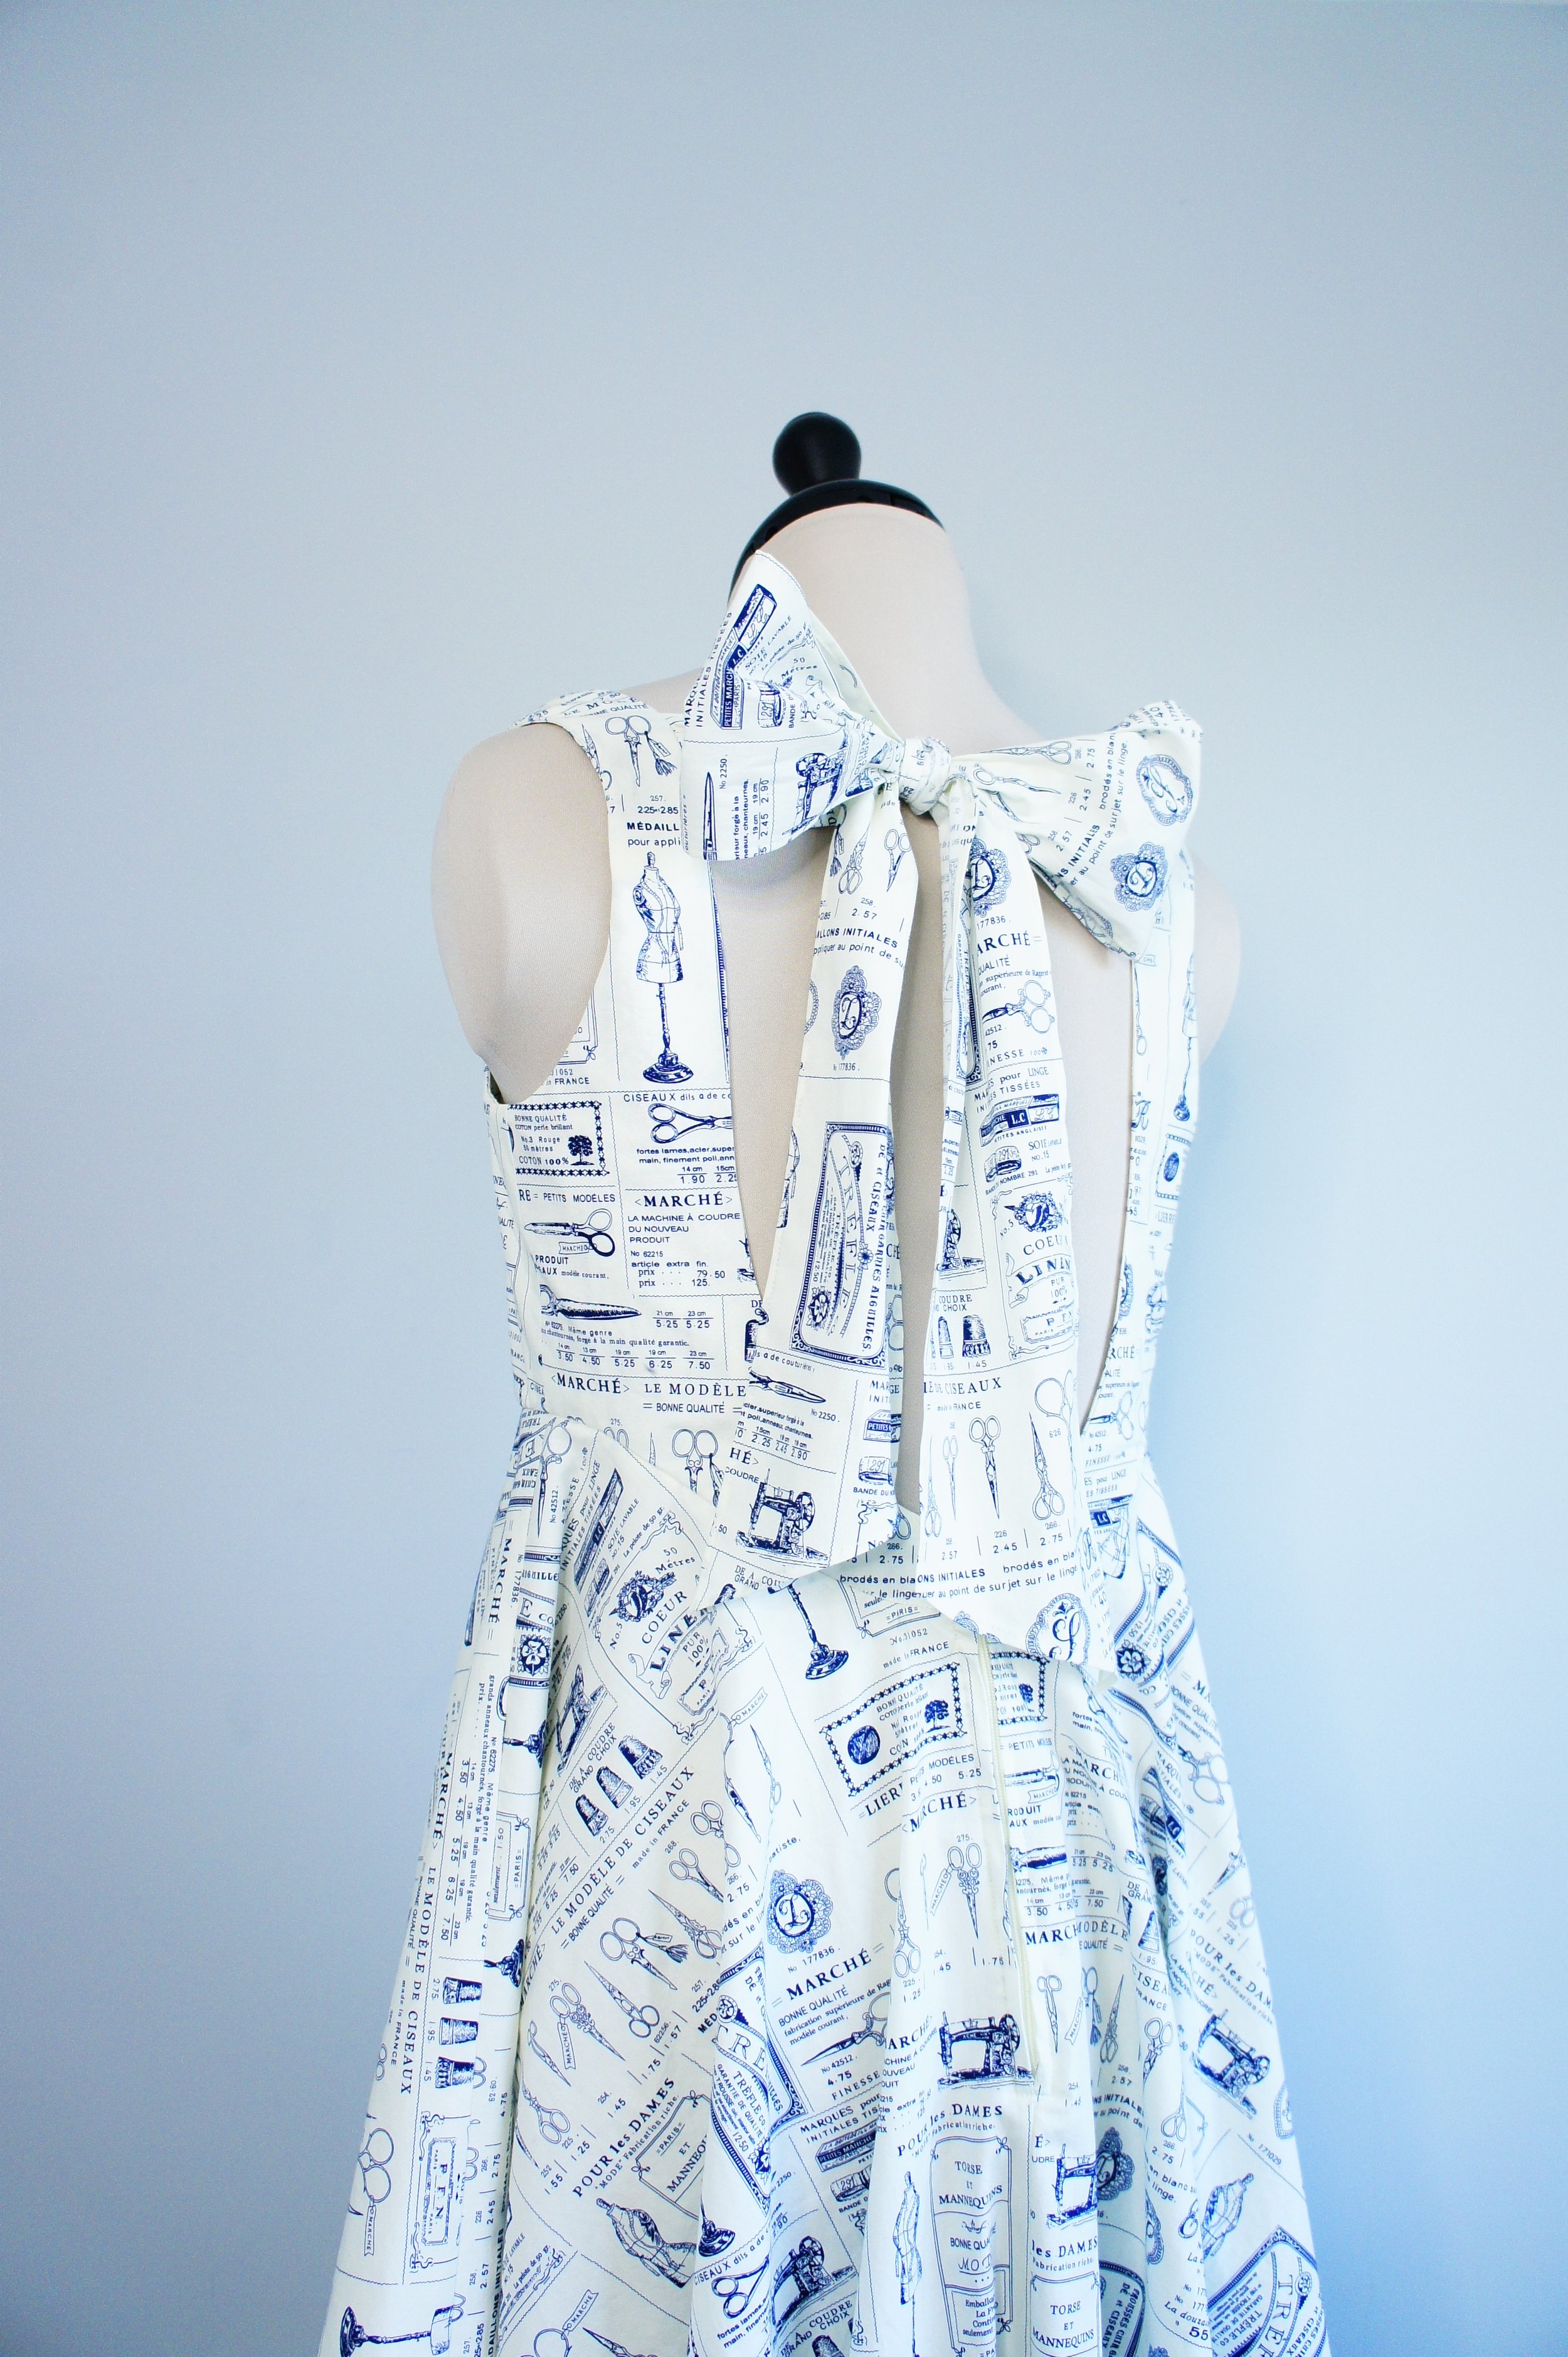
Boat neck summer dress with tie back in a novelty print cotton
Journal of making a dress with boat-neck, shaped underbust seam and large tie bow at the back.
TOTAL TIME COMMITMENT: 10.5 hours without toile (note this dress is unlined)
Cut out & transfer all pattern markings: 2.5 hours
Main construction: 6 hours
Lining construction: none
Finishings (hem): 2 hours
PATTERN CHANGES
None
SEAM FINISHING & DECORATIVE EXTRAS
Skirt side seams – French sea
Super narrow double-fold hem – beautiful finish
VERDICT & LESSONS LEARNT
The biggest lesson I learnt making this, is that sometimes, an adjustment for my narrow shoulders needs to come from the centre front, to bring both shoulders closer to one another, rather than simply making the shoulder seam itself thinner. The boat neckline of this dress should be ideal on me, but it’s much too wide, meaning the narrow shoulder sections want come in and settle further on my natural shoulder, creating a bunch of excess fabric at the centre neck. I also find that with this fit issue, the armscye is too far over onto my arm, restricting movement. None of this would be fixed by my narrowing, or even sloping the shoulder (common adjustments for me) – instead, this needs a narrowing of the whole neckline, then perhaps adding what I have narrowed, onto the side seam, to keep the overall correct width at the bust and underbust.
This is a full circle skirt and that can create a challenge for cutting out on a fabric which has a print with a very obvious right-way-up, as in this one here
VARIATION IDEAS FOR ANOTHER MAKE
Make this in linen, or a linen viscose blend
Travel Itineraries for Summerwear
Man’s shirt in grey wool flannel from Simplicity 8753
Fine wool flannel, from a modern Simplicity pattern. Beautiful shirting fabric, even though few use it this way.
TOTAL TIME COMMITMENT: 18.5 hours (including toile)
Toile (without zip, buttons, lining, interior seam finishing, basting stitch removal or hemming): 7 hours
Cut out & transfer all pattern markings (both main fabric and interlining): 2.5 hours
Main construction: 5.5 hours
Lining construction: none
Finishings (hooks, hem): 3.5 hours
PATTERN CHANGES
None
SEAM FINISHING & DECORATIVE EXTRAS
Topstitch with regular thread & 2.8mm stitch length – lovely, very subtle
Rounded buttonhole – correct choice for fine/medium fabric
VERDICT & LESSONS LEARNT
I adored sewing with this fabric. And it finished up a dream. Will make myself a shirt in wool flannel, for certain.
Flat-felling the seams was easier than I expected and makes a very (unsurprisingly) flat finish on the inside, which I expect enhances the wear experience.
I couldn’t have been prouder of myself of my edgestiching on this make. On point. I’m improving.
Learnt a lot about buttonholing on this project. While certainly less effort than handbound buttonholes, doing them on the machine is not the most straight-forward task, and they can very easily go askew if you are just a tad too assertive when feeding the fabric through the machine.
I don’t like the instructions for the interfacing on the inside of the button placket, but haven’t figured out a better option.
Cuccio yellow polish, Seriously Celcius
A limey-green yellow, this one, drifting a bit sour too, like its had some grey popped in there. That, on my skin tone, actually makes this lime a more wearable option, since the presence of that slight bit of grey takes this a notch down from being a neon, highlighter yellow.
From Simple to Splendour
I want my wardrobe to be a place where I can reach for both the unique, unusual, stand-out pieces and the quiet, hardworking, effortlessly chic staples. The bold and the understated. The conversation starters and the silent heroes.
A great wardrobe and a stylish woman needs both.
They work together harmoniously. They don’t compete; they complement. They create balance and versatility. The statement jacket feels even more special when contrasted with a simple navy jumper. The brown tailored cigarette trousers become a simple grounding for that extraordinary silk blouse I found on my travels.
I have a name for this wardrobe strategy:
From Simple to Splendour
Button-up box-pleat skirt from McCalls 7906
Lessons learnt from making a box-pleated midi skirt, in a midweight twill, using a Y2K pattern.
TOTAL TIME COMMITMENT: 8 hours
Toile: 3 hours
Cut out & transfer all pattern markings: 2 hours
Main construction: 7.5 hours
Lining construction: none
Finishings (hem): 4.5 hours
ADDITIONAL SEAM FINISHING & DECORATIVE EXTRAS
Overlocked each side of the side seam before stitching
Used a triple stitch for the deep hem, instead of changing to a topstitch thread
Rounded buttonholes
VERDICT & LESSONS LEARNT
I do not like this fabric – too bright, too stiff. I will not wear this skirt.
Also, the fabric is waaaaay too heavy for this amount of box pleating. The area at the waist is particularly bulky and the facing has a tendency to roll outwards. The unusual thing here is that the suggested fabrics are Sateen, Chino, Cotton Blends and Twill. For me, this skirt must be made in a lightweight fabric such as poplin, shirting or lawn.
For all this box pleating and bulkiness, I don’t need pockets; adds too much bulk at the hip area.
Other Skirt Sewing projects
Leighton Denny nude polish, Mirage or Not
Colour scrutiny of Leighton Denny’s 3 Times a Lady nail polish, a mid-tone neutral nude creme.
A dellightful nude that is neither too pink nor too yellow - a touch of both, so a solid neutral.
As I typically find with all Leighton Denny polish, the formulation is excellent, with lasting power both in the bottle (this won’t go off before I have had a chance to use it for several years) and on the nails.
Base coat is Essie Anchor, topped with, in my opinion, the best topcoat on the market - Leighton Denny’s In The Gloss.
A-line skirt in electric blue cotton twill from Vogue 7210
Midi skirt with contour waistband, using a Y2K Style pattern. Experimenting with a robust and stiff fabric for this design.
TOTAL TIME COMMITMENT: 8 hours
Toile: 3 hours
Cut out & transfer all pattern markings: 1 hour
Main construction: 2.5 hours
Lining construction: none
Finishings (hem): 1.5 hours
ADDITIONAL SEAM FINISHING & DECORATIVE EXTRAS
Each side of the seam allowance was overlocked before stitching
VERDICT & LESSONS LEARNT
A very easy thing to make but do not like this fabric – too bright, too stiff. Will not wear this skirt
Not a bad fit but could need a few tweaks for different fabrics as it sits just a tad low on my waist.
For a sturdier fabric might be better to taper the waist a little without changing the hips
For a finer or more delicate fabric, this is the correct fit
Branding and Cheap Clothes
I have a new theory. When you pay a brand little money, in return, they want you to walk around advertising their product. Cheap clothes always emblazon the brand on them in really obvious places. That's because they are letting you buy it cheaply in return for marketing on their behalf.
Straightforwardness and Clarity in my style
I have been ruminating about this 'wild vs familiar' cycle theory of fashion. We oscillate between style that feels familiar, and style that feels avant-garde, futuristic, never-before-seen.
When we are in a time of wanting familiar, I also think it comes with a preference for straight-forwardness in fashion. Like, it's not too many bells and whistles, not too much froufrou, not too much extra, not too much to figure out.
That is what I'm feeling in style right now. Straight-forwardness. Clarity. I want clarity of function, of form. I want things to express simply what they are, not some smoke-and-mirrors confusion.
Ultra wide leg flat-front trousers from Burda 6966
The simplicity, elegance and sophistication of sewing trousers in single wool crepe.
TOTAL TIME COMMITMENT: 9 hours
Toile (without zip, buttons, lining, interior seam finishing, basting stitch removal or hemming): 4 hours
Cut out & transfer all pattern markings (both main fabric and interlining): 1.5 hours
Main construction: 5.5 hours
Lining construction: none
Finishings (hooks, hem): 1.5 hours
Fabric type
Single wool crepe
Fabric weight
280-300gsm
PATTERN CHANGES
Added a little extra flare from the hip down to the hem
Adjusted the fit by lengthening the crotch
SEAM FINISHING & DECORATIVE EXTRAS
Outside leg seams – overlock together
Inside leg seams – overlock together
Crotch – overlock each side separately
Do a lapped zip, rather than a centred zip
VERDICT & LESSONS LEARNT
Very quick and easy to make.
This is a gorgeous, ultra-simple wide leg, which makes a fabulous pair of trousers, with a very minimal upper section (narrow waistband, no pockets, and zip in the centre back) which is flipping excellent for pretty much anything, but particularly a long line top which I want to style left out – its very smooth underneath the top.
The ultra wide leg of Version A brings the drama when paired with a plain fabric.
The work I did to correct the fit of this pattern, means this is now perfect on me.
Using single wool crepe for this was a BRILLIANT idea. It is fluid, and classy. I also don’t find it needs lining.
Other Ideas for Winter
Northern European summer dressing
I tell you, dressing for the Northern European summer is a careful and intelligent study in smart layers and adaptability.
I feel like I'm getting there with my summer collection, but there's more to do.
There are two key traps I can see, which are very easy to fall into
Wishing the weather was consistently warmer, and only making outfits for this fiction
Ending up wearing your non-summer gear, in non-summer colours or fabrics, that just don't work.
Lost fabric knowledge
Do you know how much there is to know about fabric?! There is tonnes to know about fabric. This is something we have majorly lost in the move away from handmade and towards industrial clothing production. We have not a damn clue about fabrics, different types, different properties, different benefits, hence we willingly walk around wearing crap fabric that has no durability, no pull resistance, and we have no clue how to look after it.
Zoya green polish, Cece
Colour scrutiny of Zoya’s Cece green polish, with a prominent shimmer foil finish.
Whooppee!! A sparkler this one.
Properly bright grass, pea green glitter, with mini little fine flecks in there.
Used two coats, and I had the coverage. Topped with Leighton Denny’s In The Gloss. Didn’t manage to totally smooth the glitter roughage, thinking it might be time to invest in a for-glitter topcoat……

