A Journal

A personal journal that invites readers to design their own journeys through the world - with travel, dress and taste.

Search Posts:

Jump to

Travel

Jump to

Wardrobe

Jump to

Eat

Wardrobe, Spring Frances Lawrence Wardrobe, Spring Frances Lawrence

Workings of a Garment: a 1950’s rose-print cotton gown

Study and analysis of how this summer gown was constructed.


Brand & Era

Selfridges (emulating Nina Ricci)

1950’s

Fabric type & weight

cotton, printed or possibly chintz

estimate 160-180gsm

NOTES FOR A DRESSMAKER

Fit - This is a close-fitting garment. Almost all fit is achieved through the princess seams, with only two darts at the side waist. Rather cleverly, given that this is a ready-made garment, the pleated section over the bust would disguise any less-than-perfect fit issues around the bust, making it wearable by different cup sizes without detracting from the finished look.

Panels - 8 total panels

Zip - metal teeth, cotton tape, lapped construction. Hook and thread-eye added across centre of zip to hold the lap down covering the zip, and at the top of the zip for ease of closure.

Seam allowance - very wide, around 1 inch/2.5cm. Much more common for this period, and allows for tailoring and adjustments by the owner for a better fit and longevity as the body changes shape. Also, since this is cotton, any let out seams should not have obvious pinholes if changed.

Interior seam finish - for the bodice, the seam allowance is turned-and-stitched. From the waist down, it is simply pinked. Note also the one clip at the waist to release the concave seam allowance. Considering this garment is around 70 years old, this simple and easy finish is clearly durable enough for this type of garment, in this type of fabric. No evidence of fraying (and I myself have worn this garment at least 8 times in the past few years).

Hem - evidence of original hem being very narrow 3mm double-fold hem, but a previous owner has hemmed again to shorten, fairly neatly but not as neat as the original.

Hand-finishing - thread loops would have been done by hand, and the pleated detail across the bust is also hand-tacked down in key places.

Notable absenses - no lining, no interfacing on any section, and no waist-stay (which I actually think would be very useful and protect the seams from any stress on such a fitted item.


Other Cotton Garments

Read More
Eat, England, Spring, Winter Frances Lawrence Eat, England, Spring, Winter Frances Lawrence

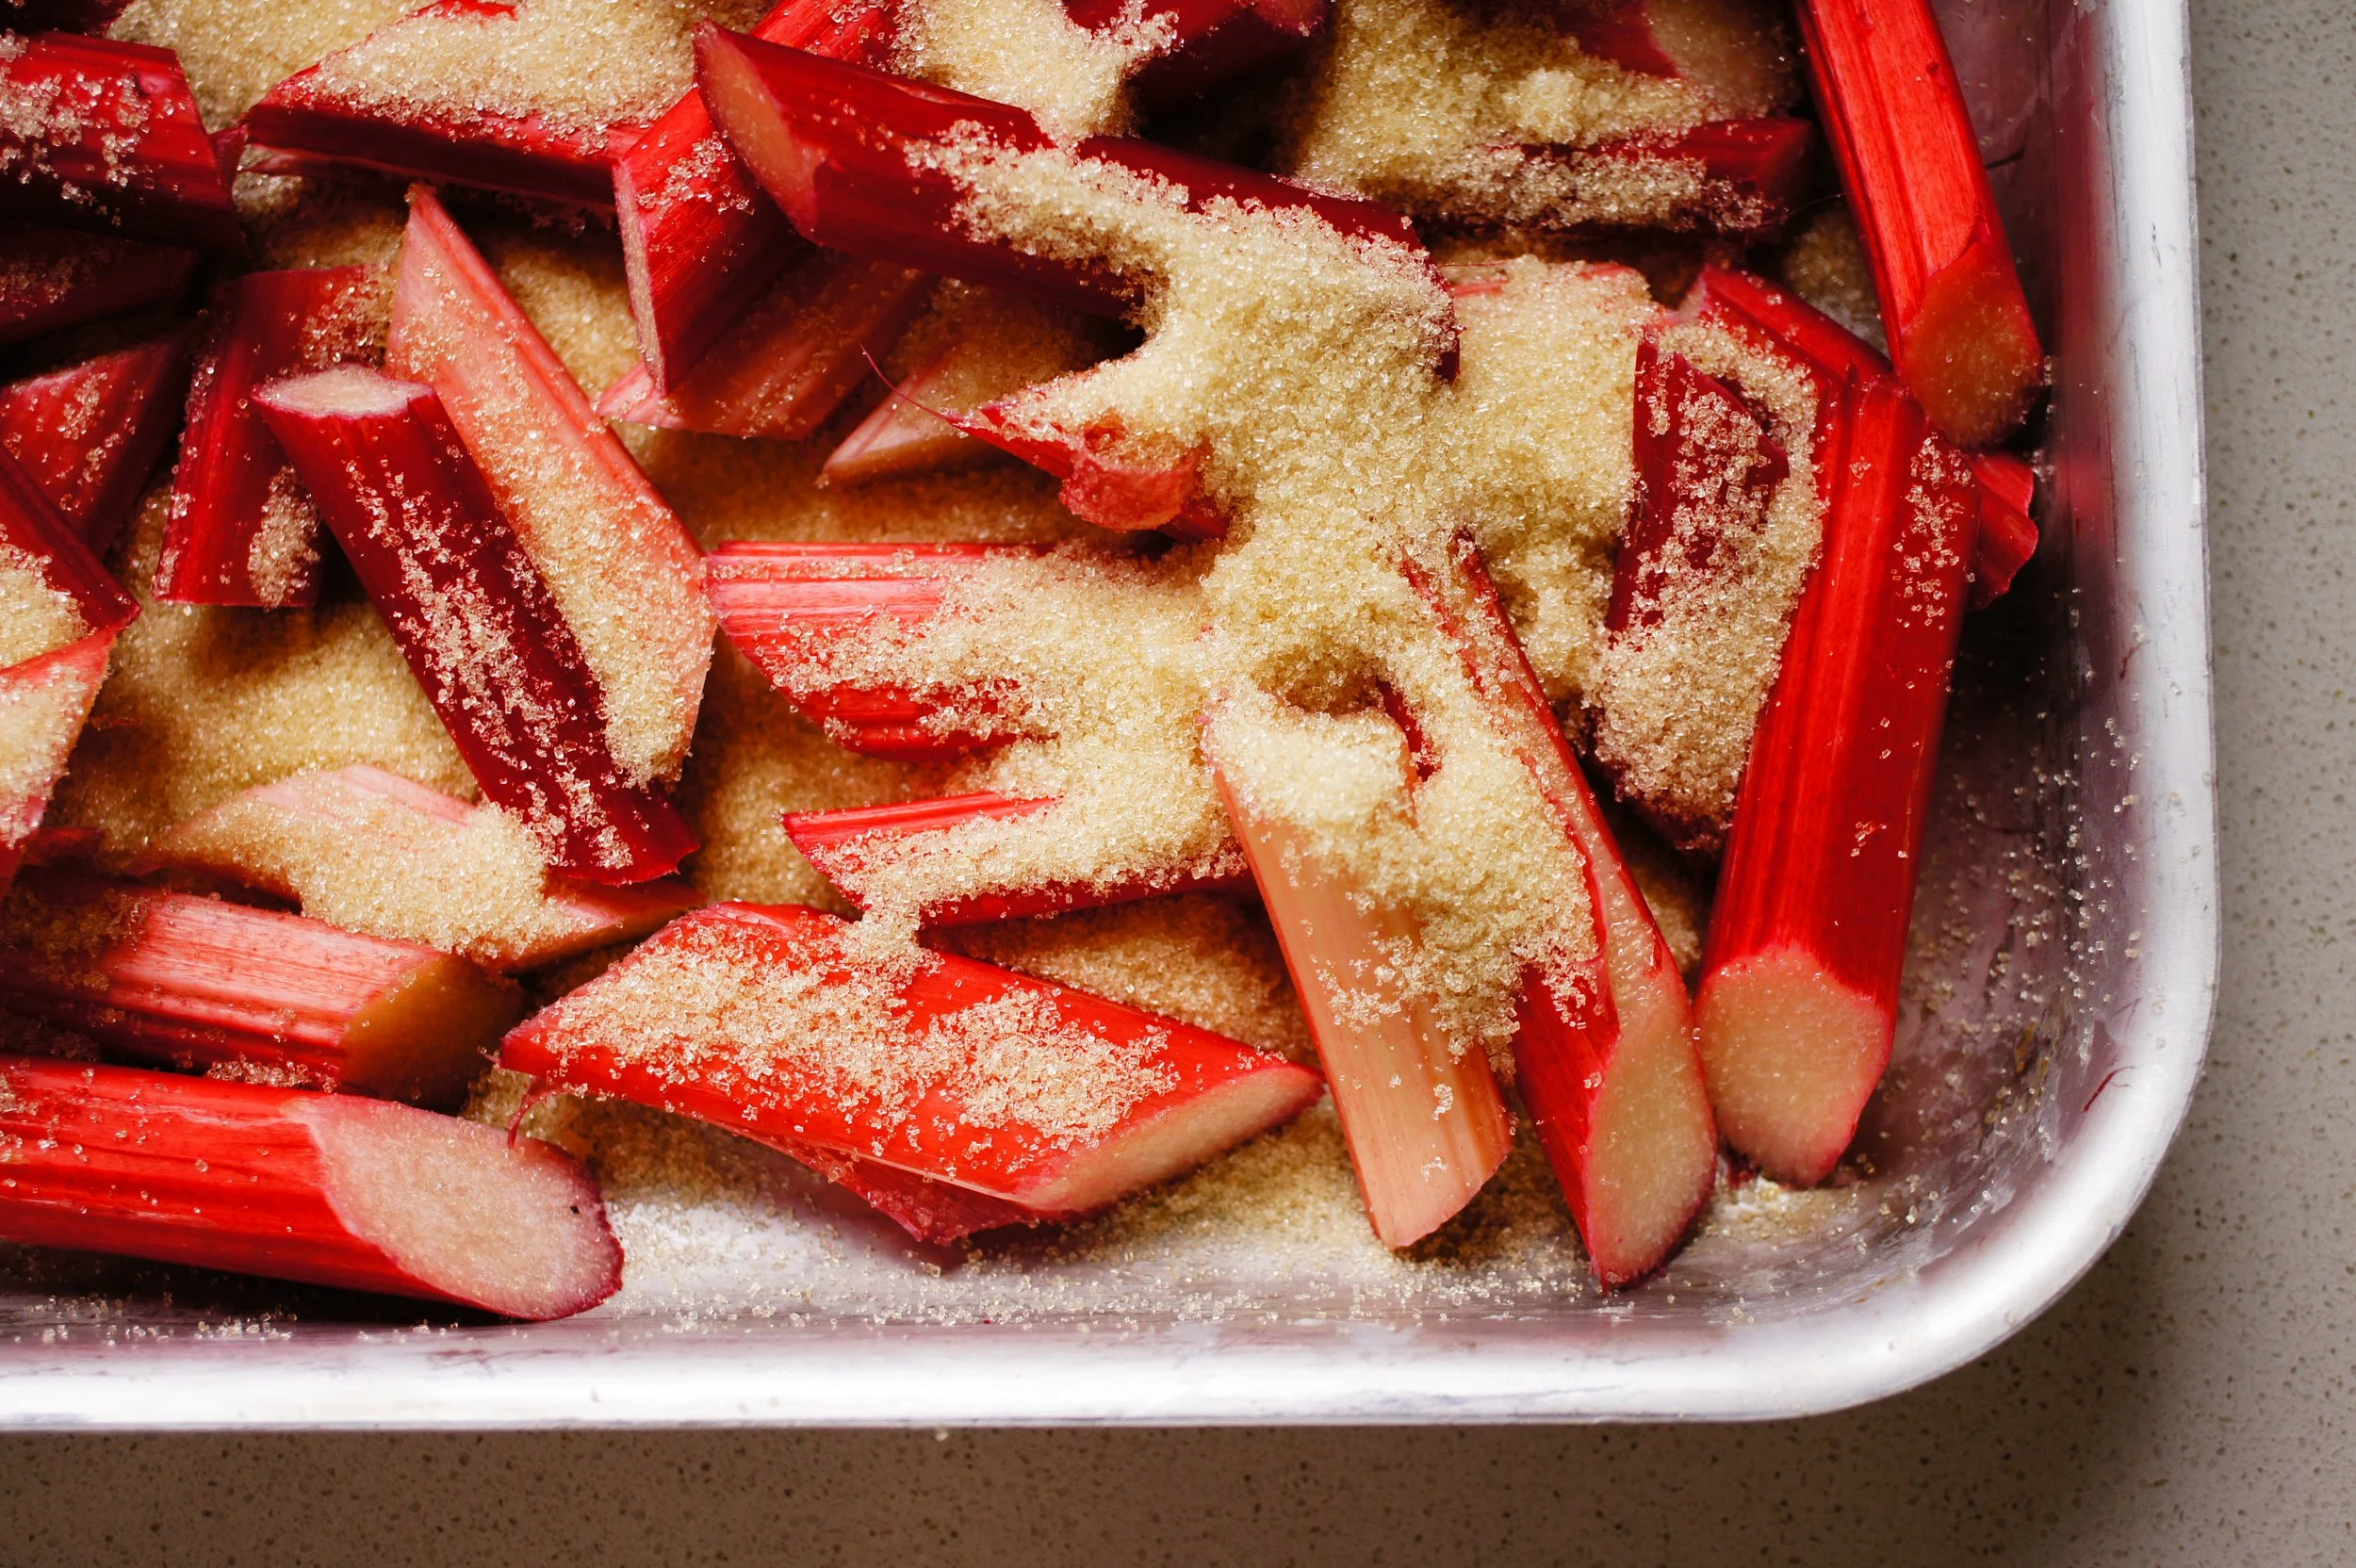
Rhubarb & Rose Compôte

Recipe for a fragrant rhubarb and rosewater compote. An utterly delightful flavour combo and a taste of The British Isles.

pink rhubarb chopping in a shallow baking tin with caster sugar

There are two rhubarb seasons - one is late winter, early spring, when the crops of pink, forced rhubarb are available, and one is the summer, when the abundant crops of green rhubarb are endlessly sprouting stalks in veg patches and borders up and down the land.

This recipe is designed for the former, the pink kind, particularly if you intend to serve the compote appetisingly atop a crepe, yoghurt or cake. While the green summer kind will taste exactly the same, it will not have the aesthetic appeal of the pink winter version, especially if you want to turn the puree into some other topping like on a cheesecake.

If you only want it for the flavour and don’t need any of the colour, this recipe will produce the same result either which way.

My recipe below is my own.


PORTION SIZE

Makes about 700ml – roughly the amount of 2 large mugs.

TOOLS

Other than the typical kitchen equipment, you will need:

  • a roasting tin with sides, about 4-5cm deep

INGREDIENTS

600g rhubarb (about 10 stalks) **forced, pink ones will make a pink compote; the green summer rhubarb will be a sludgy green colour

100g golden caster sugar

1 to 1 ½ tsp rose water

1-2 drops pink food colouring (optional)

Ratios

  • 100% fruit, 15% sugar

  • Approx. ½ tsp rose extract per 300g fruit

Variations

  • with orange or lime zest – omit the rose water and zest the citrus fruit onto the compôte just after it comes out the oven. Stir to combine.

  • with strawberries — swap half the rhubarb for strawberries

  • With vanilla – stir 2 tsp vanilla paste onto the compôte just after it comes out the oven. Stir to combine.

  • With rosé wine or liqueurs – add 2 tbsp rose wine, elderflower liqueur, Grand Marnier, Chambord etc. to the roasting tin with the raw rhubarb and sugar. Roast together.

  • With cardamom – grind the seeds of 4 cardamom pods and add to the roasting tin with the raw rhubarb and sugar. Roast together. Omit the rose water.


METHOD

Heat oven. Preheat the oven to 180°C fan

Prep rhubarb and any extras. Cut the rhubarb into large chunks and place in a roasting tin with the sugar. If any of your extras need to go in before roasting, add here.

Roast. Cover with foil and cook for 15‐20 minutes or until the rhubarb is tender and the sugar has dissolved into a lovely pink syrup. Expect it to be pretty wet.

Finish. Stir in the rosewater (or any other optional extras, and a drop or two of pink food colouring if you want to amp up the colour), then spoon into a bowl and set aside to cool completely.


USES

  • Dollop onto rice pudding, porridge or crepes

  • Blend into a smoothie

  • Use as a fruit puree for cheesecake topping

  • Serve alongside a cake (particularly a dense type of cake such as a Madeira cake or olive oil cake)

Read More
Travel, Spring, Europe, France Frances Lawrence Travel, Spring, Europe, France Frances Lawrence

Quimper - an off-season active itinerary for Spring

A 7-night springtime itinerary with medieval Quimper as the base. Cider, cycling, springtime walks, crepes and art.

Itinerary At A Glance

  • 7 night independent itinerary for the very northwest tip of France, using Quimper as the base

  • Based on travelling at the very end of winter/start of spring, driving there using the channel tunnel.

  • Highlights include discovering the Pont-Aven school of art, eating crepes in their cultural homeland, coastal biking

  • Based on a couple travelling, with a focus on leisurely cultural activities and biking, interspersed with time to just relax and soak up the atmosphere


Why here?

This is an alternative option for exploring Brittany in its off-season, using Quimper as the main base, for easy access to city, country, coast and culture, with all activities within a 1 hour drive or less.

Every image you will ever see for Brittany tourism - every website, every accommodation listing - will show Brittany in the summer time, bathed in gorgeous sunshine. It’s true that early spring is unpredictable in the northwest corner of Europe; we can get everything from blue skies and frigid air, to bouncing rain, to snow, freezing cold and biting winds, to very warm and sunny days hovering around 20°C. You just don’t know what you’re gonna get.

This makes it a brilliant month for a road trip, and a great month for venturing outside (dressed accordingly!) If the weather is just too much, there’s plenty indoor cultural action to amuse too.

Quimper is considered by many to be the ‘cultural heart’ of Brittany, and stretching from the coast to inland, there is the Parc naturel régional d'Armorique, a huge natural park with rugged granite peaks, moors & dense forests. Due to unpredictable weather, indoorsing will be a key fallback, so staying close to a city means cultural and foodie activities are in easy reach for when the weather just isn’t playing ball.


WHEN

April

Like the UK, April can be either cold and snowing, or warm and sunny, Take clothing options and plan activities that account for these unknowable circumstances.


TRAVEL MEANS

Drive from Leeds, using the Channel Tunnel crossing + Road Bike

Drive time is 12.5hrs. Alternative, similar travel time is to cross using the ferry from Plymouth to Roscoff


ACCOMMODATION

Near Quimper

Quimper’s countryside, being more inland, has much more of a ‘cosy’ comforting feel to it than the brazen and rocky boldness of the coast around Brest.

3 bed home on the banks of the River Odet

Auberge des Glazicks - Michelin-starred restaurant-with-rooms about 30 mins drive from Quimper

3 bed home in central Quimper

Hôtel Ginkgo - Just outside the city centre, boutique hotel with some rooms giving views over the River Odet


SCHEDULE

Day 1

Drive to Quimper - this is a 12.5 hour journey. Pack the car with supplies and plan the route with opportunities for break points

Check-in

Collect groceries


Day 2

Brunch or Lunch - with local cider at Le Sistrot

Bike ride - out to Parc botanique de Cornouaille (about 2hr bike ride round-trip)


Day 3

Crepe workshop - for the morning activity, book onto a crepe-making workshop in Benodet (25 min drive from Quimper)

Embroidery art - in the afternoon, visit the School of Embroidery Art by Pascal Jaouen in Quimper where they have regular exhibitions of artistic embroidery


Day 4

Relax - take the morning to chill

Walk - in the early-afternoon, take a walk in the Bois du Nevet (25 min drive from Quimper)

Evening Drinks - try local brew at La Baleine Déshydraté in Quimper


Day 5

All day bike ride - Start in the morning, bike out to Pont-Aven (4 hour bike ride round trip) and stop in at Le Musée de Pont-Aven to see their considerable collection of works from this area, most dating from mid-to-late 19th Century


Day 6

Walk - Take a morning walk in the Huelgoat Forest (50 min drive from Quimper)

Relax - Take the afternoon to chill out, read, draw, chat


Day 7

Spa day - Book a spa day of thalasso therapy at Valdys Spa in Dourarnez (30 min drive from Quimper)


Day 8

Drive home


Other April Itineraries

Read More
Wardrobe, Spring Frances Lawrence Wardrobe, Spring Frances Lawrence

Workings of a Garment: a Y2K Acne oversized long-line shirt

Learnings and inspiration for improving my dressmaking up to designer ready-to-wear standards.


Brand & Era

Acne

Y2K, 2013

Fabric type & weight

cotton poplin

estimate 140gsm

STYLE NOTES FOR A PETITE

This is not flattering on my petite frame - too much volume across the dropped shoulder, too much volume at the lower front, too much length overall in both bodice and sleeve.

It is the correct size for me (36) but it just goes to show why oversized is such a difficult silhouette to buy ready-made for a petite, particularly in designerwear, which seems to be sized for a 5’ 8” woman. Trying garments like this makes me more determined to get better and better at making my own oversized or loose-fitting garments.

Oversized is still a fit! Darts need to be in the right place, the volume needs to be proportionate, and it should all be balanced with subtle details that hint or show the figure underneath - such as cut-in shoulders, a tightly fitted cuff, a waist cut-out, or a bare arm or leg.


Other Oversized or Loose-fitting Garments

Read More
Wardrobe, Spring, Dressmaking Frances Lawrence Wardrobe, Spring, Dressmaking Frances Lawrence

Pleated blouse in wool flannel from 1970’s Gunne Sax pattern

After some significant design amendments, made a cropped blouse in micro-houndstooth wool flannel. Lessons learnt.

TOTAL TIME COMMITMENT: 19 hours including toile

Toile (without buttons, lining, interior seam finishing, basting stitch removal or hemming) and pattern amends: 7 hours

Cut out & transfer all pattern markings: 1.5 hours

Main construction: 8.5 hours

Lining construction: none

Finishings (buttons, hem): 2 hours


Fabric type

Wool flannel

Fabric weight

estimate 170gsm

VERDICT & LESSONS LEARNT

Size 11 Junior is an excellent starting size for me – I had to make hardly any adjustments to the neck, chest & shoulder (the usual places I need to adjust). The only thing I needed to do was lower the bottom of the armhole, and shorten the bodice by 1 inch. This pattern already had plenty of room at the bust due to the pleats, and plenty of room at the bicep because of the full sleeve. Had this been more fitted in those areas, doubtless I could have also had to do a full bust and fuller bicep adjustment, but the fit across the back, shoulders and chest is particularly nice.


I also adjusted the placement of the stitching across the pleats, raising them up to be more flattering on my petite frame, and also so that they were not so close to the bust area which caused the fabric to pouch out over my full bust, making me look disproportionately large there.


BUTTON HOLES NEED TO BE VERTICAL ON BLOUSES EXCEPT AT THE COLLAR!! I did them horizontally on this, and they extend beyond the edge of the placket, which I will have to live with, but feel a bit daft since they really should be vertical. It did also occur to me that if a blouse pattern has a defined placket, this determines the max size of button I can use.


Also, I need to remember that my choice of interfacing for anywhere there is going to be buttonholes, is really important. I need to choose a facing that will blend in effortlessly when the buttonholes are cut. I used a white interfacing on this, but because it is a darker fashion fabric, you can see little tufts of white where I have cut for the buttonholes. Not a disaster, but would have been so much better to have used a black interfacing.


This is the heaviest fabric I could use for this design I think, and as a matter of fact, it could look much much better on me in a super lightweight fabric like cotton batiste or crepe-de-chine. Made up, wearing it feels a tiny bit like wearing a jacket, so nice and substantial, but I think I would prefer it in a lighter weight fabric. This fabric would be better suited to a trouser or skirt I think.


I learnt a lot about proportioning a loose fit blouse on my petite frame – when there is quite a bit of extra fabric across the front, I need to be very careful and really, these look best on me as cropped blouses, as I ended up doing with this pattern.


Very pleased to find a use for the decorative stitching, but I didn’t do this in a contrasting thread, so it can hardly be seen on the finished blouse.

VARIATION IDEAS FOR ANOTHER MAKE

Make it in a much more lightweight fabric, perhaps sheer as in the sewing pattern photo.


Make the collar, button placket and cuff with a decorative scalloped edge (pattern pieces drafted)


Or make the collar and cuff inserting a piping or lace trim in a contrast colour to define the edge – this will work beautifully well if the main blouse is made in a plain fabric


Travel itineraries for Autumnwear

Read More
Wardrobe, Spring, Dressmaking Frances Lawrence Wardrobe, Spring, Dressmaking Frances Lawrence

A-line skirt in bright red serge wool twill

Using a 1990’s pattern, details on total make time, adjustments and seam finishes, and lessons learnt.
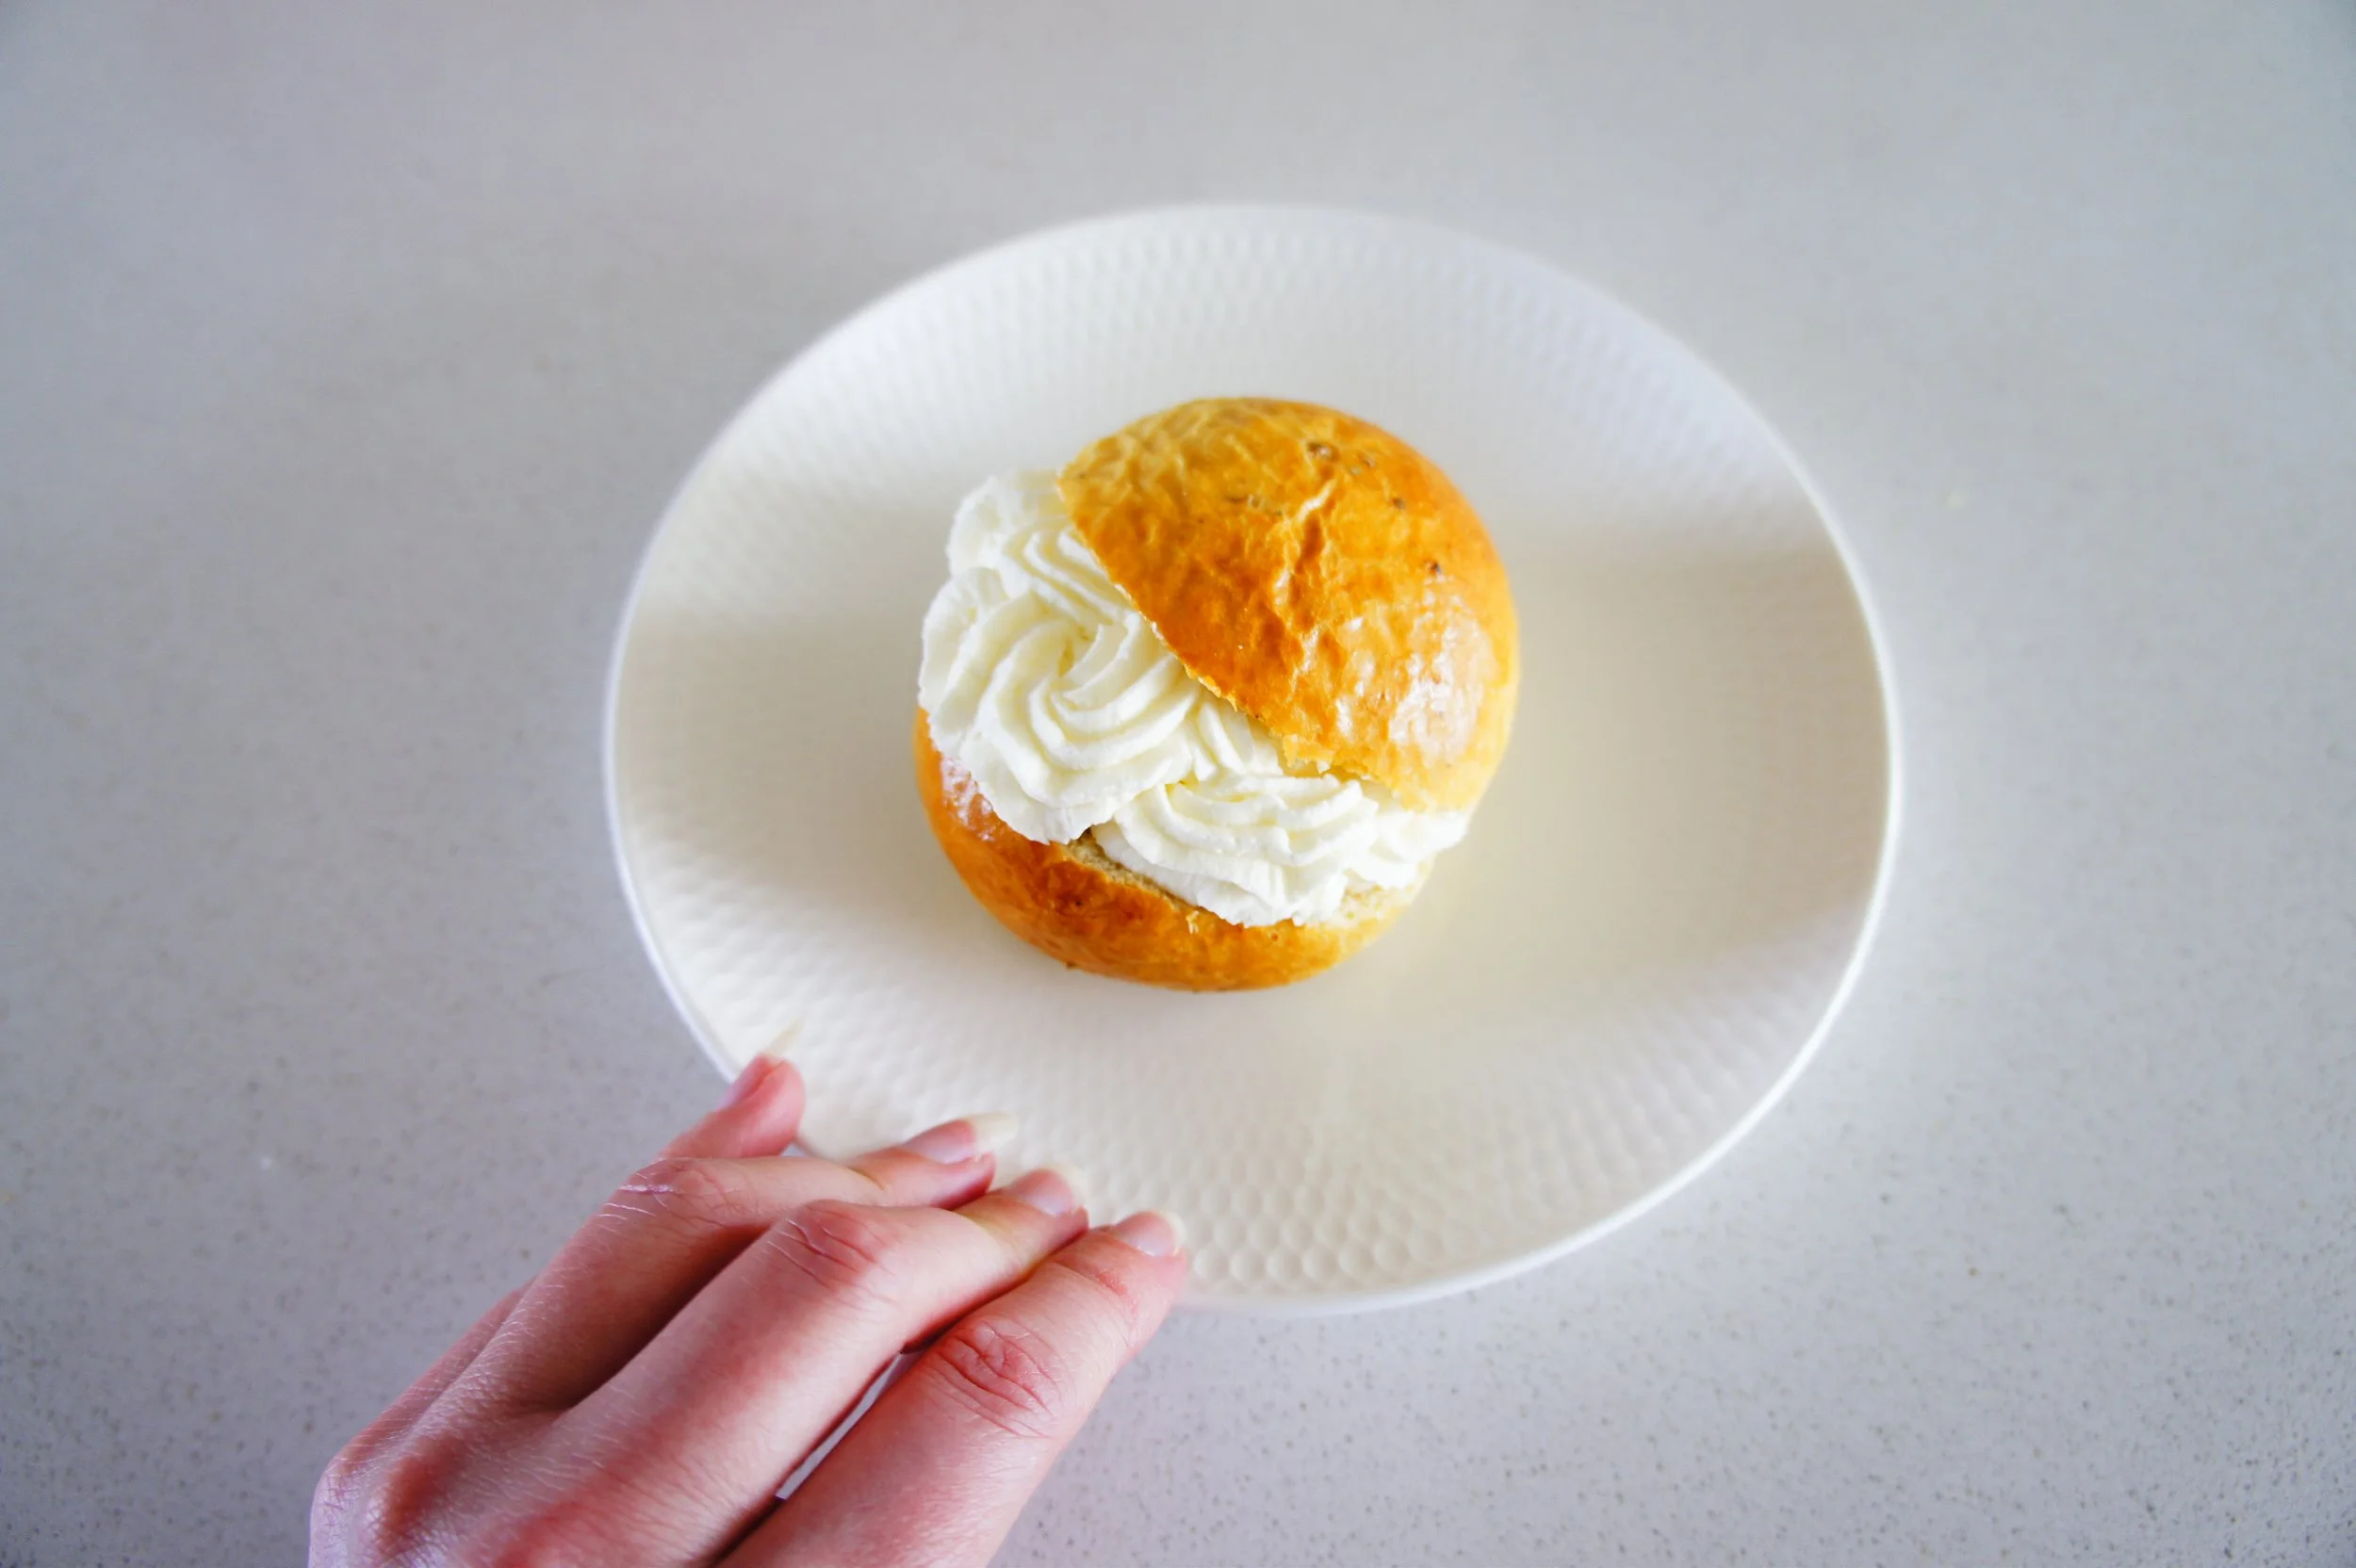
TOTAL TIME COMMITMENT: 6 hours

Toile (with buttons but no lining, interior seam finishing, basting stitch removal or hemming): none

Cut out & transfer all pattern markings: 1 hour

Main construction: 4.5 hours

Lining construction: none

Finishings (hooks, hem): 1.5 hour

ADDITIONAL SEAM FINISHING & DECORATIVE EXTRAS

Each side of the seam allowance was overlocked before stitching

Went with an overlock with single fold hem because I attempted a blind hem, but it didn’t take all the way round, and I didn’t want to unpick it and potentially ruin the overlocking so just stitched it 

VERDICT & LESSONS LEARNT

Attached the zip too high up on the centre back seam – have to draw this over my head.

This was an INCREDIBLY easy skirt to sew together and I absolutely love this, what I am calling ‘trench-weight’ wool. It is so smooth, so drapey, great handle, and yet still has a touch of structure. Been wearing it in London today actually and not found it very creasy at all. Looks amazing with my Jaeger navy wool trench which is in a similar fabric.

Other 1990’s Sewing Projects

Read More
Eat, Sweden, Spring Frances Lawrence Eat, Sweden, Spring Frances Lawrence

Swedish Semlor buns

Recipe for Lenten-Easter treat, Swedish Semlor buns. Adapted from a recipe by Estonian patisserie owner, Angeelika Kang.

This is perhaps my very favourite enriched doughs to make and to eat.

I first encountered a semla bun in Angeelika Kang’s wonderful baking book, ‘Ovenly Delights’, a book I bought for myself on a winter break in Tallinn, after visiting Angeelika’s delightful Levier patisserie in Kalamaja. Since coming home, her book is a staple in my recipe book library for excellent instruction on how to make the kind of treats you only find in patisseries.

Since discovering this recipe and first making them at home, we have taken two trips to Sweden - Sweden’s West Coast and a Stockholm workation - but never having been there in the Lenten or Easter period (which is when these tend to feature in Swedish bakeries), we have never had the chance to try these in their native land.

Oh well - just going to have to keep making them at home.

My recipe below is derived and modified from Angeelika’s original.


BATCH & BUN SIZE

My estimates are based on a 60-80g size bun per person. 

This recipe will make about 12 buns, give or take.

TOOLS

Other than the typical kitchen equipment, to make these, you need:

  • a pestle & mortar for grinding cardamom

  • a large glass mixing bowl for proving, one that cling film will ‘grip’ onto for a tight drum seal

  • a flat baking sheet for baking

INGREDIENTS

Dough

250ml full fat milk

24g active dry yeast (not fresh or instant)

100g caster sugar

½ tsp (2g) fine salt

500g strong white bread flour

100g softened unsalted butter

2 egg yolks (30-40g)

30 cardamom pods

Crème Chantilly Filling

600ml whipping cream

4 tbsp icing sugar


For brushing

Egg white + a dash of full fat milk

METHOD

Put the oven on. 50°C (fan or regular).

Remove the cardamom seeds from the pods. Lightly grind in a pestle and mortar. Don’t overdo it – you want to taste and bite into the cardamom seeds in the finished bun.

Warm the milk. Weigh milk into a small saucepan with a temperature probe – heat over medium to 37°C (will take about 4-5 mins). Do not let it exceed 43°C - this will kill the yeast.

Weigh out the remaining ingredients. While the milk is heating, weigh the flour, salt, sugar, yeast, egg yolk, butter and ground cardamom into a large mixing bowl. NOTE! If using dry yeast, weigh this into a separate bowl and hydrate with the warm milk before the next step.

Knead. Once the milk has reached 37°C, pour the warm milk into the stand mixer bowl. Turn the dough out onto the surface and knead for about 5 minutes until the dough is elastic and smooth – a dough scraper can be very helpful at the start of the process when it is quite sticky. You are aiming for a ball of soft pillowy dough that is just lightly tacky.

It may be a little sticky when you start but resist the temptation to add more flour to it. You'll find that with a little work, the dough will begin to lose its stickiness and become smoother and more elastic.

First Proof. Turn the dough out, ball off the dough and place into a large glass mixing bowl. Cover with cling film that is stretched drum-tight across the top. Place in the oven to prove for 45 mins to 1 hour, by which time it should have doubled in size and the cling film will have inflated to a dome. A light press on the dough and it will readily spring back.

******************** WAIT 45 MIN to 1 HOUR **********************

Divide the dough. Once proved, roll the dough into a rough sausage shape and use a sharp knife to cut as equal as you can before weighing each section - you want either 60g (small) or 80g (medium) per ball.

Shape the dough and space out. You are aiming for a domed ball shape with the seam of the dough on the underside. Using one finger, press the sides into the middle. Repeat this several times; you will probably notice the dough getting firmer as you do this. Flip over and using the two edges of your hands, cup under the dough to form a nicely rounded and smooth ball. Plqce onto a lined baking sheet, well-spaced apart, and repeat for the remaining buns.

Second Proof and heat oven. Leave to rise for another 15 minutes. Preheat the oven to 170°C fan, 190°C regular.

Alternatively, if you are prepping in advance, place the buns either in the fridge or the freezer at this point, for baking later. See further notes on storage below.

Egg wash. Wash the tops of each bun – either with a beaten whole egg, or - to avoid waste - some egg white beaten with a dash of cream or milk, whatever you have. Apply wash carefully and precisely, try not to miss any bits for the most professional glossy finish.

Bake. Bake in the middle of the oven:

  • 10-11 minutes for a small bun

  • 12-15 minutes for a medium bun – no more - until the tops are golden brown

Cool completely. Remove from the oven and cool completely before serving (otherwise, the cream will get melty)

******************** WAIT 45 MIN to 1 HOUR **********************

Fill with cream. Whip the cream with the icing sugar, slice off the top of the bun and, for the most professional finish, use a star nozzle to pipe in the cream before replacing the lid and lightly dusting with icing sugar.

STORAGE & FREEZING

Most enriched dough is best eaten on the day it is baked – though you can get away with up to about 48 hours if you keep it in an airtight container but by this time, it won’t be as special and will likely be a bit dry and a bit tough

To freeze before baking (freshest result)

Put into the freezer in an airtight container, just before the second proof.

When you want to bake them, take them out of the freezer and immediately place onto the lined baking sheet that you plan to bake them on. Leave in a warm place to thaw and rise - the time for this will vary depending on the temperature of the room though I typically find about 2-3 hours for these. You will need to check the dough regularly; it needs to be baked as soon as it has completed its defrosting (it should feel slightly puffy and your finger should leave an indentation if the dough is pressed lightly.) Now continue the recipe from the baking step.

To freeze after baking (most convenient)

Freeze on the day of baking immediately after they have cooled.

To serve, warm in the oven for 15 minutes at 160°C fan (no need to preheat – put straight in on a tray). After this time they should be fully defrosted, warm and slightly softened – almost as good as freshly baked.

Read More
Wardrobe, Spring, Dressmaking Frances Lawrence Wardrobe, Spring, Dressmaking Frances Lawrence

Man’s shirt in grey wool flannel from Simplicity 8753

Fine wool flannel, from a modern Simplicity pattern. Beautiful shirting fabric, even though few use it this way.

TOTAL TIME COMMITMENT: 18.5 hours (including toile)

Toile (without zip, buttons, lining, interior seam finishing, basting stitch removal or hemming): 7 hours

Cut out & transfer all pattern markings (both main fabric and interlining): 2.5 hours

Main construction: 5.5 hours

Lining construction: none

Finishings (hooks, hem): 3.5 hours


PATTERN CHANGES

None

SEAM FINISHING & DECORATIVE EXTRAS

Topstitch with regular thread & 2.8mm stitch length – lovely, very subtle

Rounded buttonhole – correct choice for fine/medium fabric


VERDICT & LESSONS LEARNT

I adored sewing with this fabric. And it finished up a dream. Will make myself a shirt in wool flannel, for certain.

Flat-felling the seams was easier than I expected and makes a very (unsurprisingly) flat finish on the inside, which I expect enhances the wear experience.

I couldn’t have been prouder of myself of my edgestiching on this make. On point. I’m improving.

Learnt a lot about buttonholing on this project. While certainly less effort than handbound buttonholes, doing them on the machine is not the most straight-forward task, and they can very easily go askew if you are just a tad too assertive when feeding the fabric through the machine.  

I don’t like the instructions for the interfacing on the inside of the button placket, but haven’t figured out a better option.


Read More
Wardrobe, Spring, Dressmaking Frances Lawrence Wardrobe, Spring, Dressmaking Frances Lawrence

Button-up box-pleat skirt from McCalls 7906

Lessons learnt from making a box-pleated midi skirt, in a midweight twill, using a Y2K pattern.

TOTAL TIME COMMITMENT: 8 hours

Toile: 3 hours

Cut out & transfer all pattern markings: 2 hours

Main construction: 7.5 hours

Lining construction: none

Finishings (hem): 4.5 hours

ADDITIONAL SEAM FINISHING & DECORATIVE EXTRAS

  • Overlocked each side of the side seam before stitching

  • Used a triple stitch for the deep hem, instead of changing to a topstitch thread

  • Rounded buttonholes

VERDICT & LESSONS LEARNT

I do not like this fabric – too bright, too stiff. I will not wear this skirt.  

Also, the fabric is waaaaay too heavy for this amount of box pleating. The area at the waist is particularly bulky and the facing has a tendency to roll outwards. The unusual thing here is that the suggested fabrics are Sateen, Chino, Cotton Blends and Twill. For me, this skirt must be made in a lightweight fabric such as poplin, shirting or lawn.

For all this box pleating and bulkiness, I don’t need pockets; adds too much bulk at the hip area.


Other Skirt Sewing projects

Read More
Wardrobe, Spring, Dressmaking Frances Lawrence Wardrobe, Spring, Dressmaking Frances Lawrence

A-line skirt in electric blue cotton twill from Vogue 7210

Midi skirt with contour waistband, using a Y2K Style pattern. Experimenting with a robust and stiff fabric for this design.

TOTAL TIME COMMITMENT: 8 hours

Toile: 3 hours

Cut out & transfer all pattern markings: 1 hour

Main construction: 2.5 hours

Lining construction: none

Finishings (hem): 1.5 hours

ADDITIONAL SEAM FINISHING & DECORATIVE EXTRAS

Each side of the seam allowance was overlocked before stitching

VERDICT & LESSONS LEARNT

A very easy thing to make but do not like this fabric – too bright, too stiff. Will not wear this skirt

Not a bad fit but could need a few tweaks for different fabrics as it sits just a tad low on my waist.

For a sturdier fabric might be better to taper the waist a little without changing the hips

For a finer or more delicate fabric, this is the correct fit

Read More
Wardrobe, Spring, Dressmaking Frances Lawrence Wardrobe, Spring, Dressmaking Frances Lawrence

Princess seamed dress with short puff-sleeves from 1980’s Style 4603 pattern

First time sewing princess seams, first time sewing with proper shirting fabric.

TOTAL TIME COMMITMENT: 37 hours including toile

Toile & pattern fitting: 15 hours

Cut out & transfer all pattern markings: 2 hours

Main construction: 9.5 hours

Lining construction, attachment and hemming: none

Finishings (attach buttons, make button holes, hem sleeve and hem skirt): 9.5 hours


PATTERN CHANGES

  • Deepened the scoop neckline

  • Changed the patch pockets to pockets concealed in the front skirt seams

SEAM FINISHING & DECORATIVE EXTRAS

  • Princess seams on bodice – overlock together

  • Armscye & attach skirt to bodice – overlock together

  • Skirt seams – overlock together

  • Shoulder seam – Overlock each side separately

  • Sleeve seam – Overlock each side separately

  • Facing edge – bias bind raw edge

  • Topstitch sleeve hem

  • Handworked buttonholes

 VERDICT & LESSONS LEARNT

This is my first princess-seamed garment, and I spent a loooooong time analysing the fit on the toile, pinching out excess and transferring the adjustments to the paper pattern. In the end, this amounted to removing some excess both just above and just below the waist to account for my hollows, a slight decrease in the shoulder width, and a slight tapering in at the underarm. This is probably the very first garment I have made so many fit adjustments to, and even though this process took quite a while, and the adjustments were really quite small, I am thrilled with the result. It fits me so well, especially around the shoulder and bustline, and hence, looks so lovely on me.

I liked working with the shirting fabric. The Panama weave is quite a loose airy weave, and I find the resulting fabric has that kind of floppy lived-in chic of linen, perfectly suited for wearing on a warm summer’s day.


Other Dress Sewing Projects

Read More
Wardrobe, Spring, Dressmaking Frances Lawrence Wardrobe, Spring, Dressmaking Frances Lawrence

A floral needlecord dress from 1970’s Style 1169 pattern

Third make with this pattern, following several refinements on fit and pattern instructions.

TOTAL TIME COMMITMENT: 17.5 hours

Cut out & transfer all pattern markings: 3 hours

Main construction: 12 hours

Lining construction: none

Finishings (buttons, hem): 2.5 hours


ADDITIONAL SEAM FINISHING, CONSTRUCTION NOTES & EXTRAS

  • Vertical interior seams – overlock

  • Raw edges on zip seam – overlock each side separately

  • Raw edges at gathered seam - overlock

  • Attach bodice facing to rest of garment – stitch-in-the-ditch

VERDICT & LESSONS LEARNT

This fine needlecord is surprising substantial, offering a slight bit of warmth for a Northern European spring summer. The length and amount of fabric also contributes to this, making it something I can wear more readily in England, for our temperate climate.  


Travel itineraries for Springwear

Read More
Travel, Spring, Europe, Spain Frances Lawrence Travel, Spring, Europe, Spain Frances Lawrence

Donostia–San Sebastián - a Spring itinerary for fashion and food

Balenciaga, pintxos and bar crawls. My itinerary journal for a long rainy weekend spent in San Sebastian, Basque Country, with a friend.


Itinerary At A Glance

  • 4 night independent itinerary for Donostia–San Sebastián and surrounds, based on flying from Manchester, in May

  • Highlights include pintxos food tour, dance theatre performance, the Balenciaga museum in Getaria and dinner at 1 Michelin star restaurant, Alameda.

  • Based on a two friends travelling, with a focus on leisurely outdoor and cultural activities, interspersed with time to just relax and soak up the atmosphere


Honest verdict

Does it live up to hype or expectations?

I would say I did have high expectations. There is a lot of hype around Donostia–San Sebastián. A major resort city and formerly the summer residence of the Spanish royal court; to say that this is a place under the radar would be false.

Luckily though, it hasn’t succumbed to too much tourism and maintains an authenticity, with a resident population who genuinely live and work here. We could tell that we were eating in pintxos bars alongside locals. The tours we took were thoughtful and warm, and the food was simply outstanding - again, in line with expectations of this being a ‘foodie’ destination.

From start to finish, the city is thoroughly recommended.

One area that did disappoint though, was the hotel. Basic, shabby, and trading off the view - not a place I would recommend.

Does the itinerary work for the trip?

Perfectly.

4 nights is a great way to enjoy San Sebastian, with plenty of time for wandering and pintxos. Having a mixture of pre-booked cultural activities with time to just wander makes the most of a long weekend. The car allowed us to make trips to places closeby to give us more options.

I would recommend staying in the city centre though (rather than on the outskirts as we did) and note that we had a lot of rain when we visited in May. It may not be immediately obvious that Spain might be quite wet, but this part of Northern Spain is so, and it did rather put a ‘dampener’ on the trip, so to speak. Perhaps better to visit summer or autumn for a chance at better weather.

Would I make another visit?

I would certainly visit the Basque Country again, though, I feel I have now seen enough of San Sebastián. My next trip to the Basque Country would be either as part of a tour of all the Northern Spanish regions, or as a tour across the Greater Basque Region including France and the Pyrenees.


WHEN

May


LIGHT & WEATHER

Moderate daylight. Wet. Cool. Overcast.

Sunrise: 07:01am - 06:31am

Sunset: 21:10pm - 21:41pm

17 hours of daylight


ACCOMMODATION

Mercure Monte Igueldo

5km to central San Sebastian

basic

inexpensive


TRAVEL MEANS

Flight & Car hire

Fly Manchester into Bilbao (BIO), which is about 100km or 1 hr driving from San Sebastian


SCHEDULE

Day 1

Fly in the morning, collect car, arrive and settle in

Day 2

Tour: Pintxos Lunch Tour with San Sebastian Food

Evening show: dance performance at the Victoria Eugenia Theatre

Day 3

Breakfast: found somewhere in the city - plenty of delicious coffee and cake places

Museum: Drove to Getaria to visit Museo Cristóbal Balenciaga (the Balenciaga museum), about 25km, 30 mins driving. Worth it.

Dinner: Pintxos bar crawl through the city

Day 4

Relax: breakfast, spend the morning chilling out

Wander the city: Small and compact, with a city beach - spent an hour or two wandering and soaking up the atmosphere

Dinner: at 1 Michelin Star Alameda - absolutely superb. Advance booking essential

Day 5

Travel home


Ideas for another visit

  • Take in San Sebastian as part of a tour of the Greater Basque Region, including Saint-Jean-de-Luz, Biarritz, Bilbao and the Pyrenees.

  • Visit Añana Salt Valley in Álava province. Visitors can take guided tours to find out about the traditional salt-making process and enjoy halotherapy treatments in the salt foot baths.

  • Take bike rides to see megalithic monument Sorginetxe, "House of Witches" , in Arrizala, Agurain, Cromlech Mendiluze and Dolmen de la Chabola de la Hechicera

  • Enjoy the natural saltwater swimming pools at Mutriku

  • Take in San Sebastian as part of a tour of all four of Spain’s northern coastal regions - Basque Country, Cantabria, Asturias and Galicia


Sewing projects for a Spring itinerary

Read More
Wardrobe, Spring, Dressmaking Frances Lawrence Wardrobe, Spring, Dressmaking Frances Lawrence

Cotton lawn dress from Givenchy 1970’s Vogue Paris Original 1950 pattern

Shortening a 1970’s Givenchy pattern I have worked with before, turning midi into mini, my journal on making this dress in Pima cotton lawn in a busy print.

TOTAL TIME COMMITMENT: 20.5 hours

Cut out & transfer all pattern markings: 5 hours

Main construction: 10 hours

Lining construction: none

Finishings (buttons, hem): 5.5 hours


ADDITIONAL SEAM FINISHING, CONSTRUCTION NOTES & EXTRAS

  • 4x side seams, armscye & pocket bags – bias bind together

  • Pocket-to-dress seam – French seam

  • Underarm – French seam

  • Shoulder seam – bias bind each side separately

  • Sleeve seam – French seam

VERDICT & LESSONS LEARNT

I find this fabric a bit ‘busy’ for my liking though I can’t pinpoint why………..I also think it really needs to be made in a plain fabric to really see those beautiful released tucks down the bodice.

VARIATION IDEAS FOR ANOTHER MAKE

  • Add a collar, turning the original mandarin collar into a collar stand?

  • Make in teal single wool crepe

  • Turn the sleeve into a half sleeve


Sewing Other Springwear

Read More
Wardrobe, Spring, Dressmaking Frances Lawrence Wardrobe, Spring, Dressmaking Frances Lawrence

A spring coat in moss green cotton-linen twill from 1960’s Simplicity 5984 pattern

There’s an absense of outerwear for spring that actually offers warmth but isn’t made from wool. My journal on making my first fully lined spring coat, with cotton flannel interlining for warmth.


TOTAL TIME COMMITMENT: 28 hours including toile

Toile (without buttons, lining, interior seam finishing, basting stitch removal or hemming): 5 hours

Cut out & transfer all pattern markings (both main fabric, facing and lining): 5 hours

Main construction: 11.5 hours

Lining construction: 1.5 hours

Finishings (buttons, button holes, hem): 5 hours


FIT ADJUSTMENTS

  • Tapered the shoulder seam at a slightly more sloping angle for a better fit at my (sloped) shoulder

SEAM FINISHING

  • No real seam finishing needed - lined garment

  • Attach collar neck edge to each other – stitch-in-the-ditch by hand

DECORATIVE EXTRAS & CHOICES

  • Contrast fabric for the pleat underlay, the facings and the button holes

  • Contrast colour for the topstitch thread

  • Omit topstitching at the collar and omit topstitching around the button holes


VERDICT & LESSONS LEARNT

The fit and length on this coat (the shorter version) is superb – just a very small bit of extra sloping at the shoulders was needed to tailor the fit perfectly to my frame.

I absolutely love this fabric – makes such a beautiful jacket with both structure and drape, and very very easy to sew.

I can now make bound button holes! Uncorded, but still – found a technique that works reliably. There are two key things to remember: 1. When cutting, make the side triangles as big as they can be 2. Sew the triangles to the buttonhole fabric in the same colour as the fabric, to prevent it being seeing through the underside of the buttonholes

I can also topstitch much better! I used Gutermann topstitch thread on top with a 90 topstitch needle, and regular all-purpose thread in the bobbin, and I found a stitch length of about 3 to be ideal – worked well!


VARIATION IDEAS

  • Make in blue and orange Ventile with taped hems and ribbed cuffs, for a more waterproof version

  • Make a version in a light colour with a dark topstitch


Other Sewing Projects from Vintage Patterns

Read More
Wardrobe, Spring, Dressmaking Frances Lawrence Wardrobe, Spring, Dressmaking Frances Lawrence

An A-line skirt in Designer’s Guild cotton duck

Experimenting with Designer’s Guild upholstery fabric………..I asked myself: ”how well can cotton duck be applied to dressmaking?”……..what I learnt

TOTAL TIME COMMITMENT: 10 hours

Toile: none

Cut out & transfer all pattern markings: 1 hour

Main construction: 6 hours

Lining construction: none

Finishings (hem): 3 hours

ADDITIONAL SEAM FINISHING & DECORATIVE EXTRAS

  • Added 4 rows of topstitching to each vertical seam on the skirt, mainly as a way to enclose the raw edges on the inside

  • Bias-bound hem

  • Bias-bound pocket bags

VERDICT & LESSONS LEARNT

I do not like the final product – fabric is easy to sew, but it’s far too stiff to wear.

Still not managing to fit the waistband correctly – this has turned out too big again at 30”. Need a better technique for fitting the waistband to ensure the finished garment is a perfect fit on me.

VARIATION IDEAS

I would like to try it again in a much more lightweight fabric (perhaps even a slightly sheer in a double layer?)


Other Skirt Sewing Projects

Read More
Wardrobe, Spring, Dressmaking Frances Lawrence Wardrobe, Spring, Dressmaking Frances Lawrence

High-waisted trousers in sage green twill from a 1970’s Vogue 1275 pattern

Journal of my total make time, lessons learnt and pattern adjustments.

TOTAL TIME COMMITMENT: 9 hours

Toile (without zip, buttons, lining, interior seam finishing, basting stitch removal or hemming): none

Cut out & transfer all pattern markings (both main fabric and interlining): 1 hour

Main construction: 6 hours

Lining construction: none

Finishings (hem): 2 hours


PATTERN CHANGES

  • Added a little extra flare from the hip down to the hem

  • Cut the waistband so that the gap and zip is located in the centre back rather than centre front

  • Add a cuff at the trouser hem

  • Removed pockets

SEAM FINISHING & DECORATIVE EXTRAS

  • Outside leg seams – overlock together

  • Inside leg seams – overlock together

  • Crotch – overlock each side separately


VERDICT & LESSONS LEARNT

These are great! Turning the waistband around, removing the pockets and adding more flare has made a big enough difference to the finished result that it feels like a very different pair of trousers from my caramel linens.

The cotton twill is a great application for this kind of garment – there is some drape in this fabric so it feels soft and moves nicely, but it also has some structure which adds drama to the flare and is handy in a trouser. I also absolutely had no need to line them.

They also felt very quick and easy to make.


Travel Itineraries for Autumnwear

Read More
Travel, Spring, Europe, Norway Frances Lawrence Travel, Spring, Europe, Norway Frances Lawrence

Bergen - an active itinerary for Spring

My imagined travel itinerary for 4-5 days in Bergen and the surrounding fjords. Biking, hiking and nordic dining


Why Bergen?

Its been on my list for a while - a second city renowned for being one of those ‘outdoorsy’ types. Might up our street.

I originally imagined this trip in December - picturing a snowy and cosy wonderland……..but this article disabused me of this idea. Apparently, the oceanic climate and presence of the sea and the mountains together cause plentiful rainfall but also gives Bergen a more temperate climate than its latitude might suggest. This is all further moderated by the Gulf Stream which means any snowfall melts quickly. Instead, I think a trip in May will be the most pleasurable, making the most of long days and (slightly) drier skies.

Bergen gained wealth and prominence as a major trade port and served as Norway's capital in the 13th century; nowadays it is Norway’s second-largest city, though small by many city standards at around 270,000 inhabitants which compares with Newcastle or Greater Norwich in the UK. Bergen is now a major cruise ship port and gateway to the Norwegian outdoors, most notably, the fjords. The outdoors, particularly the nearby mountains and waterways, characterise the city and the things it has to offer to tourists, with much in the way of hiking, biking and countryside-escaping opportunities.


Itinerary At A Glance

  • 4 night independent itinerary for Bergen, on the southwest coast of Norway

  • Based on flying in and out of Bergen from Leeds with a hop in Amsterdam.

  • Highlights include a combined rail-and-boat trip along the fjords, hiking the mountains that surround Bergen, hanging out at the UNESCO heritage Hanseatic Harbour

  • Based on a couple travelling, with a focus on leisurely cultural activities and hiking, interspersed with time to just relax and soak up the atmosphere


WHEN

May - the driest month on average with long daylight hours

Note though, the weather in this city is known to be very wet and changeable, so go with no expectations of great weather and don’t let the rain stop you, whatever you have planned


TRAVEL MEANS

KLM, from Leeds, changing in Amsterdam

Probably won’t need a car for this trip


ACCOMMODATION

My first choice would be to stay in a traditional white clapboard house, so iconic to this part of the world, though a great view of the city and its waterways could trump that. Below is my shortlist of viable contenders, with lovely Scandi design elements and a little outdoor space.


SCHEDULE

Day 1

Arrive: Try to arrive in the morning; settle in and collect a few groceries

Walking Tour: This Walking tour of Bergen looks to cover the more authentic aspects of the city, such as what it is like to live there and the issues facing Bergen in this present moment.


Day 2

Hike: Book this guided hike between two of Bergen’s most famous mountains - Floyen and Ulriken.

Dinner: Book at Bryggeloftet for a traditional dining experience, and I’ve been reliably advised that a window seat should be requested.


Day 3

Flåm railway: Combine a cruise along Sognefjord (Norway's longest and deepest fjord) with the famous Flåm Railway and Bergen Railway on this excursion. Alternatively, this private tour takes you biking, RIB riding and a trip on the Flåm railway.


Day 4

Relax

Dinner in the Mountains: Book the Ulriken by Night tour with FjordTours which is a combo tour with a the cable car to the top of Mount Ulriken (the highest of Bergen’s Seven Mountains), and dinner in the restaurant Skyskraperen.


Day 5

Travel home: try to depart in the morning


  • In this city, better to plan that whatever you are doing, you are doing come rain or shine, as rain is very common. For absolute last resort indoor activities:

    • Permanent indoor Fish Market (where there are several fish restaurants also)

    • KODE Art, Craft & Design museum - among Scandinavia’s largest art museums

    • Dinner at Lysverket

    • Bergenhus Fortress Museum and walk the fortress trail for a look at the history and nature in the area. Visit on special national holidays to watch the dramatic gun salutes.

    • Bergenhus Bryggeri to try some of the many microbrews available.


FOOD & DRINK - SPECIALITIES & FOOD CUSTOMS

  • Not known for being a cheese producing nation but apparently in the World Cheese awards in Bergen in 2018, the overall winner was fanaost from the producer Ostegården, just south of Bergen. I’d try and have a taste.

  • Fiskesuppe is a staple of Norwegian traditional grub - not to try it would be rude.

  • Raspeballer - boiled potato dumplings. In Bergen, they are often served with Vossa sausage from the neighbouring village of Voss.


Other Active Itineraries

Read More
Wardrobe, Spring, Dressmaking Frances Lawrence Wardrobe, Spring, Dressmaking Frances Lawrence

A cropped jacket in cotton twill from 1980’s New Look 6007 pattern

Using a 1980’s cropped suit jacket pattern as the starting point. Details on total make time, adjustments, seam finishes, and lessons learnt.

TOTAL TIME COMMITMENT: 16 hours including toile (note this jacket is self-lined in the same fabric)

Toile (without buttons, lining, interior seam finishing, basting stitch removal or hemming): 6.5 hours

Cut out & transfer all pattern markings (both main fabric and facing): 2.5 hours

Main construction: 7 hours

Lining construction: none

Finishings (buttons, button holes, hem): none


PATTERN CHANGES

I added a waistband and cuffs – attach to the outermost layer, fold to the inside then stitch-in-the-ditch from the outside

Since I didn’t want to make this with shoulder pads (which the shoulder is designed for) but still wanted a ‘slouchy’ ovesized shoulder fit, I reduced the shoulder length by 2.5cm at shoulder head, grading down the armscye by 15cm

Since this pattern has no lining, I chose to self-line the bodice by simply cutting extra pieces of the main bodice, and applying them in reverse. This very neatly hides all the interior raw edges

SEAM FINISHING & DECORATIVE EXTRAS

  • Armscye – overlock together


VERDICT & LESSONS LEARNT

This is a fantastic loose fit on me, and is excellent without the buttons. It’s a brilliant summer jacket option in the cotton twill fabric – serves all the same purposes as a denim jacket but a bit different.

These sleeves were incredibly difficult to set in, but I managed it without a single pucker. I took a very long time gathering and pinning in place before sewing, then sewed from the side of the gathers to control that better. The extra careful effort was worth the smooth result.

One thing to note on fit, is that I still think the arms are a little too long for me, which is disappointing for a made-to-measure, and I think it is because when ‘sizing them up’ before sewing, I hadn’t pressed the cuffs down, so they were a little ‘springer’ and higher before sewing and pressing.

I think the cuffs and waistband I added were GENIUS – they really finish this jacket off for me, much more in-keeping with my style at the moment


VARIATION IDEAS

Add just two buttons at the waistband, double-breasted style single row of buttons


More 1980’s style

Read More
Travel, Spring, Europe, UK, England Frances Lawrence Travel, Spring, Europe, UK, England Frances Lawrence

Central Cornwall - an active mid-week stay in Spring

Itinerary journal of my springtime holiday in Cornwall. Where we ate, what we saw and how we enjoyed biking around the countryside.


Itinerary At A Glance

  • 4 day independent itinerary for Central-Eastern Cornwall, based on driving from Leeds, in April

  • Highlights include Charlestown, Tintagel castle, dinner at Rick Stein’s, biking the Camel Trail and of course, eating famous Cornish treats like the pasty and cream tea

  • Based on a couple travelling, with a focus on leisurely outdoor and cultural activities, interspersed with time to just relax and soak up the atmosphere


Honest verdict

Does the place live up to expectations?

The only reason I booked this was that the pandemic forced me to consider staycation options. I myself have never paid attention to Cornwall, resistant mainly because it felt like too ‘obvious’ a choice, and since novel and unfamiliar cultural experiences is one of the main reasons I enjoy travel, holidaying on UK soil is usually very low down the list of options. Needs must in this case. Research turned up interesting historical sites, strong food culture and a countryside ideal for exploration by bike which is all the typical hallmarks of a destination we enjoy, so I booked.

Despite this, I still felt a bit bratty about it before we went; like I was being punished and not being allowed to travel abroad so this was like a version of being grounded…………..but having been and come back, I have completely amended my viewpoint.

Cornwall is not famous for nothing! I think its reputation a holiday destination is well-deserved - the countryside is attractive, there is plenty to see and do wherever you are in the peninsula and the food is great. I found the North Coast less attractive than the South Coast. It also felt like an island to me when we were there; the sea is almost always in view, which adds to the illusion of being ‘away’.

Turns out, staying in the UK can be just as enjoyable a holiday as going abroad, especially if the purpose is to just relax and enjoy some simple pleasures.

Did the itinerary work for the trip?

Cornwall is a very very long way from Yorkshire, so travelling such a distance means a weekend is really out of the question.

4 nights felt spot on for us - this was my Mum’s suggestion and one I will use again - 7 full nights would probably feel like too much for us in the UK.

She also recommended we stay Monday to Friday which was genius; you get the weekend before and after which both gives you time to organise yourself and also sort of ‘elongates’ the holiday into still feeling like a full week off work.

Side bonus is that Mon-Thu rates are oftentimes a touch cheaper than the weekends.

We had a mixture of activity, culture and history; and there wasy plenty more to do besides where we got to.

Would I make another visit?

In short, despite my reservations, I would, and probably will, go back.


WHEN

April

Very end of Spring


LIGHT & WEATHER

Long days, likely warm (not hot)

Sunrise: 06:56am to 05:57am

Sunset: 19:52pm to 20:38pm

14-15 hours of daylight


TRAVEL MEANS

Car & Bike

Driving from Yorkshire to Cornwall, with an overnight rest-stop in Bristol on the way down. About 6.5 hours each way.

Bike for activities whilst there.


ACCOMMODATION

We stayed in this Airbnb

This place was marvellous - very rurally located, luxury and modern, extremely well suited for a couple, with a fabulous little Japanese-style deep-seated bath and outdoor barbeque. Highly highly recommended.


SCHEDULE

DAY 1

Drive to Bristol; overnight in a Travelodge

DAY 2

Drive from Bristol, settle in

Biked The Camel Trail: a disused railway line that has been converted into an easy, mostly flat, bike trail

Cream tea at Tim’s Place in Wadebridge: very enjoyable and very attentive service (particularly for a cafe - felt more like proper restaurant waitress service)

Dined on the outdoor roof terrace at Rick Stein’s The Seafood Restaurant - this was when outdoor eating was the only option and admittedly, it was a bit too chilly to really fully enjoy it but we were so thrilled just to be in a restaurant, we still had a good time. Food, service and setting were all lovely.

DAY 3

Biked from Charlestown to The Lost Gardens of Heligan along Route 3 of the National Cycle Network - about 1hr each way. Enjoyed a leisurely afternoon wandering the ground and gardens before returning to Charlestown

DAY 4

Visited English Heritage site, Tintagel Castle. It is deservedly famous this place - a very large and imposing ruin of a castle perched on the north coast and spread over a large area. We spent a good few hours walking around imagining what it would have been like hundreds and hundreds of years ago. Recommended, especially as an off-weather day (which we had) - the blustery overcast and changeable weather just added to the atmosphere.

DAY 5

Had breakfast at St Kew Farmshop: this was KNOCKOUT!! Its a place for locals, so well off the tourist trail and you need a car to reach it, but it is worth it. Cafe and Farmshop combined, we had a delicious and healthy breakfast of pimped-up mushrooms on toast and a sausage-cheese English Muffin, and purchased local beef steak and asparagus for a barbecue at our accommodation later in the stay. They also have a lovely outdoor seating area looking over a small garden. Highly highly recommended

Wandered around Fowey (pronounced ‘foy’): a delightful little town on the south coast filled with independent shops and outlets. Just meandered the steep and narrow streets, drank coffee, soaked up the vibe, perused the little shops and admired the street art. If I was to recommend a place to stay in Cornwall, this would be it - the nicest town we visited on our stay

Ate freshly baked Cornish pasties from both Malcolm Barnecutts in Wadebridge, and Sarah’s Pasty Shop in Looe - both excellent. Controversially, the Cheese & Onion was my favourite

DAY 6

Drive home


Ideas for another visit

  • Stay in Falmouth for a bit of an arty ‘city break’

    Stay in Penzance for close proximity to Lands End and access to the Scilly Isles - itinerary here

    • Visit the Museum of Global Communications in Porthcurno - apparently, in 1870, the first international telegraph cable was brought ashore at Porthcurno, connecting Britain to India and later other parts of the British Empire. By the start of World War II, Porthcurno was a critical hub for allied communications with 14 cables coming ashore, carrying some 70% of all communications. Looks fascinating

    • Book in to see a performance at The Minack Theatre - an open air theatre on the cliffside overlooking the sea

    • Visit Tremenheere Sculpture Gardens near Penzance

    • Go to The Eden Project - on everyone’s list really, but unfortunately closed when we visited

    • Visit Nancarrow Farm for one of their famed Feasts or Sunday Lunch with home-reared organic meat


Summer Sewing projects for a UK staycation

Read More