


Choc-Chip Cookies
Recipe for choc-chip cookies, using a blend of dark and milk choc chips, and three types of sugar for optimum mix of crunch and chew.
BATCH SIZE
Makes about 15 cookies. You can bake all right away, or keep some dough in the fridge for baking a few at at timeTOOLS
Other than the typical kitchen equipment, to make these, you need:
a flat baking sheet for baking
INGREDIENTS
180g strong white bread flour
½ tsp baking powder (not bicarb of soda)
¼ tsp fine salt
115g unsalted butter, softened
75g caster sugar
40g light soft brown or light Muscovado sugar
35g demerara sugar
1 large egg (about 65g)
Seeds of 1/2 vanilla pod or ½ tsp vanilla extract/paste
170g Guittard chocolate chips (half dark, half milk is nice)
Zest of 1 large orange (optional)
SUBSTITUTING!
Flour - you can easily substitute plain flour for bread flour here. The bread flour just has a higher protein content, adding that touch more ‘chew’ to the finished result, but you will still get a great cookie with plain flour too.
Butter - I often replace the unsalted butter with salted butter, and when I do, I omit the salt. To make it dairy-free, Stork or any other vegan block fat can work too, though it does change the flavour a bit.
Sugar - the combination of different sugars is the result of my experimenting, giving a result between crunchy shell and gooey interior, but its not a big deal if you only have one or two of them. Just keep to the overall quantity of sugar in the recipe, and substitute for other sugars to use what you have.
METHOD
Weigh out dry ingredients - Weigh and sift the flour, baking powder and salt into a bowl.
Cream butter & sugar - Cream the butter and all sugars together until light and fluffy – this will take about 5 minutes with an electric whisk on high speed.
Add wet ingredients and flavourings - With the whisk on slow, add the egg and vanilla extract. Zest the orange directly over the mixture if you are using it. Fold in the flour and chocolate chips with a metal spoon, then your hands. By the end you should end up with quite a soft and tacky dough that will be tricky to handle.
Form & chill dough - Flour the surface with no more than 1 tbsp flour and turn the dough onto it, forming into a log, about 25cm x 5cm. Then either wrap in clingfilm or place in an airtight container and chill for at least 2 hours until firm.
*************** WAIT 2 HOURS **************
Cut cookie dough - Using a serrated bread knife and a ruler, make slices from the log that are about 1-1.3cm wide - the below timing is calibrated for this size of cookie. Space them about 1 cm apart on the trays – they don’t really spread much.
NOTE! It may seem pedantic to measure out the cookie dough but it is the best way of matching the size to what I intend, and therefore the below timing should produce the correct result. Cookies are so small that even 10g less and 1 minute longer can change the end result quite a lot.
Bake - Bake at the bottom of the oven for:
12-13 minutes for a soft-bake cookie (they should look very lightly browned at the edges, but overall, still quite pale)
14-16 minutes for a cookie with a distinctly crispy shell, and firmer interior (they should look browned all over)
They will still seem a bit puffed up and somewhat soft when you take them out, but they will firm up quite a lot as they cool, and also deflate slightly, which I think gives that classic ‘look’ of a soft-bake cookie.
Cool - Remove them from the oven. Let them cool for 5 minutes on the baking sheets and then transfer the cookies to wire racks to cool, at least a little, before eating. They are absolutely delicious warm, when they will be at their softest, and they will firm up as they cool, though they should retain the gooey interior for up to 1 day after baking.
STORAGE & FREEZING
Like most biscuits, once baked, these will keep very well in an airtight container (with a few sugar cubes for company but never a cake) for about 4-5 days. Not as fresh or gooey as right after baking, but still delish.
These also freeze excellently once baked.
You can store the raw cookie dough log in the fridge for about a week, just slicing off as many as you want to bake.
If you can bear to wait, try refrigerating the raw cookie dough for 24-48 hours before baking. During this time, some of the starches in the flour will begin to break down into sugars. The result will be cookies that are chewier, more deeply coloured and with a toffee taste.

Stockholm - a workcation in Autumn
A work-meets-play autumn break in Stockholm. How we enjoyed a workcation trip amidst falling leaves and the last of the long days for the year.
Itinerary at a glance
5 day independent itinerary for Stockholm, based on flying in and out of Leeds in October
Highlights include mushroom foraging experience, golden sun slanting through golden leaves, baked goods, an ice hockey game and an in-depth look at the female founder of Svenskt Tenn, Estrid Ericson.
Based on a couple travelling, with a focus on leisurely outdoor and cultural activities, interspersed with time to just relax and soak up the atmosphere


Honest verdict
Did I enjoy the holiday? Does the place live up to expectations?
Just like our last trip to Sweden, Stockholm exceeded our expectations. Compared to London, and in fact, the overall busy-ness of the UK, it is hard to credit that Stockholm is the capital city. So chilled. None of that pavement overcrowding nonsense. No wrestling to enter or exit the metro. Hardly a queue anywhere. Such a relaxing city, and a relaxed place to spend a few days. The nature and water is also everywhere, which adds to the tranquility.
Did the itinerary work for the trip?
Absolutely. We are experimenting with workcation formats, and this one worked. Getting to extend a city break by a few working days whilst there really lets us slip into the vibe of the city and get to know it far better than can be managed on 2 or 3 short and packed days.
Would I make another visit?
Would I…………..we could live in Sweden. Would love to see the city in both winter and spring, however, there isn’t the same volume of things to do in Stockholm as compared to some of Europe’s other capitals, so my suggestion would be to plan itinerary with 2 or 3 days’ worth of sightseeing, which will have you see a good chunk. It would be a great stop point for a longer road trip around Sweden.

WHEN
Mid-October
Autumn foliage
Cool to cold, bright golden sunshine (just as likely to get wet and grey)

TRAVEL MEANS
KLM, from Leeds, changing in Amsterdam
Fast train from the airport to the city centre. Throughout the city, we relied on walking and a little of the underground.

ACCOMMODATION
We stayed in this Airbnb
SCHEDULE
Day 1 - Tuesday
Travel in the morning
Settle in
Grocery shopping & Late Lunch - Östermalms Saluhall
Day 2 - Wednesday
Work
Svenskt Tenn exhibition “ A Philosophy of Home”
Evening ice-hockey game - Ice hockey is probably the team sport most closely associated with Sweden, with the most prominent clubs in Stockholm being Djurgården and AIK. The ice hockey season starts in September and lasts to March and Stockholm has a couple of notable ice hockey rinks:
Hovet: Originally known as Johanneshovs Isstadion, Hovet is one of Stockholm’s oldest and most iconic ice hockey arenas and is home to AIK Hockey and Djurgården Hockey.
Avicii Arena: Previously known as the Ericsson Globe and Stockholm Globe Arena, this arena is commonly referred to as “Globen” in Swedish. It is a major venue for ice hockey, concerts, and other events. Closed for modernisation until 2025
Book tickets here
Day 3 - Thursday
Work
Day 4 - Friday
Wandered Stockholm on foot
VasaMuseet - home of a 17th century warship
Prince Eugen’s art collection at Waldermarsudde - Since 1948, Waldemarsudde has been open to the public, allowing visitors to explore Prince Eugen’s extensive art collection and his beautifully preserved home. Obligatory cafe on site. Closed Mondays, late night opening Thursdays until 8pm
Evening Meal at Meatballs For the People - delish, and highly unusual. Had the Elk meatballs against a backdrop of Y2K RnB party choons. Class.
Day 5 - Saturday


Day 6 -Sunday
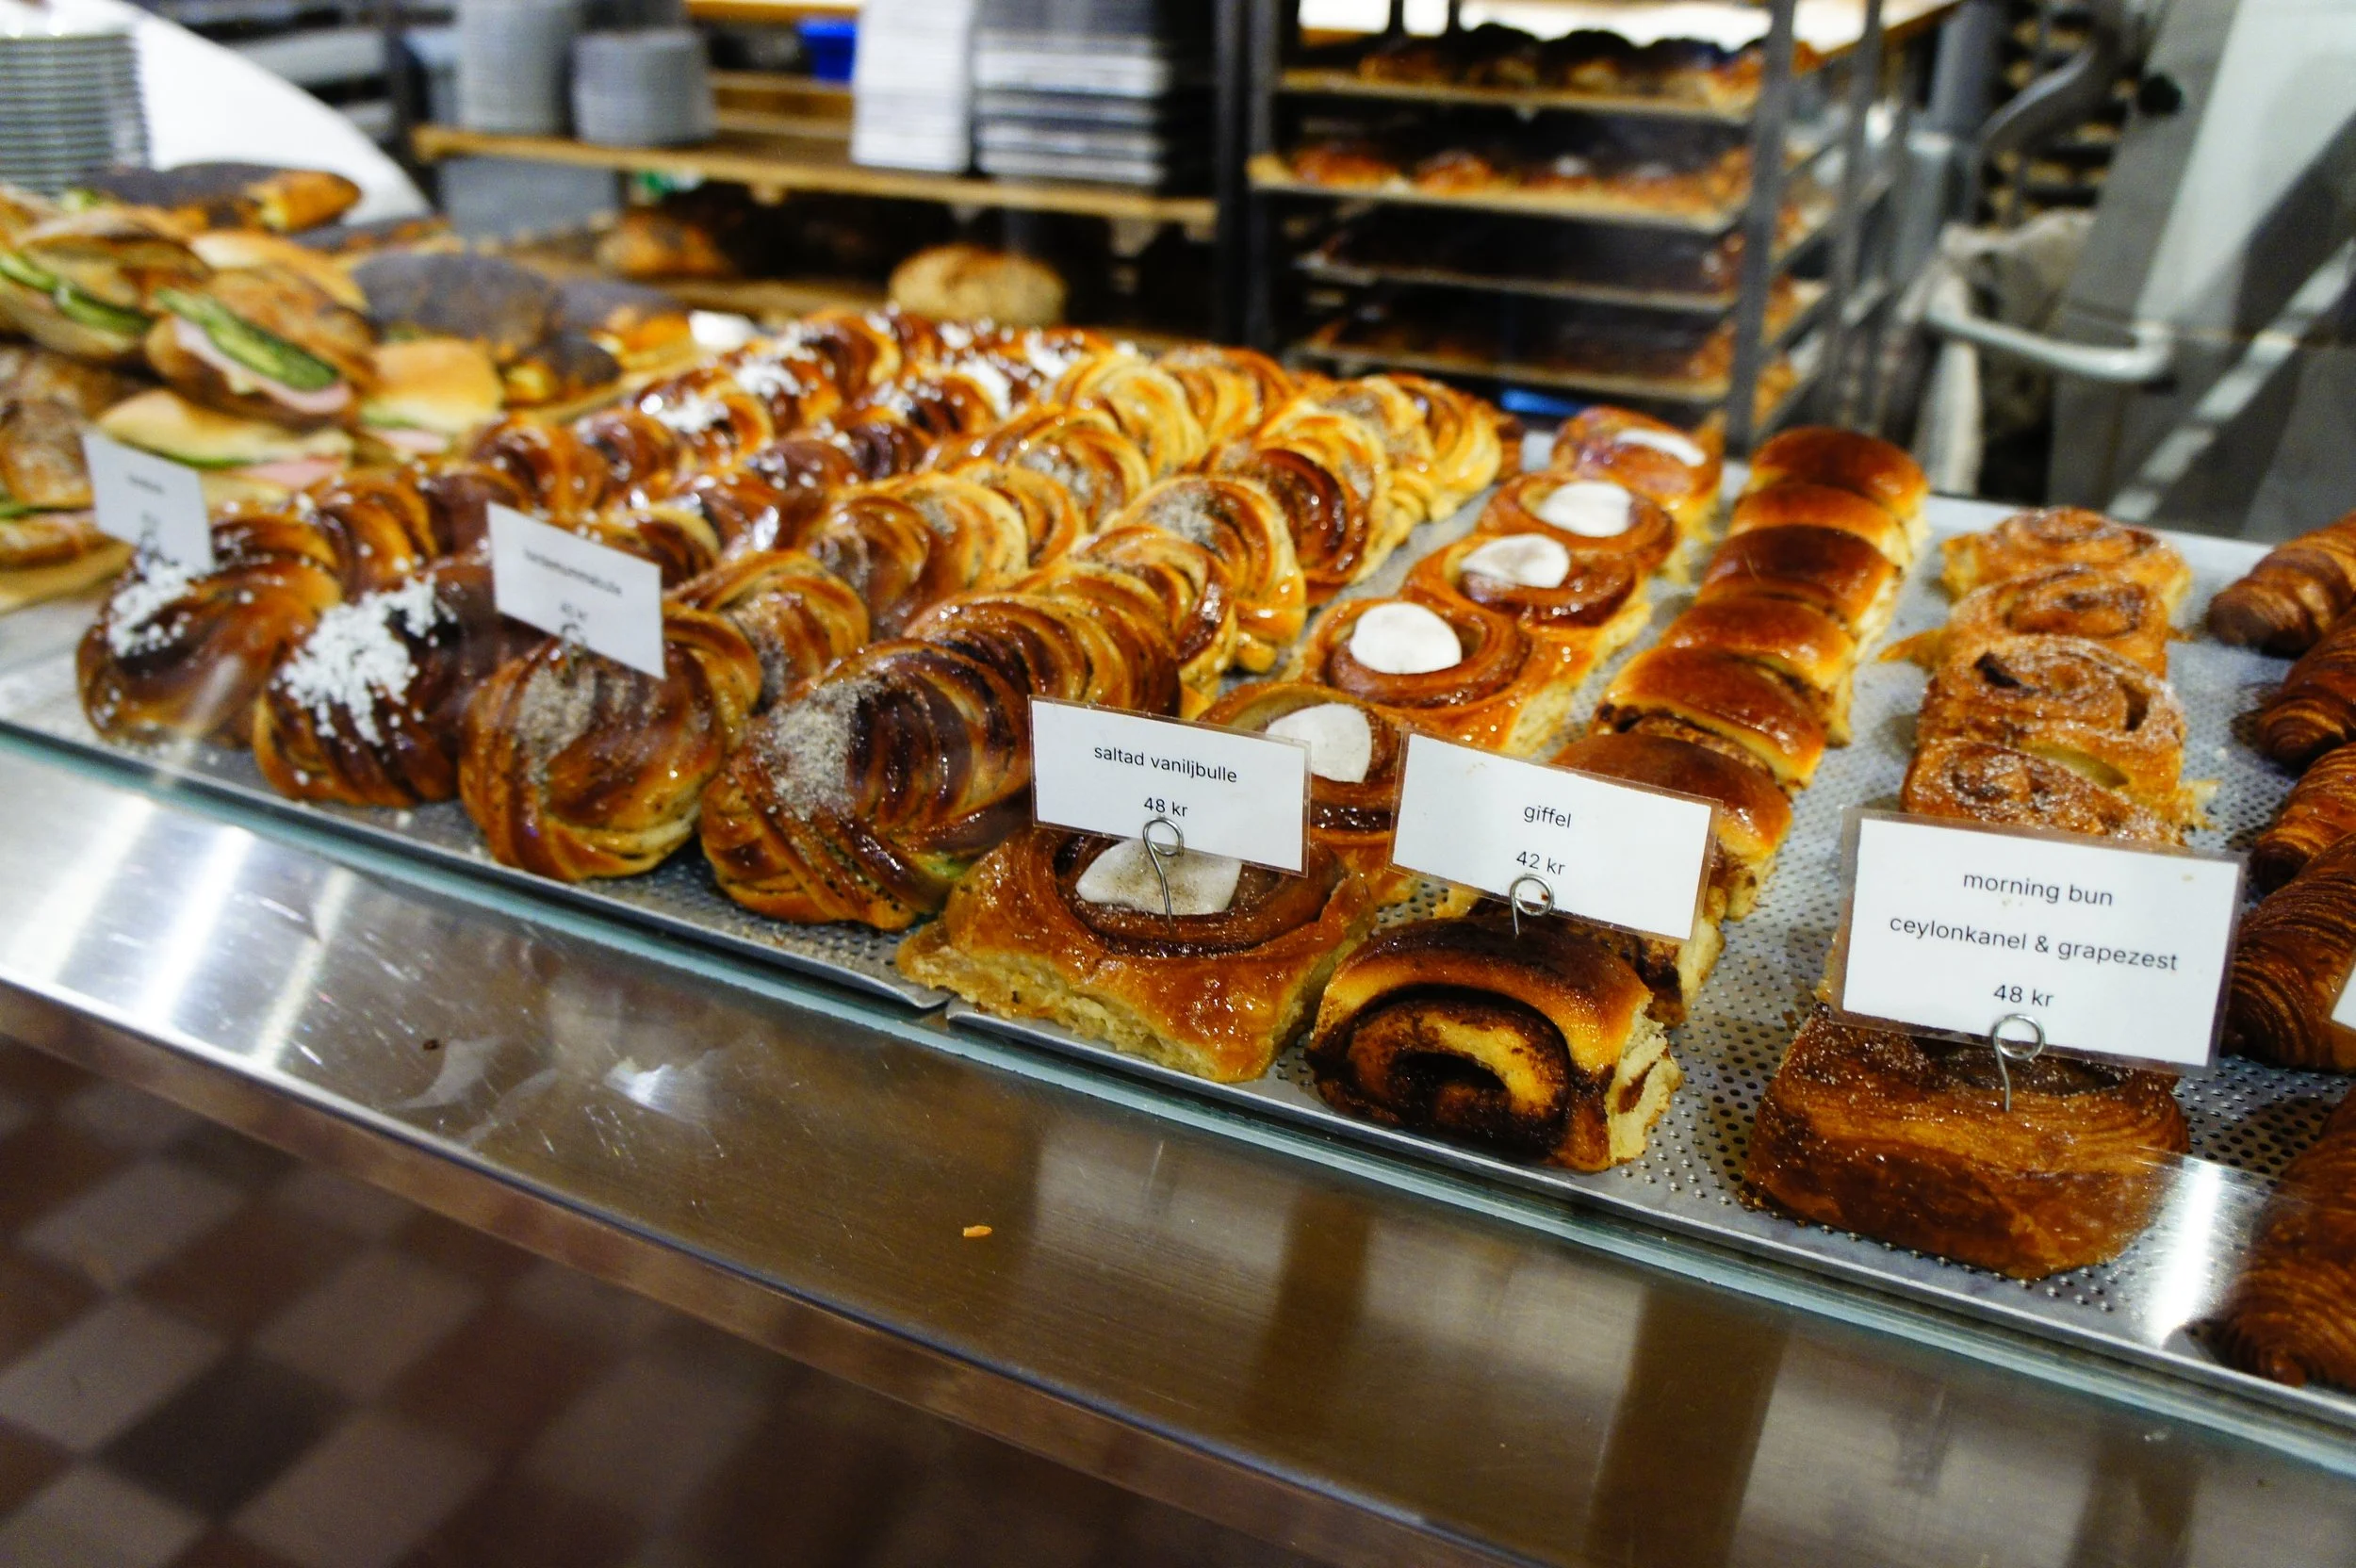
Breakfast at Stora Bageriet - Just around the corner from The Royal Dramatic Theatre is the entrance to the bakery where breakfast and light lunch is served. We first went on another day and there was a queue out the door………….when we returned on our final morning, arriving just after 8am, we knew why. Had the most delicious Salted Vanilla roll………….
Travel home
Ideas for another visit
-
Stay a couple of days on Grinda Island in summer - accessible from Stockholm by a 1 hour fast boat from Vaxholm, this island is the home of a traditional inn, where you can relax and enjoy the archipelago’s slow pace of life for a few days
-
The light festival in Brunnsviken - Join locals in early November, to take part in a procession of lit torches to bring illumination to the start of the dark season
Stockholm Jazz Festival - Happens annually, in the middle of October
Walking Tour - https://www.viator.com/tours/Stockholm/Unique-walking-tour/d907-73361P1
Ghost Walk - runs 4:30pm to 6:00pm most days. Options in Gamla Stan or Sodermalm
Guided tours of the Riksdag (Swedish Parliament) - Each day between September and June there are free tours for 28 people. The tours are in English and start at 1:30pm
-
Kanelbullens dag (Cinnamon Bun Day) is celebrated on October 4th each year.
September Sunset at Restaurang Slipen - If you prefer a sundowner to breakfast, at Slipen, you can also sit by the jetty in the early evenings and have a glass of wine and look out over the water while the sun sets over Beckholmen. In my view, September is the month for sunset’s in northern Europe, with the sun starting to dip and paint the sky with colour around 7:50pm in early-September up to 6:25pm in late-September
Other October Itineraries


Shortbread
Recipe for plain buttery shortbread, topped with crunchy sugar. Tips for that ‘short’ crumbly texture you are aiming for.


Shortbread is easy. So easy. Anyone can make shortbread and there is absolutely no need to buy the ready-made stuff, which tastes not even half as good. It is so easy that I frequently make it while I’m cooking and waiting for something to finish.
Two tips.
One - use a food processor to cut in the butter. This is both faster than rubbing in with your hands, and produces a better, ‘shorter’ texture. Removing the heat of your finger tips keeps the butter as cold as it can be, which is the main factor for that ‘short’ crumbly texture you are aiming for.
Two - replace regular caster sugar with vanilla sugar, for a subtle extra bit of flavour. Vanilla sugar is an easy USU for spent vanilla pods.
PORTION SIZE
Makes about 20-24 small shortbread biscuits
TOOLS
Other than the typical kitchen equipment, to make these, you need:
a food processor
20x20cm square cake tin with loose base, 6cm deep
a cooling rack
INGREDIENTS
200g plain flour
¼ tsp fine salt
40g ground rice
75g vanilla sugar or caster sugar, plus extra for dusting
175g unsalted butter, chilled
METHOD
Blend ingredients - Weigh all the ingredients straight into a food processor. Blend until you have a texture of wet sand.
Prep dough for baking - Line the bottom of a square 20cm x 20cm cake tin. Tip the shortbread mix straight into the tin and press down with your hands – it will be very crumbly but should merge together with the weight of pressing it. Gently smooth the top with the back of a spoon so you have a fairly even depth throughout. Chill in the fridge for about 1 hour.
**************** WAIT 1 HOUR ****************
Prep oven - Heat the oven to 140°C fan, 160°C regular.
Bake - Bake in the centre of the oven for 35-40 minutes. It should be lightly tinged gold when done.
Finish - Remove from the oven and right away, run a knife around the edge and cut into equal sizes using a sharp knife and cutting all the way through to the bottom. Dust liberally with caster sugar and leave to cool before removing
**************** WAIT 30 MINS TO 1 HOUR ****************
STORAGE
Store the shortbreads in a cool, airtight place, but not in the fridge. They keep well for a few weeks.
The shortbread can also be frozen for up to 3 months. They will defost in 10-30 mins.

Puff-sleeve midi dress in khaki green linen-cotton twill from 1970’s pattern
Fourth make with this pattern, following several refinements on fit and pattern instructions.


TOTAL TIME COMMITMENT: 20 hours
Toile (without zip, lining, interior seam finishing, basting stitch removal or hemming): none
Cut out & transfer all pattern markings: 3 hours
Main construction: 11 hours
Lining construction, attachment and hemming: none
Finishings (hem, enclose zip): 2.5 hours
Applying studs: 2.5 hours
Fabric type
Cotton-linen twill
Fabric weight
estimate 250-300gsm


ADDITIONAL SEAM FINISHING, CONSTRUCTION NOTES & EXTRAS
Overlock each edge of skirt pattern piece before construction, press open
Overlock raw edges together at gathered tier seam
Overlock raw edges separately before construction on zip seam
Attach bodice facing to rest of garment using stitch-in-the-ditch
VERDICT & LESSONS LEARNT
For a centred zip, I must not sew the whole thing around in one continuous line - this is what made the top of the zip and the seam go out of alignment
Travel itineraries for Autumnwear


Penzance - biking, brunching and lido-bathing in blackberry season
Spending a spell in Penzance, in late summer. Blackberries, biking, brunch and bathing.
Itinerary At A Glance
4 night independent itinerary for Penzance and surrounds, based on driving from Leeds, in August
Highlights include Saltwater & Geo-thermal lido, dinner at a harbourside fish restaurant, Museum of Global Communications in Porthcurno and a day trip to the Isles of Scilly
Based on a couple travelling, with a focus on leisurely outdoor and cultural activities, interspersed with time to just relax and soak up the atmosphere


Honest verdict
Does the place live up to hype or expectations?
The English seaside can be rather a disappointment to me - I’m talking the seaside towns made popular in the Victorian era that have now descended into a recurrent cheap theme of tacky shops, rickety fairground rides, fish & shop shops, arcades and absolutely zero culture worth speaking of.
I wasn’t necessarily expecting Penzance to be this, but you never know with an English seaside town……..there is always the risk………..Penzance was therefore an absolute surprise. What saves it, I think, is that it is a working harbour town, saved from the fate described above, by having actual industry instead. This isn’t a town built on tourism, its a town built on fishing.
In both Newlyn (where we stayed) and in Penzance, we encountered lots and lots of independent shops and eateries, a friendly and relaxed vibe.
Did the itinerary work for the trip?
4 days was spot on. Would have been even better to have been able to use the location as a jump off to the Isles of Scilly, but alas, this wasn’t meant to be (see note on schedule below).
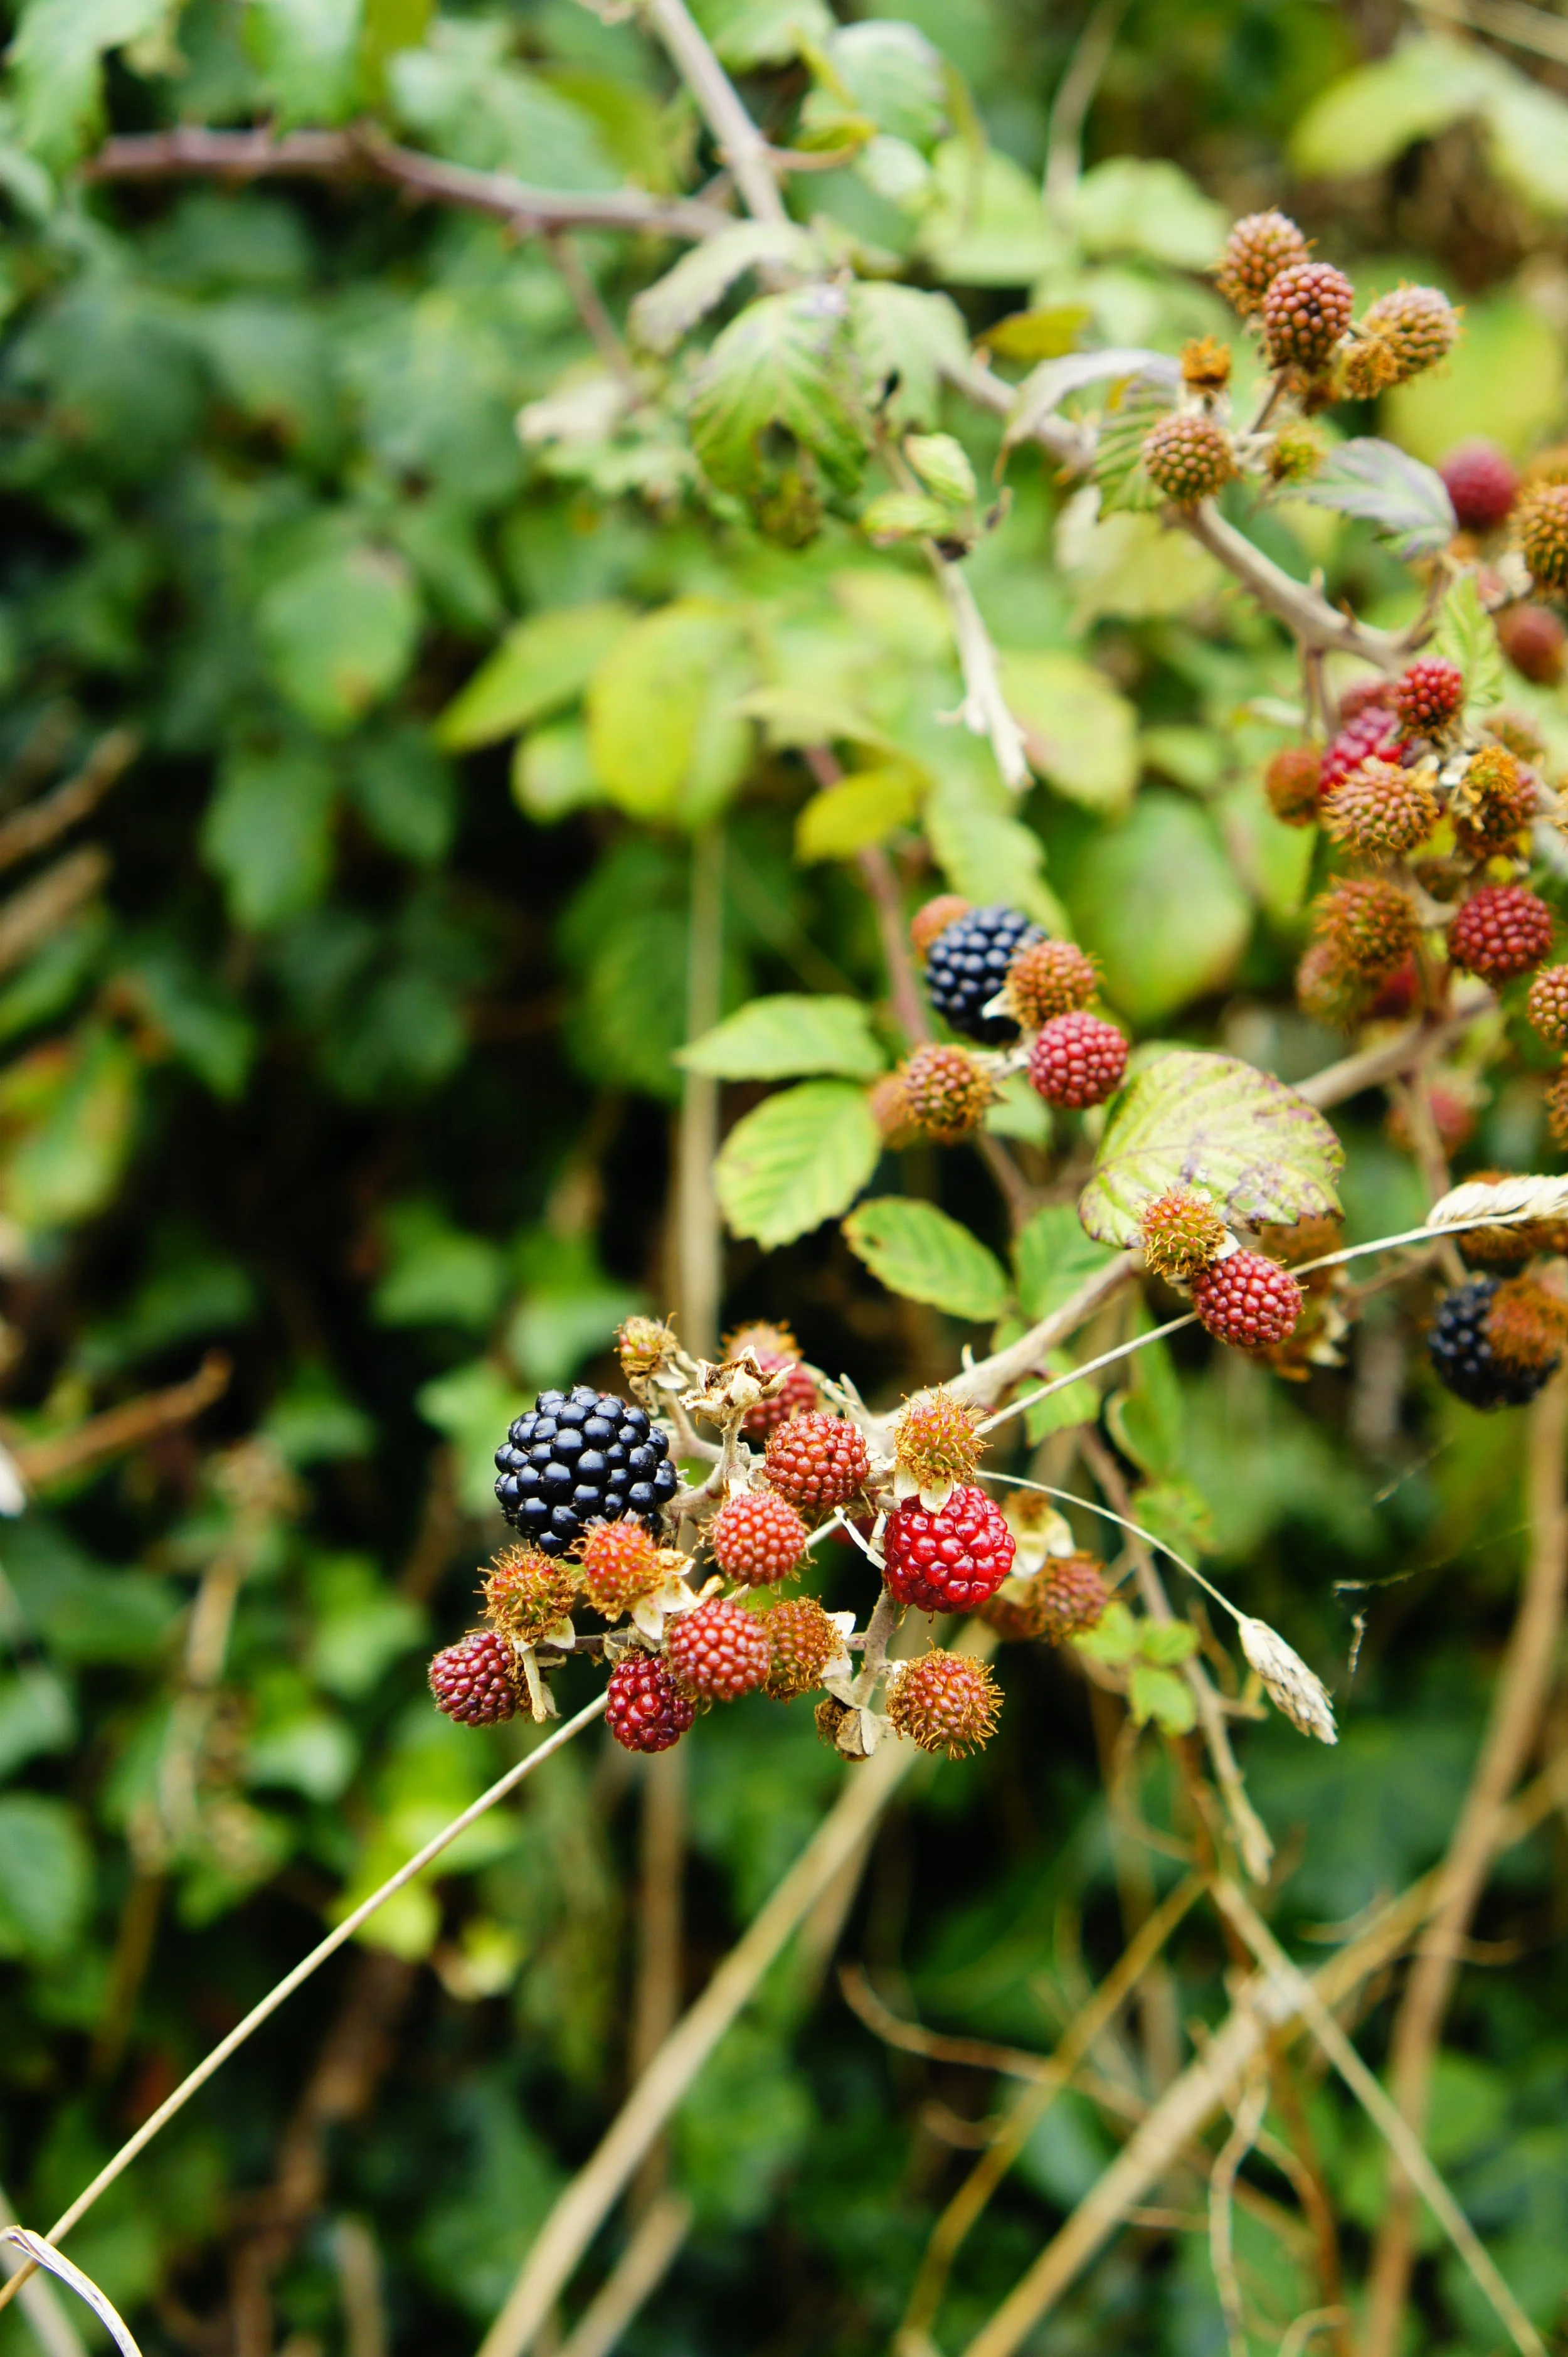
The riding is wonderful, but also challenging - we encountered multiple climbs in excess of 10% and same for the descents. This is not riding for the fainthearted, but we were rewarded by regular stops to graze on the ripe and fragrant blackberries that were fruiting in the hedgerows along the side of the road.
The one thing I will say is that this drive was a looooooooooong way from Yorkshire - it took 9 hours in the end due to bits and bats of roadworks, plus some accidents. I would say that the fact we were there in the height of school holiday season - August - contributed to this experience, so would suggest that if you can, make a visit outside these times, or fin som way to break up the journey. No matter when you go, it is at least 7 hours to drive there, and navigating the busy road network through the middle of England is unlikely to go smoothly.
Would I recommend it? Would I make another visit?
Can definitely recommend it, though for us personally, one trip is likely enough. Maybe we’ll go back in another 10 years.
WHEN
August
This is high season for Cornwall, with the kids being off school. Be sure to book early for best availability.
We got warm (not hot), with one rainy day. Expect changeable weather at any time, including strong sun, rain, mist, fog and wind.

LIGHT
Long days
Sunrise: 05:51am to 6:36am
Sunset: 21:05pm to 20:08pm
16 hours of daylight

TRAVEL MEANS
Car & Road bike
Driving from Yorkshire to Cornwall should be about 7 hours each way but expect more for traffic issues.
Road bike for activities while there.
ACCOMMODATION
This rental on Booking.com
1.5 miles to central Penzance
luxury and modern
well suited for a couple
free parking
outdoor space
SCHEDULE
Day 1
Drive, start in the morning, collect groceries, arrive and settle in
Day 2
Bike ride: Round trip, 25km, 350m climbing. Newlyn-Mousehole-Sancreed-Heamoor-Penzance-Newlyn.
Dinner: in the flat
Day 3
Relax: make breakfast, spend the morning chilling out
Bike ride: Round trip, 40km, 580m climbing. Newlyn-Mousehole-Pourthcurno-Lands End-Sennen Cove-St Buryan-Paul-Newlyn.
Visited the Museum of Global Communications in Porthcurno: in 1870, the first international telegraph cable was brought ashore at Porthcurno, connecting Britain to India and later other parts of the British Empire. By the start of World War II, Porthcurno was a critical hub for allied communications with 14 cables coming ashore, carrying some 70% of all communications. A fantastic place to visit. Really tells the story of the pioneers who made our current world of always-on, rapid communication, possible.
Dinner: Booked at Argoe, harbourside fish restaurant. Excellent. Whole monkfish cooked on the bone over coals, to share. Best monkfish I have ever eaten. Terrace overlooking the working harbour fell silent for the evening.
Day 4
THE ORIGINAL PLAN GOT CANCELLED DUE TO WEATHER!
The plane flying across to the Isles of Scilly is teensy, hence, liable to get cancelled if the weather is not favourable. Sady for us, despite every other day being 22 deg.C and sunny, the day we were booked to travel to St Mary’s, the cloud was very low and visibility was too poor to fly.
Day trip to St Mary’s, Isles of Scilly: Fly from Lands End with Skybus (book early - you are unlikely to grab a seat on the day)
Collect a picnic lunch from Hugh Street Café or Tanglewood Kitchen
Walk the St Marys Island Coastal path: 17km, 3.5h hike
THE BACK-UP PLAN!
Go to The Eden Project
Dinner: easy-breezy modern fish-and-hip shop with a twist, Mackerel Sky
Day 5
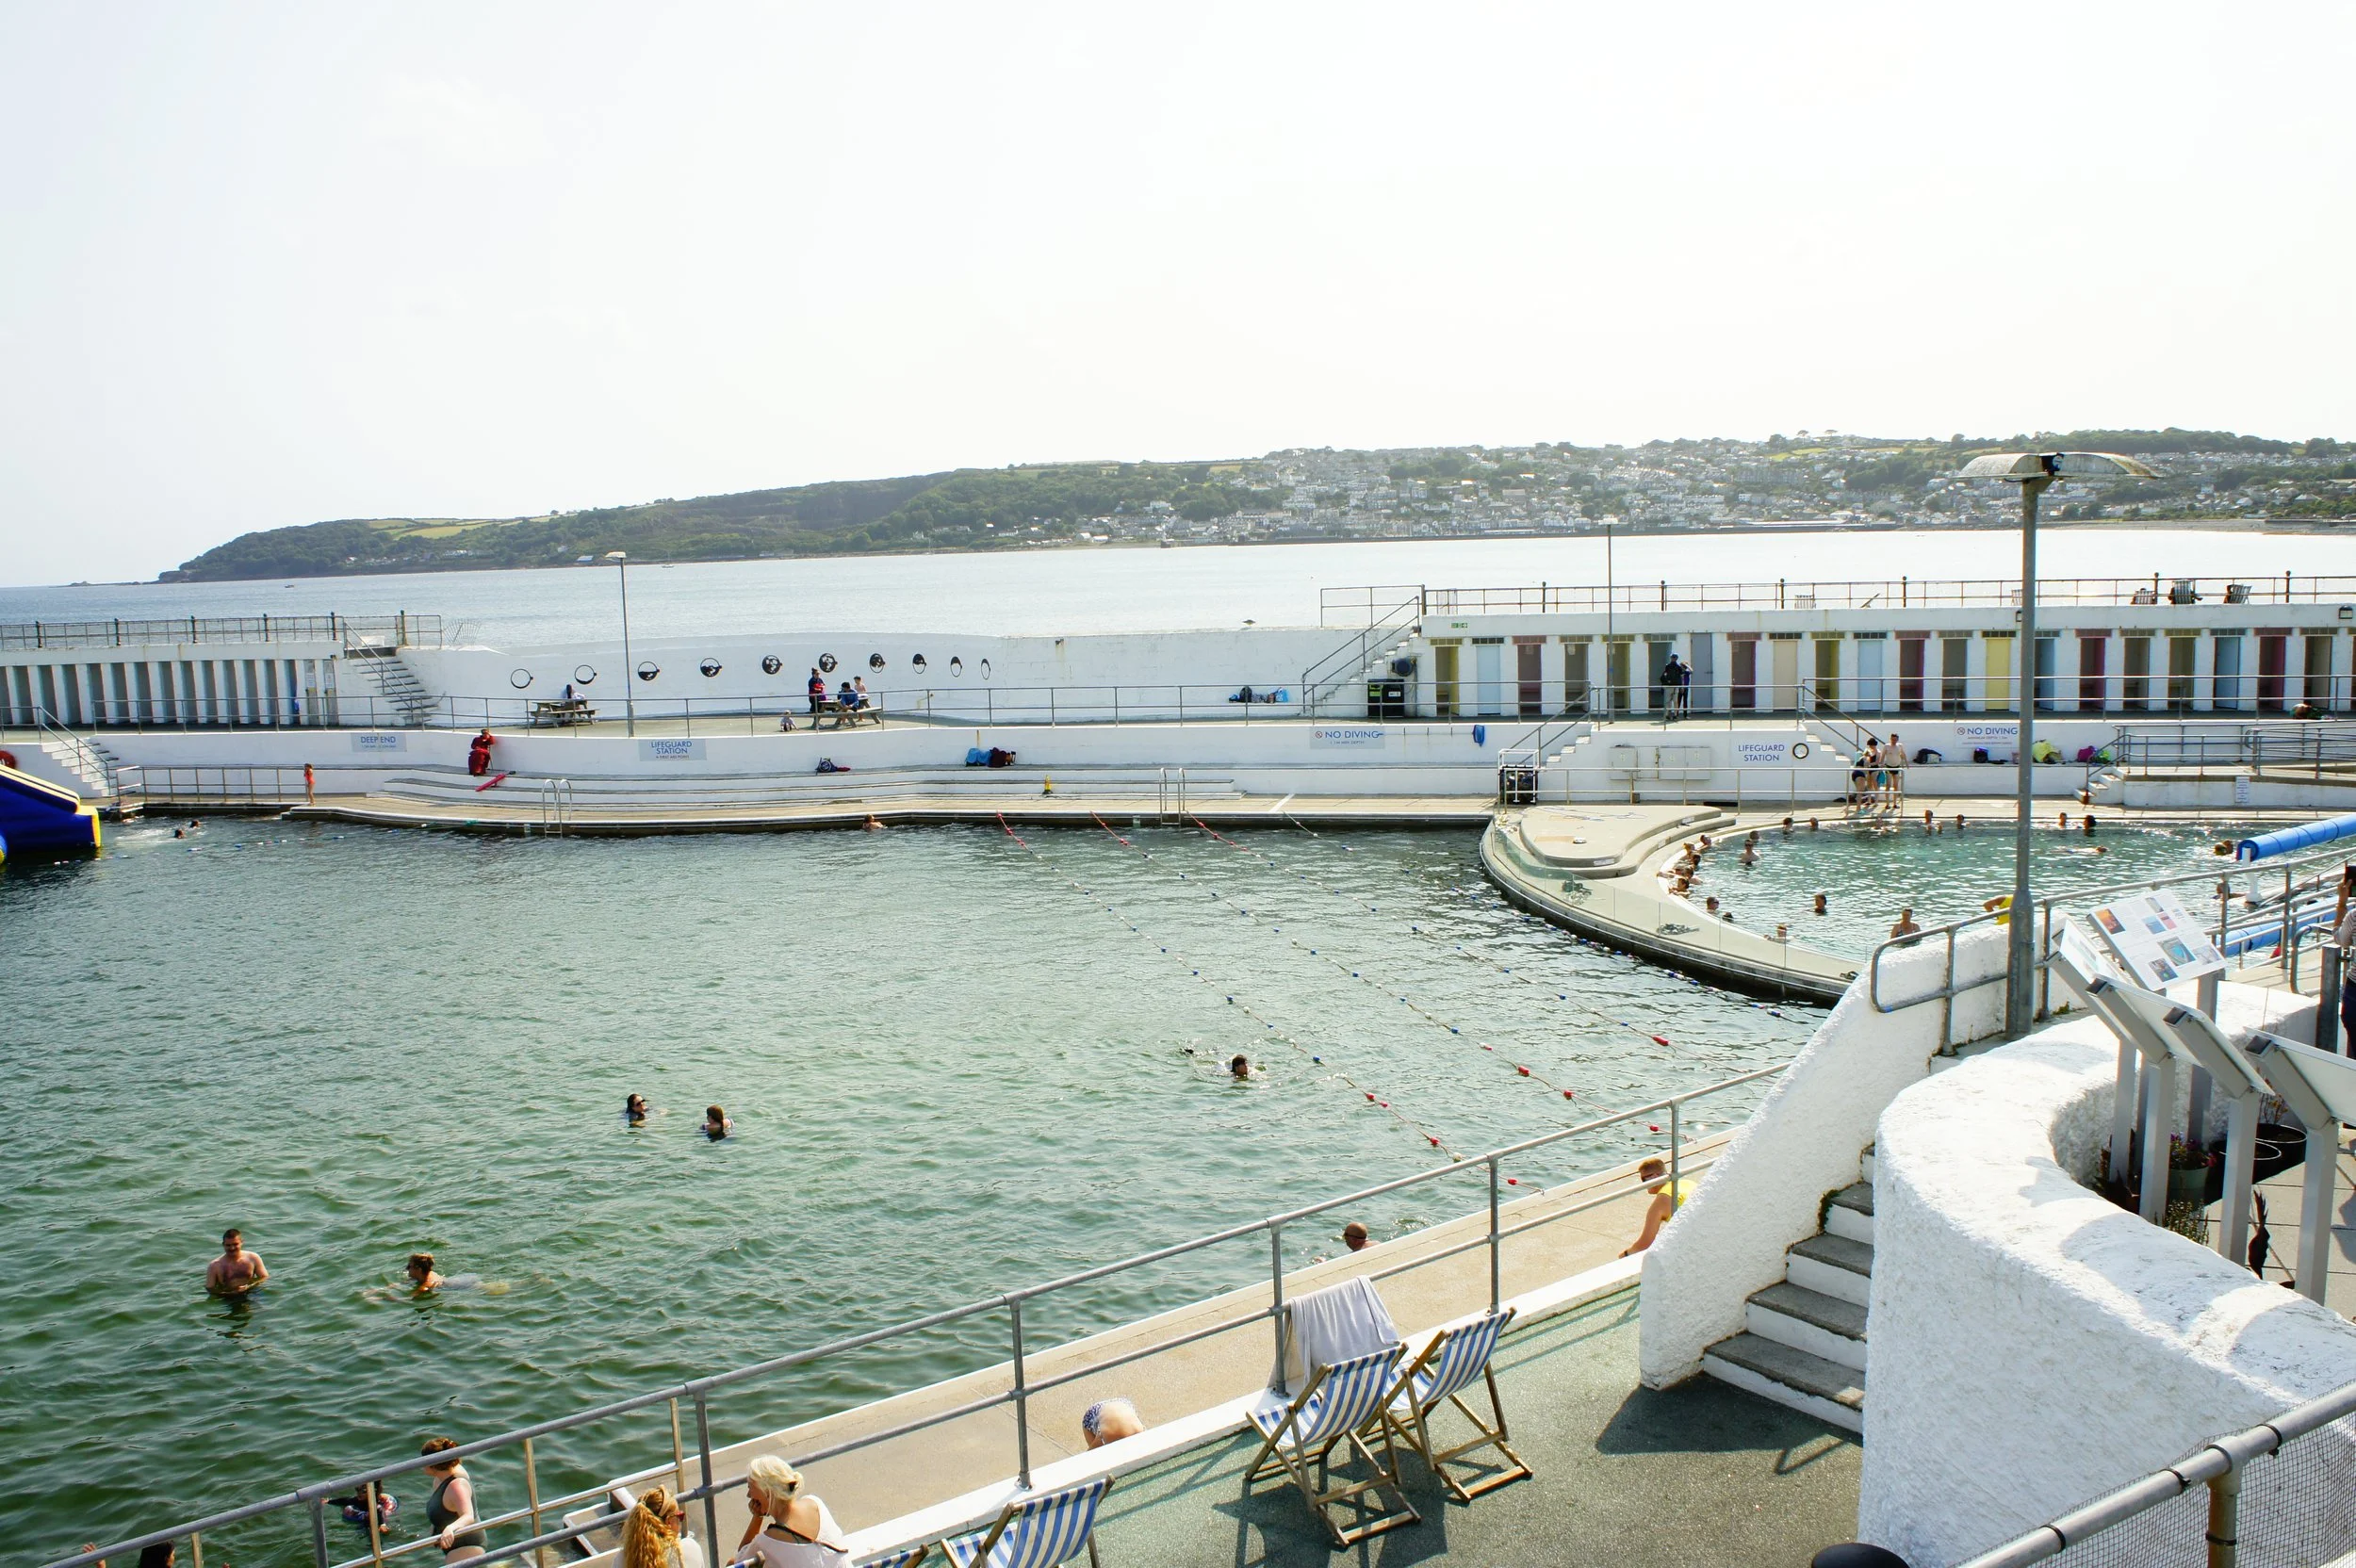
Morning swim: Jubliee Pool Saltwater Lido & Geothermal Pool, 1 hour session - you need to book this several days in advance - you are highly unlikely to get a spot on the day. Lovely to bob about in the warm pool. Expect it to be busy.
Brunch: 45 Queen St (strictly walk-ins only, open from 10am, closed Monday & Tuesday). Highly recommended.
Drive home

RIDING IN SOUTHWEST CORNWALL
Riding around Newlyn and Penzance is scenic but not effortless. The terrain isn’t mountainous, but it’s rarely flat - short, punchy climbs and winding roads keep you working. Riding shifts beteen deep shade, to bright sea vistas. It’s a region best suited to confident riders who enjoy a bit of unpredictability: weather, narrow lanes, and the occasional steep descent. That said, there are a lot of road options to choose from, so you can mostly avoid traffic, and the views make it worth the effort.
Ideas for another visit
-
Stay on the Roseland Peninsula, just south of Truro and across the water from Falmouth
-
Bike ride: Take in the whole of West Penwith, starting in Penzance, on this 65km road ride
Visit St Michael’s Mount
Evening Show: at The Minack theatre - advance booking essential
Visit Tremenheere Sculpture Gardens (gardens open daily 10.30am – 5.30pm, though Gallery closed Sunday and Mondy) with lunch at Tremenheere Kitchen
Newlyn Art Gallery & Exchange- this gallery has loads of events, including vintage fairs happen in the Autumn, textile workshops and Newlyn art walking tours happening on just 4 to 6 dates in the spring and summer. These need to be booked well in advance, with
Golowan Festival is a 10-day festival of arts, performances, culture and parades. It’s the UK’s second largest street festival and happens in June.
Penzance Art Festival is also on in June
-
Breakfast at Artist Residence
Supper club at Chapel House Penzance
Visit Nancarrow Farm for one of their famed Feasts or Sunday Lunch with home-reared organic meat
Visit Potager Garden for brunch (near Falmouth)
Other Countryside Itineraries


Chokoladbiskvier
Recipe for Chokoladbiskvier, or Swedish Chocolate Buttercream Macaroons. Alcohol optional. Ideal for making at any time of the year.
Swedish Chocolate Buttercream Macaroons


When we visited Sweden, we took a marvellous hike-with-outdoor-cooking with Anders, just outside of Halmstad. Part of the spread Anders brought included some mini baked treats, which were utterly delicious, and he told me they had been baked by his wife, Viktoria.
I was quizzing him with all sorts of questions about the baking and assume he must have decided that I needed to hear it from the horse’s mouth, and a few days after our hike, completely unexpectedly, they very kindly invited us for fika at their home in Halmstad.
The day was balmy. We sat outside under a tree, at a small table covered with a white tablecloth with the corners held down by clip-on cloth weights in the shape of a Dalarna Horse, and Viktoria served 6 types of bitesize fika, all baked by her own hands.
The classic Biskvi was my favourite of Viktoria’s treats, and she was further kind enough to share the recipe with me, which is what I have used to make these.
I’d say they are pretty close to what we had that day, though I would advise anyone to do a test run in your oven with a few of the bases at a time, to check your own oven’s bake time - these can easily overbake.
PORTION SIZE
Makes about 25-28 macaroons
TOOLS
Other than the typical kitchen equipment, to make these, you need:
a blender or food processor
an electric whisk
a baking sheet or a shallow roasting tin, 3-4cm deep
a cooling rack
INGREDIENTS
Base
275g skinless almonds or ground almonds
135g caster sugar
2 large egg whites (about 80g)
Buttercream
250g salted butter, softened (or half salted & half unsalted)
135g caster, vanilla or icing sugar
2 egg yolks
3 tbsp rum, cognac or brandy (about 60ml - optional)
Chocolate enrobing
150g semi-sweet dark chocolate (45-60% cocoa solids)
20g coconut oil
METHOD
Prep almonds - If you are using whole skinless almonds, finely grind them in a food processor first. Transfer the ground almonds with the sugar to a large bowl and whisk to fully combine.
Make dough for bases - In a separate bowl, whisk the egg whites until soft peaks form, and then mix in the dry ingredients. You should have a very thick paste, almost like marzipan.
Prep bases for baking - Line a baking sheet with reusable paper. Weight out 17-18g of the mixture, roll into a ball between palms and then flatten slightly into a disc, approx. 4cm in diameter. Space about 4cm apart on the baking sheet – they don’t spread at all during baking. Let them stand for about 30 minutes at room temperature.
**************** WAIT 30 MINS ****************
Prep oven - Heat the oven to 160°C fan, 180°C regular.
Bake - Bake in the centre of the oven for 12-15 minutes. They should be lightly tinged gold just at the edges when done (if bronzed all over, you have gone too far.) Remove from the oven and allow to cool on the baking sheet before loosening them and transferring to a wire rack.
Make buttercream filling - While they are cooling, whisk the butter and sugar into a fluffy batter. Add the egg yolks one at a time, then add the (optional) alcohol, and whisk to combine.
Top bases with buttercream - Work quickly here as the buttercream can start to get a bit melty. Spread the buttercream on the underside of the macaroon taking it right up to the edges. Shape with a knife or spatula into a soft round dome or peaked teepee – the peaked is traditional Swedish and what you tend to see in bakeries. Do your best, but don’t worry if you can’t make a perfect dome or teepee – smooth as best you can.
Chill - Lower the fridge temperature as much as you dare and refrigerate for about 1 hour, or in the freezer for 30 minutes so that they get really cold. You may leave them overnight at this point.
**************** WAIT 30 MINS TO OVERNIGHT ****************
Prep chocolate - Melt the chocolate and coconut oil in a bowl over a pan of simmering water on the hob, or in the microwave at full power for 1-2 minutes.
Enrobe with chocolate - Gripping the edge of the base, dip the buttercream side of the macaroons in the chocolate briefly, to coat up to the edge but leaving the base uncoated. Allow the chocolate harden, then briefly dip it again.
**************** WAIT 30 MINS TO OVERNIGHT ****************
STORAGE
Store the macaroons in a cool place, but preferably not in the fridge, as the chocolate surface can become dull.
The macaroons can also be frozen for up to 3 months. Defrost them slowly in the fridge

Brest in Winter - combined biking with city break
Brest in Finisterre in the off-season. Winter hikes, thalasso therapy, eating crepes, and admiring the early sunset off the west coast.
Itinerary At A Glance
4 night independent itinerary for the very northwest tip of France - Finistère in Brittany - choosing the outskirts of Brest as the base
Based on travelling at the very end of winter/start of spring, flying in and out of Brest. Car will also be essential to move around.
Highlights include a winter hike around the Crozon peninsula, artisanale beer and lemonade, biscuits and a visit to one of the most important oceanogrphic centres in the world.
Based on a couple travelling, with a focus on leisurely cultural activities and biking, interspersed with time to just relax and soak up the atmosphere


Why here? Why March?
Brittany is almost always shown in summer — search the internet and its mostly golden light and blue skies. But March offers a different perspective. The climate is similar to southern England: mild, wet, and unpredictable. Expect anything from crisp sunshine to bouncing rain, even the odd snow flurry. It’s not warm, but it’s rarely bitter — daytime temperatures hover around 8–11°C.
This trip uses the outskirts of Brest as a base, giving easy access to coast, countryside, and culture all within an hour’s drive. Finistère, the westernmost part of Brittany, is wrapped almost entirely by ocean. Like Cornwall, with which it shares Celtic roots, the region has an island-like feel: the sea is never far, and often in view.
Brest itself is a major urban centre, rebuilt after heavy WWII bombing. While it lacks historic architecture, it makes up for it with a lively harbour, a strong maritime identity, and a surprising claim - it’s considered the European capital of oceanography, home to over half of France’s maritime researchers.
In March, staying near a city makes sense. Weather may force changes, but museums, galleries, and restaurants stay open year-round. It’s a practical base for an off-season road trip, with plenty of indoor options when the outdoors won’t cooperate.
WHEN
March
Likely chilly (but not freezing)
Like the UK, March can be either cold and snowing, or warm and sunny, with spring bursting forth early. Take clothing options and plan activities that account for these unknowable circumstances.
LIGHT
Moderate daylight
Sunrise: 07:59am to 07:58am
Sunset: 19:02pm to 20:47pm
11-12 hours of daylight

TRAVEL MEANS
EITHER
Fly indirect from Manchester to Brest with AirFrance, transferring through Paris
OR
Fly indirect from Leeds to Brest, with KLM-AirFrance, transferring through Amsterdam and Paris
OR
Fly Liverpool to Nantes with Easyjet, then drive 3h 45m to Brest
In summer, there are many more flights, including Leeds to Brest via Dublin, with AerLingus.

ACCOMODATION LOCATION
Near Brest
Just outside of Brest is the Plougastel-Daoulas peninsula, which is easily accessible to Brest via a bridge over the water that connects the two.
There is also the commune of Le Relecq-Kerhuon, just to the east of Brest and giving right out onto the beach.
Either of which would make an excellent base for the delights of both city and country. The views in this part of Finistère are all about ocean, ocean, ocean.
SCHEDULE
Day 1
Fly in the morning, drive in the afternoon, collect groceries, arrive and settle in
Day 2
Brunch: at La Coloc overlooking Brest harbour
Visit Atelier des Capucins: Former shipbuilding workshops, now the largest covered public square in Europe. A huge and diverse public meeting spot with food, performance, art, shopping…also accessible by cable car!
Visit ocean museum 70.8 maritime innovation gallery: Opened in 2020, and located in the Atelier des Capucins, 70.8 is a center for technical and scientific culture dedicated to the ocean, presenting maritime innovation in all its aspects.
Tour Tanguy: for an immersive experience of Brest’s long history
Day 3
Hike Crozon peninsula: Drive to Crozon for a hike
Day 4
Relax
Le Comoedia Galerie d'Art: contemporary gallery with a strong focus on street art
Brasserie Poem Brewery, making artisanale beer and lemonade (Bar open from 4pm to 12:30am on weekends, with tours of the brewery available Fridays only, 9am to 5pm)
Evening Show at Le Quartz theatre
Day 5
Travel home
Ideas for another visit
Visit Peck & Co, a gastronomy concept store, a dining boutique with various inspirations, a place where you can snack from 9:00 a.m. to 7:30 p.m
Lunch at Le Castelach
In summer, visit the Crozon peninsula by sea, on board the Brestoâ or the Loch Monna from Brest
In the summer, every 4 years (next is 2028) is the International Maritime Festival, where a flotilla of traditional boats gather in the harbour from all over the world, alongside a programme of artistic and cultural performances
Other Off-season Itineraries


Apricot jam
Recipe for homemade apricot jam - more apricot than sugar. Making a taste of France at home.
Apricots have such a short season that it feels like a real imperative to preserve their flavour during summer and the house will smell divine doing so. Tangy, sparkling and fragrant, to me, apricot jam is one of the tastes of France. To have some on hand has the power to transport me to a warm summer’s afternoon in the Loire Valley when really, I’m scoffing it on a slice of toast on a wet and grey November morning in Yorkshire. The trick is storing it away in a place I forget about it so that I don’t eat it all during the summer.
My recipe below is derived and modified from an original by Pam the Jam.
PORTION SIZE
Makes 2x medium jars (about 400-500ml)TOOLS
Other than the typical kitchen equipment, you will need:
a ladle
a metal jam funnel (this will make it a lot easier to only get jam into the jars and not down the sides)
INGREDIENTS
500g underripe or just ripe apricots
275g sugar (granulated or preserving)
4g powdered pection
12ml lemon juice (about half a lemon’s worth)
A drop or two of grapeseed oil (if needed)
Ratios
100% fruit, 55% sugar
approx 2g pectin per 150g sugar
Many recipes suggest a 1:1 ratio of fruit to sugar but this blanket statement is useless and I find this far far too sweet. For apricots, roughly 55% sugar to fruit, I find, makes a jam that tastes much more of the fruit than the sugar.
You can use the above ratios to tailor your portion to however much fruit you have available to preserve.
METHOD
Prep fruit - Rinse the apricots, destone them and cut them into quarters.
NOTE! It is often considered more ‘traditional’ that the apricots are halved so that they retain a bit of size and chunk after cooking, but I prefer a more spreadable jam where the fruit has been much softened in the process of cooking, hence my instruction to quarter the fruit.
Macerate fruit - Place the apricots in the jam pot (not too large – jam reduces, which, if it’s too shallow in the pan, makes it hard to get an accurate temperature and can encourage burning). Weigh the sugar, pectin and lemon juice straight into the pan with the apricots, mix to distribute. Cover and let macerate overnight for the juices to draw.
************** WAIT OVERNIGHT ***************
Sterilise jars - First, preheat the oven to 110°C and set out a clean cotton tea towel/dish towel (not terry cloth) on the counter and put a small saucer in the fridge or freezer. Wash the jars and lids in hot soapy water and rinse but don’t dry them. Place the jars onto a baking tray and into the oven for the duration of the jam cooking - If you are using jars with rubber seals, be sure to remove these before placing in the oven and if you have separate lids, place them in a bowl of boiling water.
NOTE! When adding food to the jars, it is necessary that both the food and jars are at the same temperature so that the jars don’t crack, and the jam doesn’t heat up any more when it goes into the jar.
Bring jam up to boil - Place the pan with the jam on the stove over medium heat and allow it to come to a boil — it might look very foamy at this point – don’t worry about it.
Rolling boil - Allow to boil for 15-20 minutes until set, stirring occasionally. Use a thermometer for the best control over the progress – jam sets between 104°C and 105°C. It will be a rich orange once ready, and the sound changes from a wet ‘pop’ to more of a ‘burble’. This fruit doesn’t set quite so readily, so for a spreadable jam, I prefer to take it up to 105°C.
Remove from the heat as soon as it hits 105°C anywhere in the pan and lightly stir in the same direction to remove any foam, adding a drop or two of oil if it doesn’t dispel easily.
Ladle into pots - Now comes the crucial moment. While the jam is still extremely hot — in other words, right away — ladle it into the clean pots, leaving a margin of about half an inch (2 cm) between the top of the jam and the top of the jar. Immediately place the lids on the jars. Quickly wipe off the jars with a sponge to remove any jam on the sides. Using a tea towel to protect your hands from the heat, screw the lids on as tightly as possible.
LET COOL FOR SEVERAL HOURS BEFORE TRYING!
USES
Dollop onto rice pudding or porridge
Spread onto toast after butter
Swirl through a cheesecake
Smear onto warm scones or hotcakes
In thumbprint cookies
As a filling for Victoria Sponge Cake
In a nut butter and jam sandwich

Swedish Kokosrulad (coconut roll cake)
Recipe for Swedish Kokosrulad, a coconut roll cake filled with a custard buttercream.


Not too sweet, soft texture, moist middle and very delicately flavoured.
Aside from the taste (one of my absolute favourites), I love that this cake keeps well in the fridge and I find it delightful served chilled. Due to this, it’s a great option to make ahead of time and conveniently store ready for later devouring, and is an absolute delight on a hot summer’s day.
The sponge relies on getting the eggs and sugar whisked up to ribbon stage, which takes a good 10 minutes on high speed - a stand mixer helps a lot here as you can get on with other tasks while it is labouring away. Otherwise, a handheld electric whisk will do the job equally well, but whatever you do, don’t get impatient and attempt to shorten this task. It really makes a difference to the lightness of the final sponge.
My recipe below is derived and modified from an original in the excellent guide to Swedish baking, Fika - The Swedish Way, published by Norstedts.
PORTION SIZE
Makes 12-14 moderate slicesTOOLS
a blender or food processor
a stand mixer or handheld electric whisk
a 30cmx40cm shallow roasting tin with sides, 3-4cm deep
INGREDIENTS
Cake
120g desiccated coconut
60g (3 tbsp) potato starch or potato flour
1 ½ tsp baking powder
3 large eggs (about 160g out of shells)
180g caster sugar
Caster sugar, for sprinkling
Custard buttercream
75g unsalted softened butter
100g caster sugar
150g ready-made custard or homemade crème pâtissière, at room temperature
OPTIONAL For the crème pâtissière
25g plain flour
25g cornflour
300ml whole milk
1 ½ tsp vanilla paste or seeds from 1 vanilla pod
2 large eggs
50g caster sugar
METHOD
OPTIONAL – For crème pâtissière
Make a paste - Weigh the two flours into a small bowl and weigh in about 50ml of the cold milk, working it all into a paste with the back of a spoon or a small whisk. Make sure there are no lumps; set aside.
Warm the milk - Weigh the rest of the milk and the vanilla into a small saucepan and place over a low-medium heat until scalded.
Mix eggs and sugar to ribbon stage - Weigh the eggs and sugar into a medium bowl (having the ingredients form some depth in a smaller bowl helps with the whisking) and use an electric whisk on high to mix until pale and fluffy – expect about 4-5 minutes to reach the volume. You are aiming for the ribbon stage, which it is very pale and fluffy, about 5 times the original volume, and the mixture leaves a trail (a ribbon) when the whisk is lifted.
Heat to thicken - Add the flour-milk paste and whisk to combine. Pour over the hot milk and whisk again. Pour everything back into the pan and cook over a low-medium heat until thickened.
I alternate between letting it sit on the heat to thicken, and stirring, switching between a balloon whisk and a spatula to work out the foamy bubbles on the top and the thicker sections as they form on the bottom. I find this whole process can take 10-15 minutes – don’t be tempted to crank the heat up.
You can choose how much to thicken it, but it is ready once it easily coats the back of a spoon and leaves an open trail if you run a finger across it. You can take it thicker if you wish, until it is decidedly thick like the consistency of extra thick double cream, which I think is better for this recipe.
Chill - Pour into a glass bowl and cover with the clingfilm touching the top. Chill fully.
For the roulade
Prep oven and baking sheet - Preheat the oven to 200°C fan, 220°C regular. Line the bottom of the roasting tin with reusable or greaseproof paper.
Mix eggs and sugar to ribbon stage - Weigh the eggs and sugar into a large bowl or the stand mixer. Whisk for at least 10 minutes on high speed – it really does take this long to get the right volume. You are aiming for the ribbon stage, which it is very pale and fluffy and about 5 times the original volume.
If you are using a stand mixer, you are free to continue with other tasks.
Combine & fold in dry ingredients - Weigh the desiccated coconut, potato starch and baking powder into a bowl and use a balloon whisk to combine these dry ingredients together evenly. Fold the dry ingredients into the egg-sugar mixture in a few goes. The mixture should be very light and fluffy, almost like a meringue.
Pour batter into baking tin - Pour the cake mixture into the tin, level the top and use a cranked spatula to encourage it into a rectangle but do not push it all the way to the edge of the paper – it will continue to spread a little during baking and you don’t want it too thin as it is delicate once baked and can easily tear. Tap once to release air bubbles.
Bake - Bake in the middle of the oven for 5-7 minutes. It is done when golden on the top, probably with some huge bubbles, and springy to touch. Bring out the oven and complete all the next steps immediately, with the cake still warm.
Sprinkle with sugar and remove from tin - First, use a spatula to loosen the edges and make sure you can lift the reusable paper all the way round the edge. Next sprinkle the top with caster sugar, then lay a sheet of greaseproof paper and then a sturdy clean tea towel over the top of the tin. For extra precaution, put two elastic bands around all this at each short end. In one quick and decisive motion, flip over so that the sugared sponge top drops onto the greaseproof. Hold the edges tightly – you don’t want this to slide out of the side.
Roll up and cool - Carefully peel off the reusable paper that was on the bottom, then roll up loosely with the greaseproof paper inside. Leave to cool on a wire rack.
*************** WAIT 1 HOUR **************
Finish the custard buttercream - Beat the sugar and caster sugar together until fluffy, then add the custard/crème pat in two or three sessions and beat to combine.
Fill and roll up - Once everything is cooled, gently unfurl the rolled cake and spread the buttercream right to the edges, then roll up fairly tightly, aiming for no gaps.
Chill - chill for at least 30 minutes before serving
*************** WAIT 30 MINUTES **************
SERVE!
Cut into slices 2-3cm wide.
STORAGE
Store in an air-tight container in the fridge; stored well for about 3-4 days.
I also really like this chilled, and served cold from the fridge.
An excellent candidate for freezing and fika, simply slice up and store in airtight bags in the freezer for up to 3 months. A slice only needs about 15 minutes to defrost.
The Four L’s of Summer Dressing
For summer dressing I need the 4 L's:
Lightweight
|
Loose
|
Layers
|
Long & Short
|
Lightweight | Loose | Layers | Long & Short |
These principles are what I need for a warm to temperate climate, like Central to Northern Europe.

Vogue September 1978
Striking fashion imagery from a vintage Vogue magazine, September 1978 edition.


Thoughts from Carpe Diem Regained by Roman Krznaric
A book on seizing the day, and doing more of that. My reflections and key takeaways.
Different personas who seize the day
The Experimentalist
Wings it
Pretends to know more than they do to seize an opportunity
The Death Gazer
Is acutely aware of their mortality
Is compelled to seize life because they think about how short it is
The Daredevil
Their efforts to seize the day involve great danger
The Role-breaker
Refuses to conform
Refuses to allow any ‘role’ to define which opportunities they should seize or pursue
The Opportunist
Lie, bribe, cheat, steal and exploit
Bend the rules to seize the opportunities they want
The Revolutionary
Aims to seize history
Like to think they are seizing the day on behalf of more than themselves
How to be more spontaneous
Practise first – like an artist or an athlete – this makes seizing the opportunity easier when it comes along
Accept offers and say yes more – everything is an offer even if it may not be phrased as one!
Notice more
Let go – forget fear and judgement – allow yourself to be vulnerable
Use everything – everything is a spark for spontaneity

Reflections on The Lost Art of Dress, by Linda Przybyszewski
A book about The Dress Doctors, a troop of women operating during the early-to-mid 20th century who advised American women on style and clothing throughout the Great Depression, World Wars and social upheaval.
“Knowledge, not money, is the key to beauty in dress.”
This has been on my want-to-read list for quite some time, and I’m so very glad I finally got round to it.
It’s both opinionated and academic, an in-depth look at how there was once a proud, educated, and forthright group of women who were embedded in the US education system through Home Economics, who taught dressmaking and style.
“By teaching dressmaking, the Dress Doctors made women into creators, not just shoppers....[The Dress Doctors’] aim was the creation of what they called “artistic repose”, the moment when the discerning eye takes in a design as a whole and finds it perfectly satisfying in colour, line and form.”
Their teachings not only honed students’ creative expression, their dressmaking skills and their ability to dress themselves well and beautifully, but it also lead to paying careers for women, independence, an ability to handle a budget, problem solving skills and a self-assuredness in how they presented themselves to the world. They also sought to teach the principles of art and an appreciation for utility equally matched by beauty.
This book is about a combination of dressmaking, art, cultural history of the 20th century, women’s independence, and fashion, and seeks to tie all the different threads together. I think it does it very very well.
I loved everything about this book.
“…by dressing well, a woman could gain ‘a basic sense of security and self-respect’ that would release her ‘from the tensions caused by concerns about her appearance. She would then be free to give her full attention to the more vital matters, for herself, and for the welfare of others.’ Dressing beautifully was satisfying in itself, because the human soul and eye craved beauty, but it was also a means to a more work-a-day end.”

A-line skirt in bright red serge wool twill
Using a 1990’s pattern, details on total make time, adjustments and seam finishes, and lessons learnt.


TOTAL TIME COMMITMENT: 6 hours
Toile (with buttons but no lining, interior seam finishing, basting stitch removal or hemming): none
Cut out & transfer all pattern markings: 1 hour
Main construction: 4.5 hours
Lining construction: none
Finishings (hooks, hem): 1.5 hour


ADDITIONAL SEAM FINISHING & DECORATIVE EXTRAS
Each side of the seam allowance was overlocked before stitching
Went with an overlock with single fold hem because I attempted a blind hem, but it didn’t take all the way round, and I didn’t want to unpick it and potentially ruin the overlocking so just stitched it
VERDICT & LESSONS LEARNT
Attached the zip too high up on the centre back seam – have to draw this over my head.
This was an INCREDIBLY easy skirt to sew together and I absolutely love this, what I am calling ‘trench-weight’ wool. It is so smooth, so drapey, great handle, and yet still has a touch of structure. Been wearing it in London today actually and not found it very creasy at all. Looks amazing with my Jaeger navy wool trench which is in a similar fabric.
Other 1990’s Sewing Projects


Swedish Semlor buns
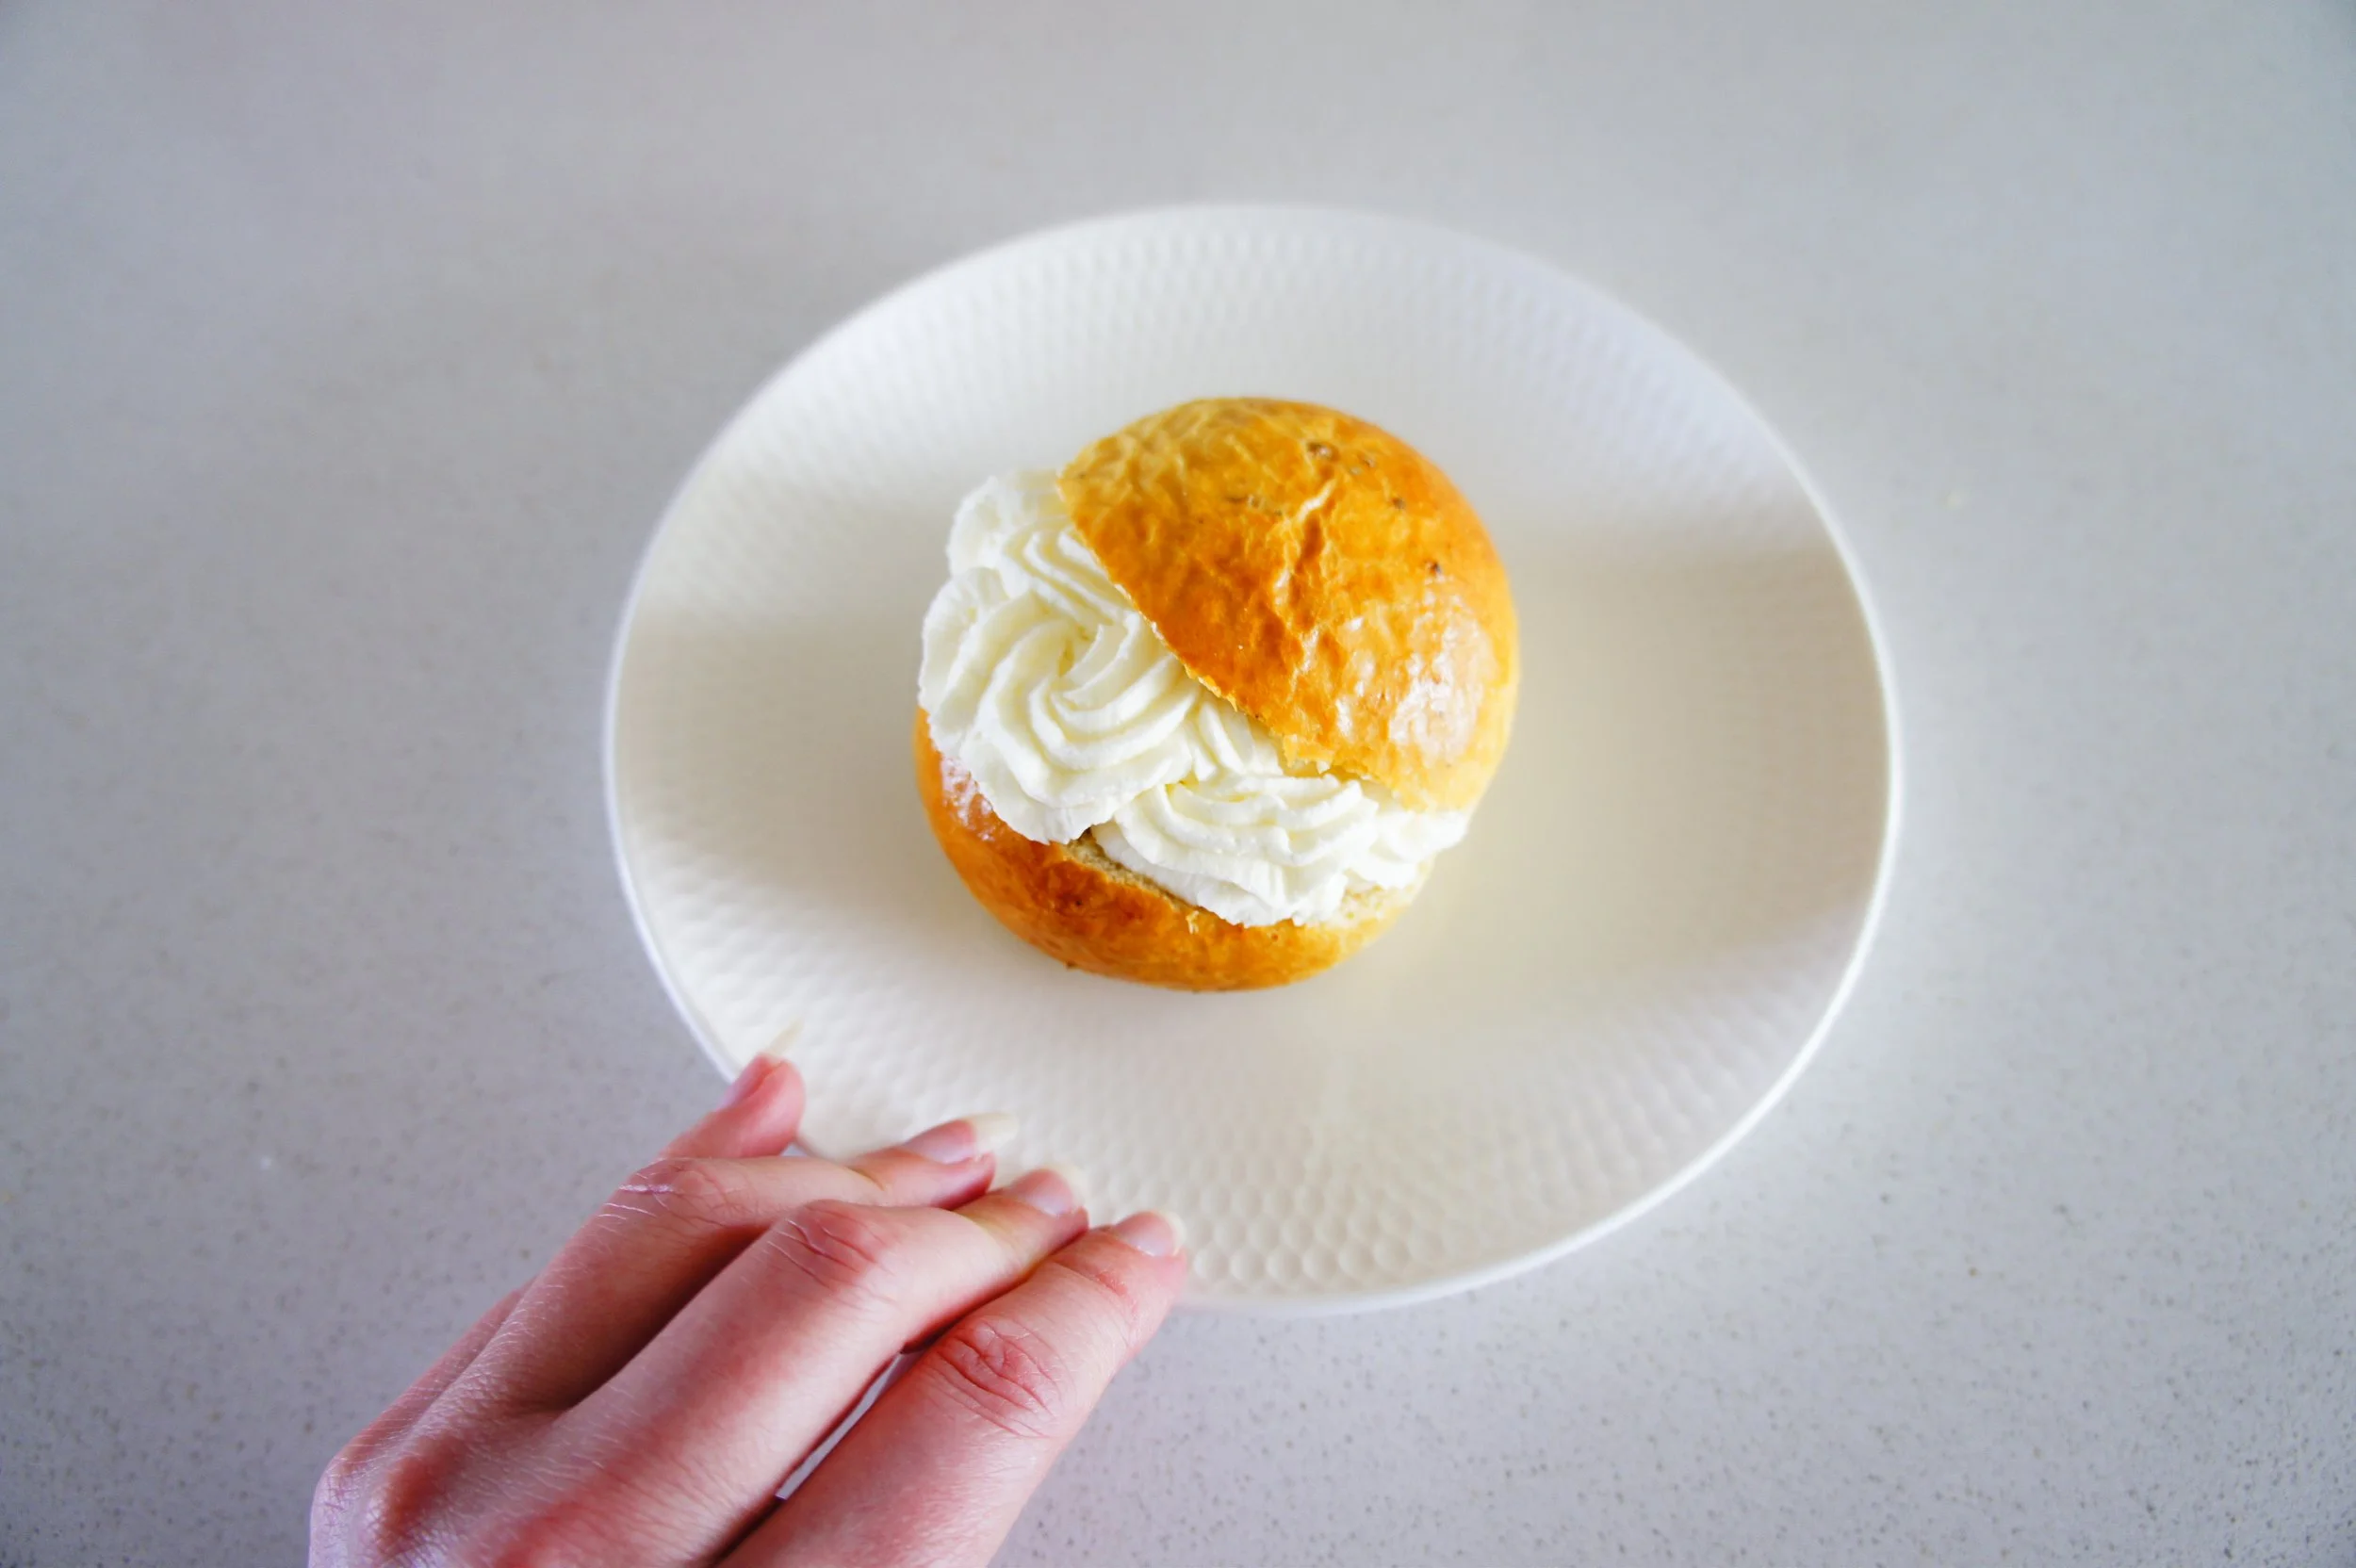
Recipe for Lenten-Easter treat, Swedish Semlor buns. Adapted from a recipe by Estonian patisserie owner, Angeelika Kang.


This is perhaps my very favourite enriched doughs to make and to eat.
I first encountered a semla bun in Angeelika Kang’s wonderful baking book, ‘Ovenly Delights’, a book I bought for myself on a winter break in Tallinn, after visiting Angeelika’s delightful Levier patisserie in Kalamaja. Since coming home, her book is a staple in my recipe book library for excellent instruction on how to make the kind of treats you only find in patisseries.
Since discovering this recipe and first making them at home, we have taken two trips to Sweden - Sweden’s West Coast and a Stockholm workation - but never having been there in the Lenten or Easter period (which is when these tend to feature in Swedish bakeries), we have never had the chance to try these in their native land.
Oh well - just going to have to keep making them at home.
My recipe below is derived and modified from Angeelika’s original.
BATCH & BUN SIZE
My estimates are based on a 60-80g size bun per person. This recipe will make about 12 buns, give or take.
TOOLS
Other than the typical kitchen equipment, to make these, you need:
a pestle & mortar for grinding cardamom
a large glass mixing bowl for proving, one that cling film will ‘grip’ onto for a tight drum seal
a flat baking sheet for baking
INGREDIENTS
Dough
250ml full fat milk
24g active dry yeast (not fresh or instant)
100g caster sugar
½ tsp (2g) fine salt
500g strong white bread flour
100g softened unsalted butter
2 egg yolks (30-40g)
30 cardamom pods
Crème Chantilly Filling
600ml whipping cream
4 tbsp icing sugar
For brushing
Egg white + a dash of full fat milk
METHOD
Put the oven on. 50°C (fan or regular).
Remove the cardamom seeds from the pods. Lightly grind in a pestle and mortar. Don’t overdo it – you want to taste and bite into the cardamom seeds in the finished bun.
Warm the milk. Weigh milk into a small saucepan with a temperature probe – heat over medium to 37°C (will take about 4-5 mins). Do not let it exceed 43°C - this will kill the yeast.
Weigh out the remaining ingredients. While the milk is heating, weigh the flour, salt, sugar, yeast, egg yolk, butter and ground cardamom into a large mixing bowl. NOTE! If using dry yeast, weigh this into a separate bowl and hydrate with the warm milk before the next step.
Knead. Once the milk has reached 37°C, pour the warm milk into the stand mixer bowl. Turn the dough out onto the surface and knead for about 5 minutes until the dough is elastic and smooth – a dough scraper can be very helpful at the start of the process when it is quite sticky. You are aiming for a ball of soft pillowy dough that is just lightly tacky.
It may be a little sticky when you start but resist the temptation to add more flour to it. You'll find that with a little work, the dough will begin to lose its stickiness and become smoother and more elastic.
First Proof. Turn the dough out, ball off the dough and place into a large glass mixing bowl. Cover with cling film that is stretched drum-tight across the top. Place in the oven to prove for 45 mins to 1 hour, by which time it should have doubled in size and the cling film will have inflated to a dome. A light press on the dough and it will readily spring back.
******************** WAIT 45 MIN to 1 HOUR **********************
Divide the dough. Once proved, roll the dough into a rough sausage shape and use a sharp knife to cut as equal as you can before weighing each section - you want either 60g (small) or 80g (medium) per ball.
Shape the dough and space out. You are aiming for a domed ball shape with the seam of the dough on the underside. Using one finger, press the sides into the middle. Repeat this several times; you will probably notice the dough getting firmer as you do this. Flip over and using the two edges of your hands, cup under the dough to form a nicely rounded and smooth ball. Plqce onto a lined baking sheet, well-spaced apart, and repeat for the remaining buns.
Second Proof and heat oven. Leave to rise for another 15 minutes. Preheat the oven to 170°C fan, 190°C regular.
Alternatively, if you are prepping in advance, place the buns either in the fridge or the freezer at this point, for baking later. See further notes on storage below.
Egg wash. Wash the tops of each bun – either with a beaten whole egg, or - to avoid waste - some egg white beaten with a dash of cream or milk, whatever you have. Apply wash carefully and precisely, try not to miss any bits for the most professional glossy finish.
Bake. Bake in the middle of the oven:
10-11 minutes for a small bun
12-15 minutes for a medium bun – no more - until the tops are golden brown
Cool completely. Remove from the oven and cool completely before serving (otherwise, the cream will get melty)
******************** WAIT 45 MIN to 1 HOUR **********************
Fill with cream. Whip the cream with the icing sugar, slice off the top of the bun and, for the most professional finish, use a star nozzle to pipe in the cream before replacing the lid and lightly dusting with icing sugar.
STORAGE & FREEZING
Most enriched dough is best eaten on the day it is baked – though you can get away with up to about 48 hours if you keep it in an airtight container but by this time, it won’t be as special and will likely be a bit dry and a bit tough
To freeze before baking (freshest result)
Put into the freezer in an airtight container, just before the second proof.
When you want to bake them, take them out of the freezer and immediately place onto the lined baking sheet that you plan to bake them on. Leave in a warm place to thaw and rise - the time for this will vary depending on the temperature of the room though I typically find about 2-3 hours for these. You will need to check the dough regularly; it needs to be baked as soon as it has completed its defrosting (it should feel slightly puffy and your finger should leave an indentation if the dough is pressed lightly.) Now continue the recipe from the baking step.
To freeze after baking (most convenient)
Freeze on the day of baking immediately after they have cooled.
To serve, warm in the oven for 15 minutes at 160°C fan (no need to preheat – put straight in on a tray). After this time they should be fully defrosted, warm and slightly softened – almost as good as freshly baked.

High-waisted trousers in smooth serge wool twill
Working with a 1970’s Vogue Basic Design pattern, details on total make time, adjustments, seam finishes, and lessons learnt.

TOTAL TIME COMMITMENT: 9.5 hours, no toile (note these trousers are unlined)
Toile (without zip, buttons, lining, interior seam finishing, basting stitch removal or hemming): none
Cut out & transfer all pattern markings (both main fabric and lining): 1.5 hours
Main construction: 6.5 hours
Lining construction: none
Finishings (buttons, hem): 1.5 hours


PATTERN CHANGES
Increased zip length to 8” (for easier clearance over my hips)
SEAM FINISHING & DECORATIVE EXTRAS
Edgestitching at pocket opening
2 ½” hem, made using blind hem
Leg and crotch seams – overlock separately
Pocket bags – overlock together
VERDICT & LESSONS LEARNT
I need to be more careful and choosy about trousers with tucks:
- just because they fit at the waist, they may not be the best fit at the hips. The tucks need to have more room and ease to ‘billow’ over the hips and not cling. I have drafted a pattern with an extra 2 ½” at the hips
- when making a garment with these pleats/tucks, it may be better to fit them to have the waist band sit very slightly below my natural waist, to avoid the tucks ‘poofing’ over my stomach
This weight of wool, I am henceforth going to refer to a ‘trench weight’ wool. It is fine for use on some trousers and skirts, though better application would be a trench coat or a jacket. Its smooth and lovely to wear though, and I don’t find these trousers miss a lining.
VARIATION IDEAS FOR ANOTHER MAKE
Make in a very fluid fabric, such as a viscose crepe or viscose jacquard – should work really well with the pleats at the front, and especially if I lower the waist a teeny bit to sit just below my natural waist
Other 1970’s Sewing projects


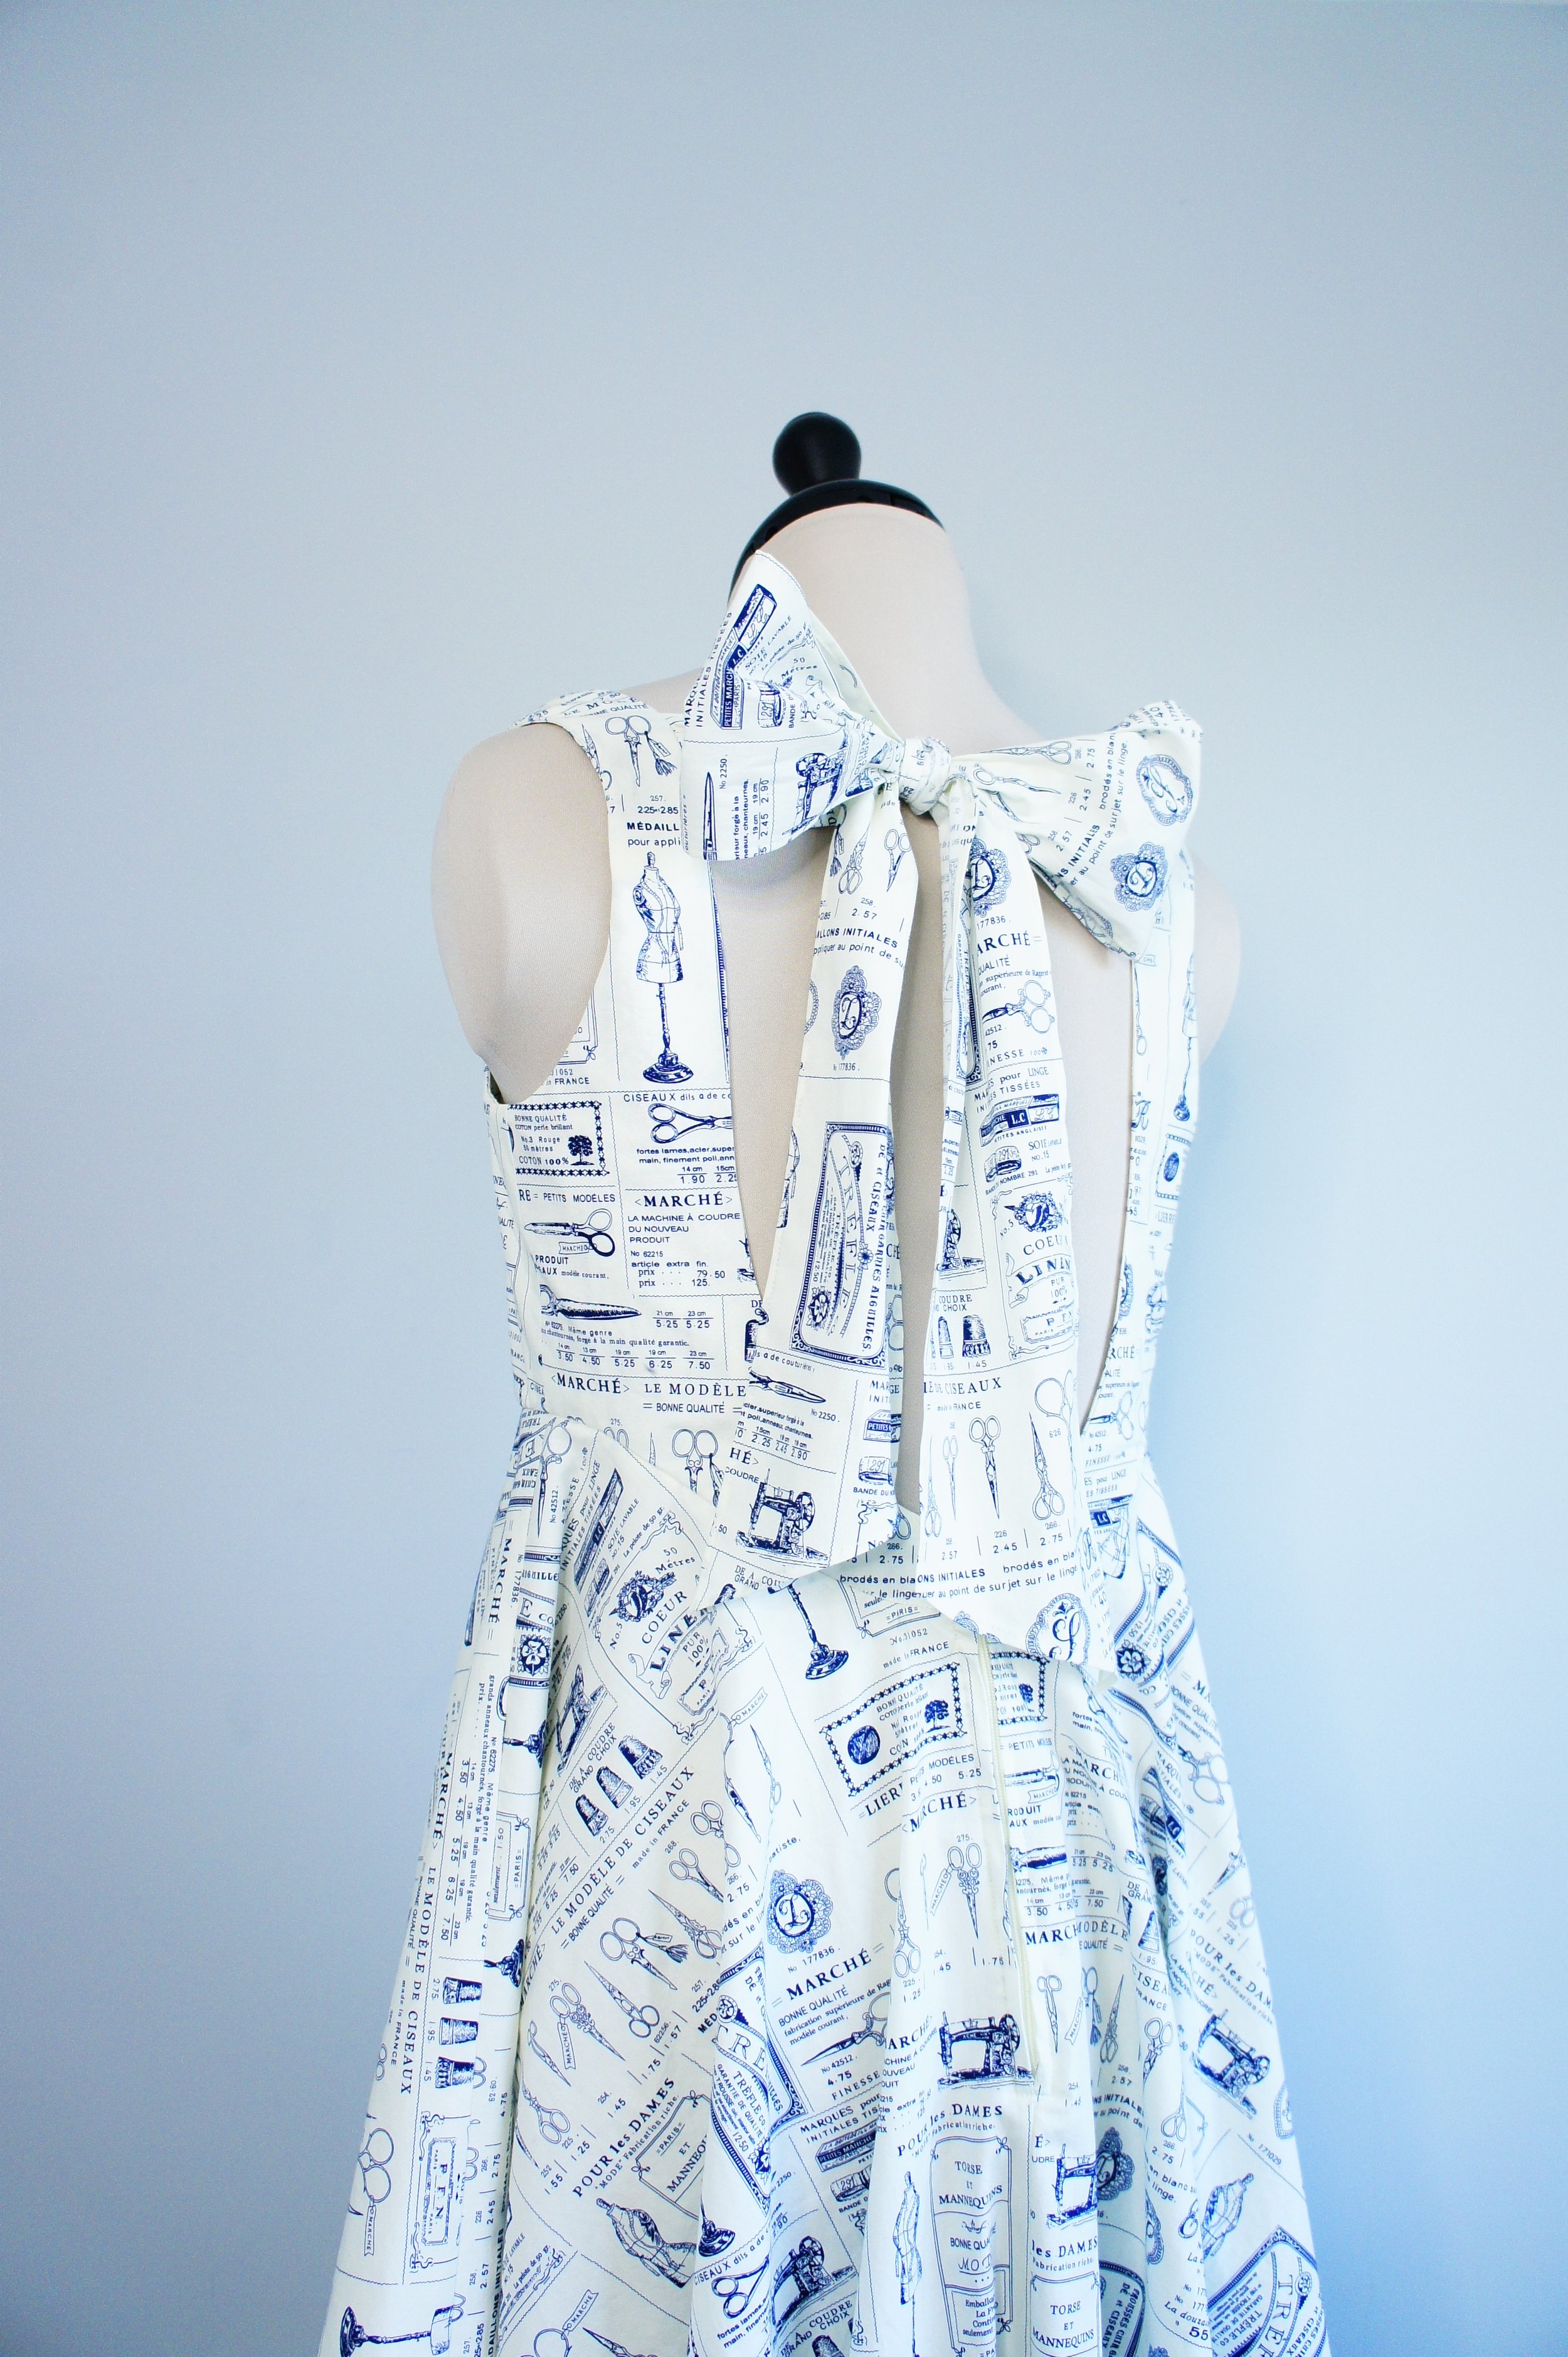
Boat neck summer dress with tie back in a novelty print cotton
Journal of making a dress with boat-neck, shaped underbust seam and large tie bow at the back.


TOTAL TIME COMMITMENT: 10.5 hours without toile (note this dress is unlined)
Cut out & transfer all pattern markings: 2.5 hours
Main construction: 6 hours
Lining construction: none
Finishings (hem): 2 hours


PATTERN CHANGES
None
SEAM FINISHING & DECORATIVE EXTRAS
Skirt side seams – French sea
Super narrow double-fold hem – beautiful finish
VERDICT & LESSONS LEARNT
The biggest lesson I learnt making this, is that sometimes, an adjustment for my narrow shoulders needs to come from the centre front, to bring both shoulders closer to one another, rather than simply making the shoulder seam itself thinner. The boat neckline of this dress should be ideal on me, but it’s much too wide, meaning the narrow shoulder sections want come in and settle further on my natural shoulder, creating a bunch of excess fabric at the centre neck. I also find that with this fit issue, the armscye is too far over onto my arm, restricting movement. None of this would be fixed by my narrowing, or even sloping the shoulder (common adjustments for me) – instead, this needs a narrowing of the whole neckline, then perhaps adding what I have narrowed, onto the side seam, to keep the overall correct width at the bust and underbust.
This is a full circle skirt and that can create a challenge for cutting out on a fabric which has a print with a very obvious right-way-up, as in this one here
VARIATION IDEAS FOR ANOTHER MAKE
Make this in linen, or a linen viscose blend
Travel Itineraries for Summerwear


Man’s shirt in grey wool flannel from Simplicity 8753
Fine wool flannel, from a modern Simplicity pattern. Beautiful shirting fabric, even though few use it this way.


TOTAL TIME COMMITMENT: 18.5 hours (including toile)
Toile (without zip, buttons, lining, interior seam finishing, basting stitch removal or hemming): 7 hours
Cut out & transfer all pattern markings (both main fabric and interlining): 2.5 hours
Main construction: 5.5 hours
Lining construction: none
Finishings (hooks, hem): 3.5 hours


PATTERN CHANGES
None
SEAM FINISHING & DECORATIVE EXTRAS
Topstitch with regular thread & 2.8mm stitch length – lovely, very subtle
Rounded buttonhole – correct choice for fine/medium fabric
VERDICT & LESSONS LEARNT
I adored sewing with this fabric. And it finished up a dream. Will make myself a shirt in wool flannel, for certain.
Flat-felling the seams was easier than I expected and makes a very (unsurprisingly) flat finish on the inside, which I expect enhances the wear experience.
I couldn’t have been prouder of myself of my edgestiching on this make. On point. I’m improving.
Learnt a lot about buttonholing on this project. While certainly less effort than handbound buttonholes, doing them on the machine is not the most straight-forward task, and they can very easily go askew if you are just a tad too assertive when feeding the fabric through the machine.
I don’t like the instructions for the interfacing on the inside of the button placket, but haven’t figured out a better option.

Cuccio yellow polish, Seriously Celcius
A limey-green yellow, this one, drifting a bit sour too, like its had some grey popped in there. That, on my skin tone, actually makes this lime a more wearable option, since the presence of that slight bit of grey takes this a notch down from being a neon, highlighter yellow.
From Simple to Splendour
I want my wardrobe to be a place where I can reach for both the unique, unusual, stand-out pieces and the quiet, hardworking, effortlessly chic staples. The bold and the understated. The conversation starters and the silent heroes.
A great wardrobe and a stylish woman needs both.
They work together harmoniously. They don’t compete; they complement. They create balance and versatility. The statement jacket feels even more special when contrasted with a simple navy jumper. The brown tailored cigarette trousers become a simple grounding for that extraordinary silk blouse I found on my travels.
I have a name for this wardrobe strategy:
From Simple to Splendour